15 Simple DIY Oven Bake Clay Crafts Anyone Can Master
You’ll master oven bake clay by conditioning and rolling it evenly, then use precise cutters, molds, or stamps for forms like pinch pots, marbled dishes, or pendant necklaces. Layer colors for marbling, add textures or details, punch holes for ornaments or jewelry, and bake at 275°F for 15–30 minutes per project thickness.
Finish your crafts with glazes or sealants for durability—add ribbons, gilding, or magnets for flair. Discover new techniques, combinations, and creative projects just ahead.

| Polymer Clay 50 Colors with Sculpting Tools | Best Value | Number of Colors: 50 | Total Weight: 2.96 pounds (2.86 listed) | Baking Method: Oven bake (recommended), hair dryer | VIEW LATEST PRICE | Read Our Analysis | |
| Sculpey Original White Polymer Clay 1 lb | Best For Beginners | Number of Colors: 1 | Total Weight: 1 pound | Baking Method: Oven bake (275°F, 15–30 min) | VIEW LATEST PRICE | Read Our Analysis | |
| CiaraQ Polymer Clay Starter Kit | Best Overall | Number of Colors: 50 | Total Weight: 2.8 pounds | Baking Method: Oven bake, hair dryer | VIEW LATEST PRICE | Read Our Analysis | |
| Polymer Clay Kit 50 Colors with Tools | Budget-Friendly Pick | Number of Colors: 50 | Total Weight: 2.8 pounds | Baking Method: Oven bake (130°C/266°F), hair dryer, boil | VIEW LATEST PRICE | Read Our Analysis | |
| ReArt Oven Bake Polymer Clay (4.4Lbs) | Most Versatile | Number of Colors: 1 | Total Weight: 4.4 pounds | Baking Method: Oven bake | VIEW LATEST PRICE | Read Our Analysis | |
| CiaraQ Polymer Clay Kit 24 Colors | Best For Kids | Number of Colors: 24 | Total Weight: 9.31 oz (264g) | Baking Method: Oven bake (135°C/275°F), boil, hair blower | VIEW LATEST PRICE | Read Our Analysis | |
| Shuttle Art 82-Color Polymer Clay Kit | Most Colors | Number of Colors: 82 | Total Weight: ~7.1 oz (200g) | Baking Method: Oven bake (130°C/266°F), boil, hair blower | VIEW LATEST PRICE | Read Our Analysis | |
| Aestd-ST 85-Color Polymer Clay Kit | Premium Choice | Number of Colors: 85 | Total Weight: ~4.63 pounds | Baking Method: Oven baking (recommended), hair dryer, boil | VIEW LATEST PRICE | Read Our Analysis | |
| Polymer Clay 52 Colors with Tools | Editor’s Choice | Number of Colors: 52 | Total Weight: 2.39 ounces | Baking Method: Oven bake, hair dryer, boil | VIEW LATEST PRICE | Read Our Analysis | |
| Shuttle Art Polymer Clay Kit 60 Colors | Top-Rated Pick | Number of Colors: 60 | Total Weight: 3.52 pounds | Baking Method: Oven bake (130°C/266°F), boil, hair blower | VIEW LATEST PRICE | Read Our Analysis |


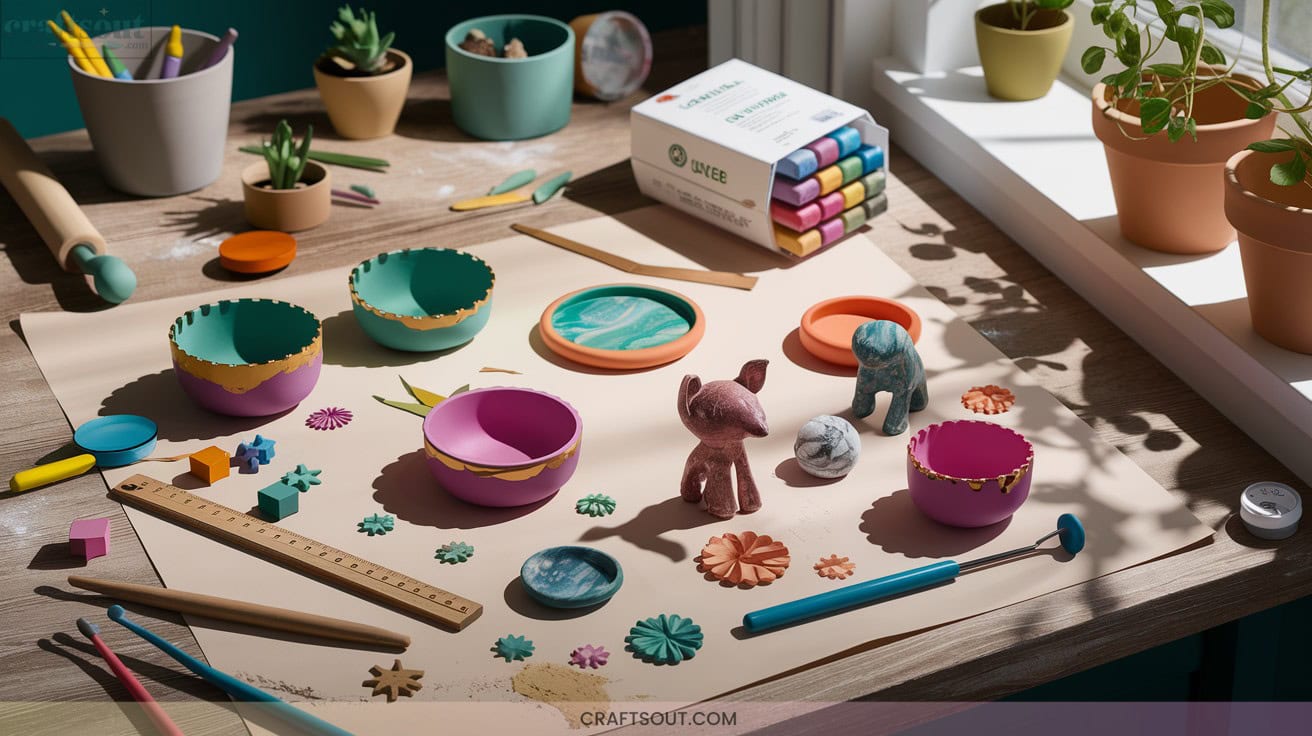
1. Pinch Pots for Beginners

Pinch pots offer a fundamental introduction to hand-building with oven bake clay, making them ideal for beginners keen to master basic ceramic techniques.
Start by selecting your preferred clay—polymer for durability, air dry for ease, or stoneware if you’ll use a kiln.
Roll a small lump into a sphere, then press your thumb deeply into the center.
Employ controlled pinching, rotating the form to expand the cavity evenly.
Refine the surface by smoothing cracks with a damp finger or stiff paintbrush.
Innovate by incising patterns with pencils or chopsticks, or attach handles.
Allow to dry thoroughly, then paint, seal, and display.
2. Marbled Jewelry Dishes

For an elevated take on functional decor, marbled jewelry dishes showcase advanced color blending and shaping techniques with oven-bake clay.
Elevate your decor with marbled jewelry dishes that highlight sophisticated color blending and sculpting using oven-bake clay.
Select multiple clay colors, twist and roll them together, then flatten to 1/4″ thickness for ideal marbling.
Use a round template and X-Acto knife to cut precise circles.
Drape the clay into an oven-safe bowl or over a muffin pan for rippled edges—tucking or folding enhances edge detail.
Bake at 275°F for 15 minutes, cool completely, and gently release.
Finish with liquid gilding along the rim, then seal with gloss glaze for a professional, innovative, and unique result.
3. Colorful Trinket Trays

Building on the sophistication of marbled jewelry dishes, you can craft colorful trinket trays that showcase intricate patterns and personalized details using oven-bake clay.
Begin by conditioning multiple clay colors, then stack and roll them to create vivid marbling or layered effects.
Use a rolling pin for uniform thickness, then cut shapes with precision tools—X-Acto knives or clay cutters.
Mold the slab in oven-safe bowls or custom templates for round, square, or irregular forms.
Refine edges with ruffling techniques or patterned molds.
After baking, enhance details with acrylic paint, then finish with a clear glaze for professional, gift-worthy brilliance.
4. Festive Holiday Ornaments

Curious how to elevate your holiday décor with custom details? Start by conditioning oven-bake clay, then roll it to a consistent 1/4-inch thickness using a rolling pin for uniform baking. Employ stamp-style cookie cutters to imprint sophisticated shapes and textures. For intricate reliefs, opt for translucent or colored clay to maximize visual impact.
Use a skewer to create a hanging hole at the top of each design. Arrange pieces on parchment-lined baking sheets and bake at 275°F for 15–17 minutes. Cool fully before threading five-inch ribbons through each hole, ensuring secure knots for polished, professional ornament presentation.
5. Playful Toy Cookies

Wondering how to craft remarkably realistic toy cookies from oven-bake clay?
Begin with polymer clay, selecting shades for dough and chocolate chips. Roll the clay, then use professional cutters to shape classic rounds or seasonal designs.
Start with polymer clay in dough and chip hues, rolling and cutting it into classic or festive cookie shapes for a lifelike touch.
Employ ball styluses or toothbrushes to texture surfaces, mimicking baked crumb. Layer ochres and tans for authentic browning; embed faux chips or stamp intricate sugar patterns.
Bake at manufacturer-specified temperatures for safety and durability.
Finish with acrylic paints for added detail, then seal with glaze for a confectionary sheen.
Display your cookies as play kitchen props, dollhouse miniatures, or whimsical decor accessories.
6. Textured Coasters

Texture transforms a simple coaster into a tactile work of art when working with oven-bake or air dry clay.
Begin by conditioning your polymer clay; roll it to a uniform 1/4-inch thickness on parchment with a rolling pin. For advanced effects, intertwine colored ropes for marbling, then flatten.
Employ impression makers—natural elements, geometric stamps, or textured beads—to craft innovative patterns.
Cut coasters using sharp knives or cookie cutters for precision.
Bake at 275°F for 15-20 minutes, then cool completely.
Finish by applying Mod Podge; allow to dry overnight for maximum durability and a professional, sealed finish.
7. Miniature Plant Pots

After exploring the tactile possibilities of textured coasters, you can apply those same principles of pattern and detail to crafting miniature plant pots with oven-bake clay.
Bring the artistry of textured coasters into your next project by designing miniature plant pots with intricate patterns using oven-bake clay.
Start by conditioning your chosen polymer clay, then roll it to a uniform thickness. Use precision knives or wires for clean cuts, and freeze the clay to achieve crisp geometric facets.
Incorporate textural elements and stamps for advanced surface design. Assemble the form around a small mold, ensuring smooth seams.
Bake on parchment at 275°F, monitoring thickness for ideal cure. Finish with glaze or sealant, then select compact succulents or herbs for a cutting-edge display.
8. Personalized Keychains
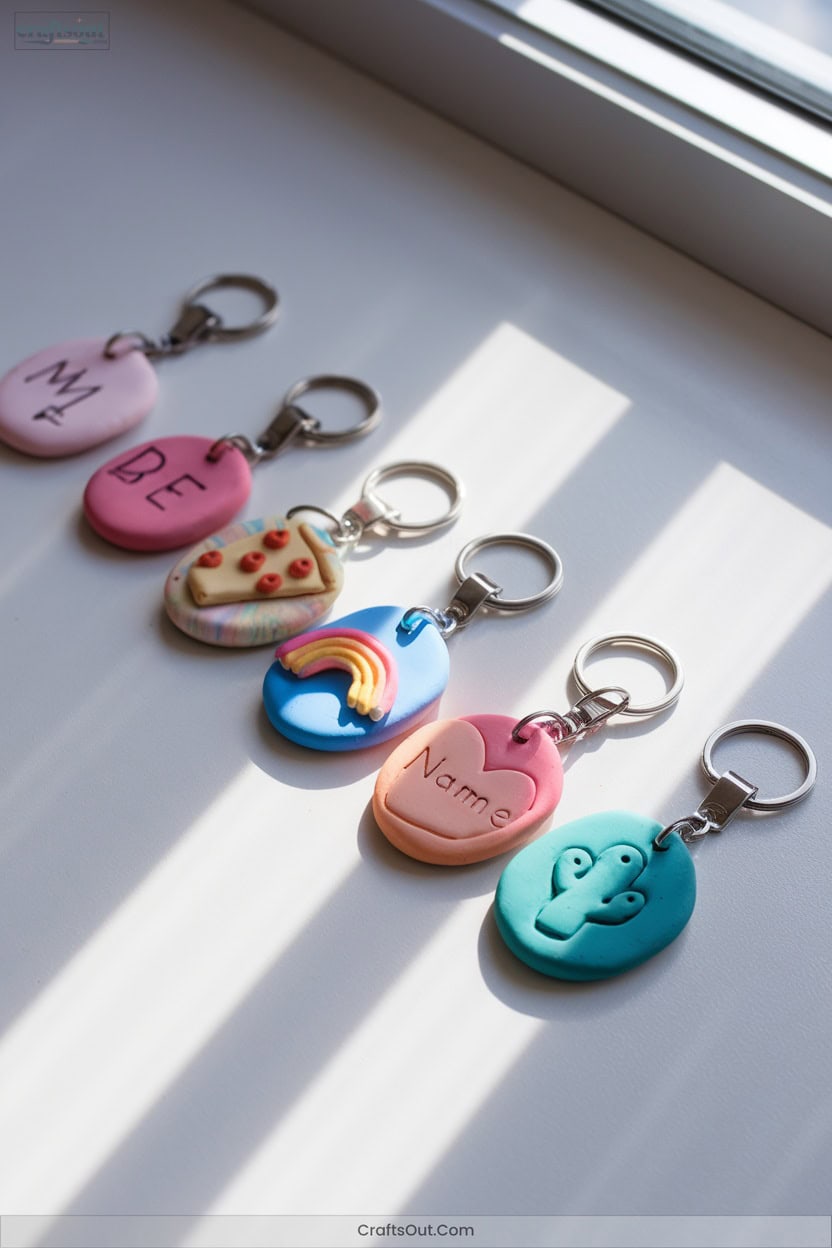
A personalized keychain crafted from polymer clay lets you merge advanced design techniques with functional artistry.
Choose vibrant clay colors, conditioning them thoroughly for seamless blending.
Use professional clay tools or sharp household implements to sculpt initials, themed motifs, or intricate patterns.
Flatten clay with a rolling pin, cut your desired shape, and pierce a hole for hardware.
Bake on parchment at the precise temperature specified on your polymer clay’s packaging.
Once cooled, attach a jump ring and secure it to a keychain ring using pliers.
Enhance your piece with acrylic paint, glitter, or a Modge Podge finish for added durability.
9. Patterned Fridge Magnets
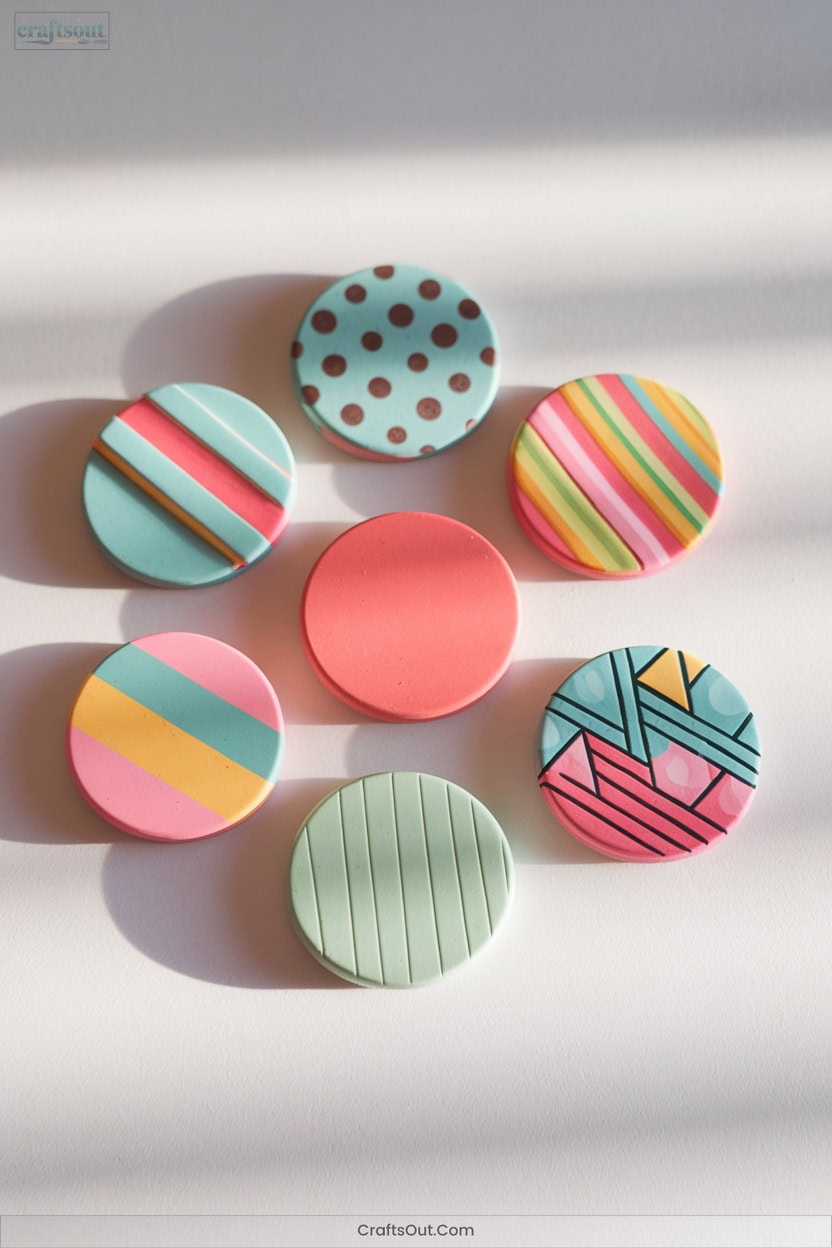
Ever wondered how to transform simple oven bake clay into striking, functional art for your kitchen?
Start by prepping your workspace—cover it to minimize mess.
Condition and knead your clay, then use precision cutters or knives for geometric shapes like hexagons or triangles.
Bake per the clay’s instructions for ideal hardness.
Once cooled, employ fine brushes or markers to apply intricate patterns—think chevrons, polka dots, or abstract designs.
After drying, affix strong magnets with Gorilla Glue, applying sparingly and letting cure for 24 hours.
Display your creations on the fridge or gift them—each magnet becomes bespoke art with utility.
10. Decorative Wall Hangings

Once you’ve mastered patterned fridge magnets, you can elevate your skills by crafting sophisticated decorative wall hangings from oven bake clay.
Take your clay artistry further by transforming simple materials into eye-catching decorative wall hangings with oven bake clay.
Condition your polymer clay thoroughly, then use geometric or nature-inspired templates for precise shaping.
Incorporate abstract forms or custom textures for avant-garde appeal.
Don’t forget to punch strategic holes with a straw for balanced suspension.
Bake pieces at 275°F for 20–30 minutes, ensuring even curing.
Once cooled, embellish with acrylics, seal for durability, and string elements using jute twine or cotton cord.
Add beads or tassels for dimension, then display your innovative creation in a prominent space.
11. Cute Animal Figurines

Bring your miniature menagerie to life by sculpting cute animal figurines from oven-bake clay, using refined shaping and detailing techniques for professional results.
Start by selecting vivid clay colors to match your chosen animal.
Form basic shapes—balls for bodies, logs for legs, and teardrops for wings—then assemble with precision.
Integrate small details: use contrasting clay for expressive eyes, delicate ears, and sculpted tails.
Employ texturing tools or household items to enhance realism.
Prevent sticking when rolling thin strips by utilizing parchment.
After perfecting accessories and custom touches, bake according to manufacturer’s specifications for durability.
Finish with acrylic gesso for polish.
12. Stamped Gift Tags

A personalized stamped gift tag elevates your handmade presents with tactile charm and professional detail.
Condition polymer clay until smooth, then roll to uniform thickness using a rolling pin. Select a shape cutter—rectangular, circular, or tag-specific—for a crisp silhouette.
Press stamps (alphabet, lace, or textured) into the clay, using ink pads for color permanence after baking, and mini clear blocks for precision alignment. Punch a string hole with a small circular cutter.
Smooth edges for a clean finish. Bake tags at 130°C (275°F) for 15 minutes per 6mm thickness.
Cool fully, then thread with twine for a bespoke touch.
13. Layered Pendant Necklaces

Layered pendant necklaces showcase the versatility of polymer clay, allowing you to combine geometric forms, marbled effects, and intricate textures for a striking, dimensional accessory.
Polymer clay layered pendants combine bold shapes, marbled hues, and textured details for a truly eye-catching, multidimensional necklace.
Start by rolling out polymer clay sheets, then use precision cutters to create base and accent shapes.
Layer with marbled clay or textured segments for visual complexity.
Bake at 275°F for 15 minutes, tenting with foil to prevent scorching.
Once cooled, seal with a gloss glaze and add jump rings for assembly.
For advanced personalization, incorporate painted details or metallic leaf.
- Cut and layer various clay shapes
- Bake and glaze for durability
- Assemble with your chosen chain
14. Beaded Clay Bracelets

Personalization defines beaded clay bracelets, as you select from an array of handmade polymer clay beads, elastic cord, and accent findings to craft pieces tailored to your style.
Begin by measuring your wrist and mapping your arrangement on a bead board, experimenting with advanced color coordination and asymmetrical patterns.
Thread beads using a fine beading needle for precision, especially with intricate or small-holed varieties.
Integrate metallic spacers or custom charms for artistic flair.
Secure ends with surgeon’s knots and a drop of jewelry glue, then discreetly tuck excess cord into adjacent beads.
Test fit for comfort and refine length for a professional, innovative finish.
15. Custom Drawer Pulls
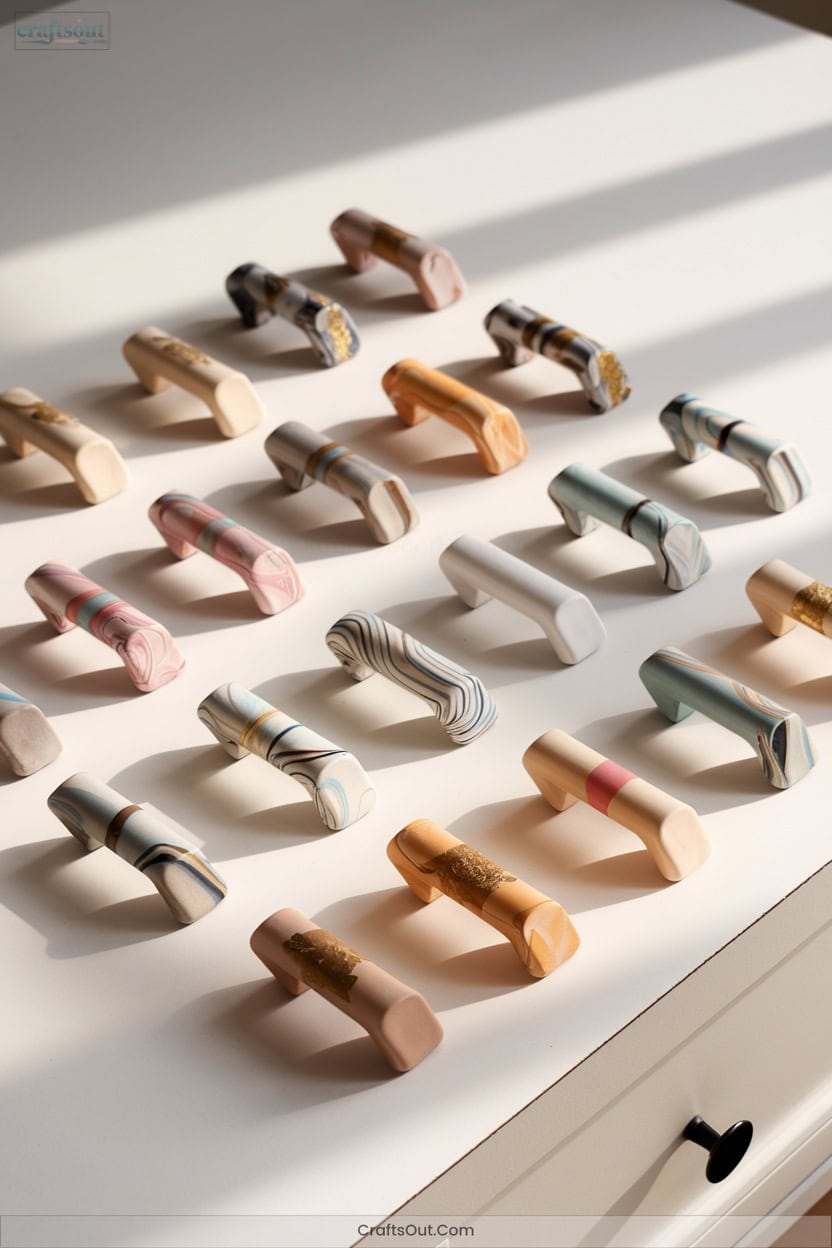
Ever wondered how to elevate standard furniture into bespoke statement pieces? Start with oven-bake clay or polymer clay, conditioning it thoroughly. Roll your clay between spacers for uniform thickness on wax paper, then use cookie cutters or molds to form innovative shapes. After baking at 275°F for 30 minutes, allow it to cool fully before integrating hardware.
Drill holes precisely, then secure with bolts and nuts, ensuring compatibility and stability. Enhance with advanced techniques: texturing, custom paint, or embedded clay motifs. Seal using outdoor Mod Podge for durability. Experiment, refine, and transform ordinary drawers with creative, professional-grade pulls.
- Condition and shape clay
- Bake, cool, and drill
- Attach hardware and seal
More Details on Our Top Picks
Polymer Clay 50 Colors with Sculpting Tools
If you’re a parent, teacher, or craft enthusiast looking for a mess-free, creative outlet that kids and adults can enjoy together, this 50-color polymer clay set is your go-to choice. You get 50 vibrant, non-sticky clays in a two-layer storage box, plus sculpting tools and a user guide.
Weighing 2.96 pounds (listed as 2.86), it’s perfect for DIY projects, oven baking (recommended), or light heat with a hair dryer. ASTM D-4236 compliant and free of wheat and nuts, it’s safe for most users; however, it is not suitable for children under 3 due to small parts.
You’ll boost color recognition, dexterity, and creativity. This set is ideal for gifts, classrooms, or family crafting.
- Number of Colors:50
- Total Weight:2.96 pounds (2.86 listed)
- Baking Method:Oven bake (recommended), hair dryer
- Included Tools:Sculpting tools included
- Safety Standards:ASTM D-4236
- Age Recommendation:3+ (with small parts warning)
- Additional Feature:Two-layer storage box
- Additional Feature:Educational project guide included
- Additional Feature:Dedicated customer support team
Sculpey Original White Polymer Clay 1 lb
Sculpey Original White Polymer Clay 1 lb is your go-to choice for hassle-free, creative projects that last. You’ll love how it stays soft until you bake it at 275°F for 15–30 minutes; no air drying needed.
Once baked, you can sand, drill, carve, or paint it with acrylics. It’s easy to mold and perfect for sculpting, holidays, or school crafts. Safe for ages 8+, it’s non-toxic and meets ASTM and EN safety standards. Store it in a cool, dry place below 77°F, ideally in PP containers or the fridge.
Weighing 1 lb, this USA-made clay is ideal for beginners and pros alike, earning top ratings in crafts.
- Number of Colors:1
- Total Weight:1 pound
- Baking Method:Oven bake (275°F, 15–30 min)
- Included Tools:None specified
- Safety Standards:ASTM D-4236, EN 71 AP
- Age Recommendation:8 years and up
- Additional Feature:Sandable after baking
- Additional Feature:Drillable and carveable
- Additional Feature:Made in USA
CiaraQ Polymer Clay Starter Kit
The CiaraQ Polymer Clay Starter Kit is perfect for kids and beginners enthusiastic to plunge into DIY oven bake clay crafts with zero hassle. You get 50 vibrant colors (0.7 oz each) in a tidy 6.4 x 6 x 3.1-inch storage box. It’s non-toxic, allergen-free, and ASTM D-4236 compliant: safe for ages 3+.
You’ll sculpt easily with the included tools and follow the project booklet for fun ideas. Bake in the oven (recommended) or use a hair dryer for tiny pieces. You’ll boost dexterity, color recognition, and creativity. With a stellar 4.5/5 from over 11,000 reviews, it’s a top seller.
Missing something? Contact support for replacements.
- Number of Colors:50
- Total Weight:2.8 pounds
- Baking Method:Oven bake, hair dryer
- Included Tools:Sculpting tools, accessory set
- Safety Standards:ASTM D-4236
- Age Recommendation:3+
- Additional Feature:Comes with project booklet
- Additional Feature:Good ductility, easy sculpt
- Additional Feature:Replacement for missing accessories
Polymer Clay Kit 50 Colors with Tools
You get 50 vibrant colors and 51 total pieces in the CyAJM Polymer Clay Kit, making it ideal for kids 3+ and adults who love DIY oven bake projects. Each 0.7 oz color is soft, non-sticky, and easy to knead. You’ll receive 19 tools, a silicone mold, 48 accessories, and a two-tier storage box.
Bake creations at 266°F for 10–30 minutes or use a hair dryer for small pieces. It’s CPSIA and ASTM compliant, so it’s safe; however, kids 3–6 need supervision. Use it to boost creativity, hand-eye coordination, and sensory play. It is perfect for earrings, stickers, or classroom crafts.
This kit is great for holidays and is backed by 24/7 support.
- Number of Colors:50
- Total Weight:2.8 pounds
- Baking Method:Oven bake (130°C/266°F), hair dryer, boil
- Included Tools:19 sculpting tools, silicone mold
- Safety Standards:CPSIA, ASTM F963-23
- Age Recommendation:3+ (with supervision 3–6)
- Additional Feature:19 sculpting tools included
- Additional Feature:Silicone mold for shapes
- Additional Feature:Multicultural color inspiration
ReArt Oven Bake Polymer Clay (4.4Lbs)
Crafters who want a durable, no-fuss polymer clay that stays workable until baked will love ReArt’s 4.4-pound kit. It’s perfect for beginners and pros alike who crave versatility without the mess. You’ll appreciate its soft, non-sticky texture that’s easy to shape, blend, and texture with included tools.
Since it won’t dry out in the air, you can save unused portions for later. Just pop your finished pieces in a home oven; no kiln needed and get long-lasting, stable results. The non-toxic, eco-friendly formula is safe to handle and great for jewelry, models, holiday crafts, and more.
With sculpting tools, molds, and bright, odorless clay included, you’re all set for creative, low-waste fun.
- Number of Colors:1
- Total Weight:4.4 pounds
- Baking Method:Oven bake
- Included Tools:Sculpting tools, paint brushes
- Safety Standards:ASTM D-4236
- Age Recommendation:Not specified
- Additional Feature:High-quality PVC formula
- Additional Feature:Professional-grade durability
- Additional Feature:Low waste clay
CiaraQ Polymer Clay Kit 24 Colors
Perfect for kids, beginners, and creative minds chasing vibrant expression, CiaraQ’s 24-color polymer clay kit delivers a rainbow of possibilities in one compact set. You’ll love how it stays soft and workable, shapes easily, and bakes to a durable finish.
Each 11g block is individually wrapped, measuring just 1.5 x 0.7 x 0.2 inches, and fits neatly in the 4 x 1 x 2 inch box. Non-toxic and ASTM D-4236 compliant, it’s safe for children. Bake at 275°F for 10–15 minutes, or use alternative heat methods for small pieces.
You’ll boost dexterity, color recognition, and creativity: all while having fun. It’s a top seller; ideal for gifts and imaginative projects.
- Number of Colors:24
- Total Weight:9.31 oz (264g)
- Baking Method:Oven bake (135°C/275°F), boil, hair blower
- Included Tools:Sculpting tools included
- Safety Standards:ASTM D-4236
- Age Recommendation:Not explicitly stated (3+ implied via standards)
- Additional Feature:Mini modeling clay set
- Additional Feature:Refund or resend policy
- Additional Feature:Ideal for imagination development
Shuttle Art 82-Color Polymer Clay Kit
A vibrant palette of 82 rich, non-sticky polymer clay blocks makes the Shuttle Art 82-Color Polymer Clay Kit a top pick for kids, beginners, and creative adults diving into DIY oven bake clay crafts. You’ll love the 19 tools and 16 accessories that are perfect for crafting earrings, keychains, and ornaments. Just bake at 130°C for 10–15 minutes to set your designs.
The non-toxic, ASTM-compliant clay is safe for ages 3+; however, small parts and sharp tools mean supervision is needed. Packed in a fancy gift-ready box, it’s ideal for birthdays or holidays. With a 4.4-star rating from thousands, this best-selling kit delivers quality, variety, and creative freedom.
- Number of Colors:82
- Total Weight:~7.1 oz (200g)
- Baking Method:Oven bake (130°C/266°F), boil, hair blower
- Included Tools:19 polymer clay tools, 16 accessories
- Safety Standards:ASTM D-4236, ASTM F2923-20, EN71
- Age Recommendation:3+ (small parts warning, sharp objects)
- Additional Feature:Jewelry-making focused accessories
- Additional Feature:Fancy gift-ready box
- Additional Feature:Sharp tools included
Aestd-ST 85-Color Polymer Clay Kit
You’ll love the Aestd-ST 85-Color Polymer Clay Kit if you’re into vibrant, hands-on creativity that suits both kids and adults. You get 85 colors (0.7 oz each), 19 tools, and 16 accessories: perfect for jewelry, crafts, or beginner projects. The non-toxic, eco-friendly clay bakes in the oven or with a hair dryer for quick fixes. It’s ASTM-certified safe; however, keep small parts away from toddlers under 3.
You’ll find earring hooks, molds, beads, and more inside, plus guides to get started. With a 4.6/5 rating from 219 reviews, this #115 clay set delivers quality, variety, and fun. Your next creative project’s ready to bake.
- Number of Colors:85
- Total Weight:~4.63 pounds
- Baking Method:Oven baking (recommended), hair dryer, boil
- Included Tools:19 sculpting tools, 16 accessories
- Safety Standards:ASTM D-4236
- Age Recommendation:3+
- Additional Feature:Cartoon-themed color palette
- Additional Feature:All-in-one art craft set
- Additional Feature:131 total kit pieces
Polymer Clay 52 Colors with Tools
This 52-color polymer clay set suits creative kids and craft-loving families best, especially those diving into oven-bake projects for the first time. You get 52 soft, non-sticky 20g blocks, 20 sculpting tools, and 49 decorative accessories like earring hooks, beads, and key rings.
It’s perfect for making trinkets, animals, or custom charms. You’ll love how easy it is to shape, carve, and bake: no cracking, and it hardens perfectly in the oven. Great for developing dexterity, color recognition, and creativity in kids 3+. You can reuse the clay, and it’s safe: ASTM certified, no nuts or wheat.
With stellar reviews and top rankings, it’s a go-to for gifts, parties, or classroom fun.
- Number of Colors:52
- Total Weight:2.39 ounces
- Baking Method:Oven bake, hair dryer, boil
- Included Tools:20 sculpting tools, 49 accessories
- Safety Standards:ASTM D-4236
- Age Recommendation:3+
- Additional Feature:49 decorative accessories
- Additional Feature:Reusable non-hardening clay
- Additional Feature:Party-friendly activity material
Shuttle Art Polymer Clay Kit 60 Colors
With 60 vibrant, oven-bake clay blocks and a full toolkit, the Shuttle Art Polymer Clay Kit suits creative kids and crafters who want everything in one box. You get 19 sculpting tools, gem molds, earring hooks, beads, and more; this is perfect for jewelry or mini sculptures. Each 0.7 oz color is soft, non-sticky, and easy to shape. Just bake your pieces at 130°C for 10–15 minutes or use boiling water or a hair dryer for small items.
It’s non-toxic and ASTM/EN71 compliant, so it’s safe for ages 3+. However, small parts are a choking hazard. With a 4.4-star rating from nearly 10,000 reviews, it’s a trusted, giftable favorite in a sleek box.
- Number of Colors:60
- Total Weight:3.52 pounds
- Baking Method:Oven bake (130°C/266°F), boil, hair blower
- Included Tools:19 sculpting tools, 16 accessories
- Safety Standards:ASTM D-4236, ASTM F2923-20, EN71
- Age Recommendation:3+ (with choking hazard warning)
- Additional Feature:Vibrant individually packaged colors
- Additional Feature:Satisfaction guaranteed warranty
- Additional Feature:Festival gift ideal
What Factors Should You Consider When Choosing Diy Oven Bake Clay Crafts?
You’ll want to check the color variety options so you can bring your ideas to life without buying extra supplies. Make sure the clay meets safety standards and is age-appropriate for whoever’s using it.
Look for kits with baking flexibility and useful tools included; this way, you can start creating right away.
What Should You Know About Color Variety Options?
Choose a DIY oven bake clay kit with a broad color range: up to 85 shades. You’ll reveal endless creative possibilities. You can blend, layer, and mix hues to craft intricate designs that stand out. With 50 to 85 colors, your projects gain depth and realism; this is perfect for detailed sculptures or vibrant patterns.
Individually packaged colors stay fresh and are simple to sort, so you always find the shade you need. Bright, diverse palettes boost imagination, especially for kids; this supports color recognition and fine motor skills. You’ll also get more creative freedom when your kit includes accessories like molds and tools that work with the full spectrum. The right color variety doesn’t just look good: it makes crafting more engaging, educational, and fun.
Pick a kit that gives you real choice, and watch your ideas come to life exactly as you envision them.
What Should You Know About Safety Standards Compliance?
While creating fun and colorful projects, don’t overlook safety; always pick oven-bake clay that meets recognized standards like ASTM D-4236 and EN71. This ensures it’s been tested for harmful substances. You’ll want a non-toxic formula, especially one free from allergens like wheat, nuts, and peanuts, so it’s safer for sensitive users.
Check labels carefully; compliant clays give clear instructions on baking temps and storage, helping you avoid mishaps. These guidelines aren’t just suggestions: they’re tested protocols to protect you during and after crafting. Even if a clay says it’s for ages 3 and up, stay alert to choking risks from small parts.
Choosing a product that follows strict safety rules doesn’t just check a box; it gives you real peace of mind. You craft with confidence, knowing your creations are as safe as they are creative.
What Should You Know About Age Appropriateness Guidance?
Oven-bake clay labeled for ages 3 and up can be safe for young crafters when it meets ASTM D-4236 and EN71 standards. However, age recommendations alone aren’t enough to determine suitability. You should check for small parts that could be a choking hazard, especially if kids under 6 are crafting.
Even if the clay’s non-toxic, younger children need supervision to handle tools safely and avoid putting pieces in their mouths. Some kits are built for beginners, with simple shapes and textures that boost fine motor skills and color recognition. Others target advanced crafters with detailed molds and techniques. Match the project to the child’s skill level, not just their age.
Look for sets that highlight developmental benefits like creativity and dexterity. If you’re involving preschoolers, pick no-mess, soft clays with large components. Always read labels closely. You’ll get the best results when the craft fits the child’s abilities and needs.
What Should You Know About Baking Method Flexibility?
If you’re working on a DIY project where convenience matters, check the baking requirements before picking your clay. Most types need a home oven set between 130–275°F for 10 to 30 minutes; however, not all handle heat the same way. Some brands let you use a hair dryer for tiny pieces or boil very small works; however, boiling’s often less effective.
Never assume your clay is microwave-safe; many types aren’t and could ruin your project. Always follow the package instructions to avoid soft spots, cracking, or warping. Proper baking guarantees your piece hardens fully and holds its shape. Under-baking risks a fragile finish; meanwhile, overdoing it might cause burns or discoloration. Knowing your clay’s needs makes the process smoother and your results more reliable.
Choose based on your tools and comfort level. Flexibility’s great, but only if it works for your setup.
How Does Included Tools And Accessories Impact Your Choice?
Since most projects demand precision and variety, check what tools and accessories come with the kit. You’ll often find carving tools, rolling pins, and shaping tools that let you create fine details easily. Many kits include extras like earring hooks, beads, and molds; this allows you to make jewelry or decorative pieces without buying more supplies. Some even offer over 19 tools and 16 accessories, giving you tons of creative options right out of the box.
Look for kits with a detailed project manual: it’ll guide you step by step and spark ideas, especially if you’re just starting. Having everything together saves you time and hassle; you won’t need to hunt down items separately. A well-equipped kit means you can start crafting right away, experiment freely, and bring your designs to life without delays or extra trips to the store.
Frequently Asked Questions
Can I Use Regular Kitchen Ovens for Baking Homemade and Polymer Clay?
You can use regular kitchen ovens for baking both homemade and polymer clay. Achieve precise temperature control—use an oven thermometer, preheat thoroughly, and employ parchment or foil. Innovate by experimenting with multi-layered structures or embedded mixed-media elements.
How Do I Prevent Cracks in Oven Bake Clay Crafts?
Condition, compress, and control clay consistently—knead thoroughly, eliminate entrapped air, and maintain uniform thickness. Bake with balanced temperatures, buffer with baking soda, and bolster with foil supports. Cool completely before handling, and employ liquid clay for seamless structural reinforcement.
Is Homemade Flour-Based Clay Food Safe?
You shouldn’t consider homemade flour-based clay food safe. Flour can harbor pathogens like E. coli and Salmonella, even after baking. Innovate by utilizing non-toxic, food-grade materials or professional modeling compounds to guarantee both creative versatility and user safety.
What Sealant Is Best for Protecting Finished Clay Pieces?
If you want your clay creations to stand the test of time, prioritize compatibility—test Helmar Crystal Kote Matte or epoxy enamel resin for scratch resistance, clarity, and longevity. Don’t forget adhesion tests before applying your chosen finish.
Can I Mix Polymer Clay and Homemade Clay in the Same Project?
You can experiment by mixing polymer clay and homemade clay, but you’ll encounter curing inconsistencies and textural unpredictability. Test small sample blends, monitor their structural integrity post-baking, and consider surface treatments to enhance cohesion without compromising each material’s unique properties.
Conclusion
Remember, practice makes perfect, so don’t be afraid to experiment with your oven bake clay crafts. You’ve learned how to condition clay, use precision tools, and apply advanced finishing techniques—skills that’ll elevate every project. Whether you’re perfecting pinch pots or sculpting layered pendants, let your creativity lead.
Follow kiln safety guidelines, sand for a smooth finish, and seal for durability. With each piece, you’ll master professional results and discover the endless possibilities this versatile medium offers.


