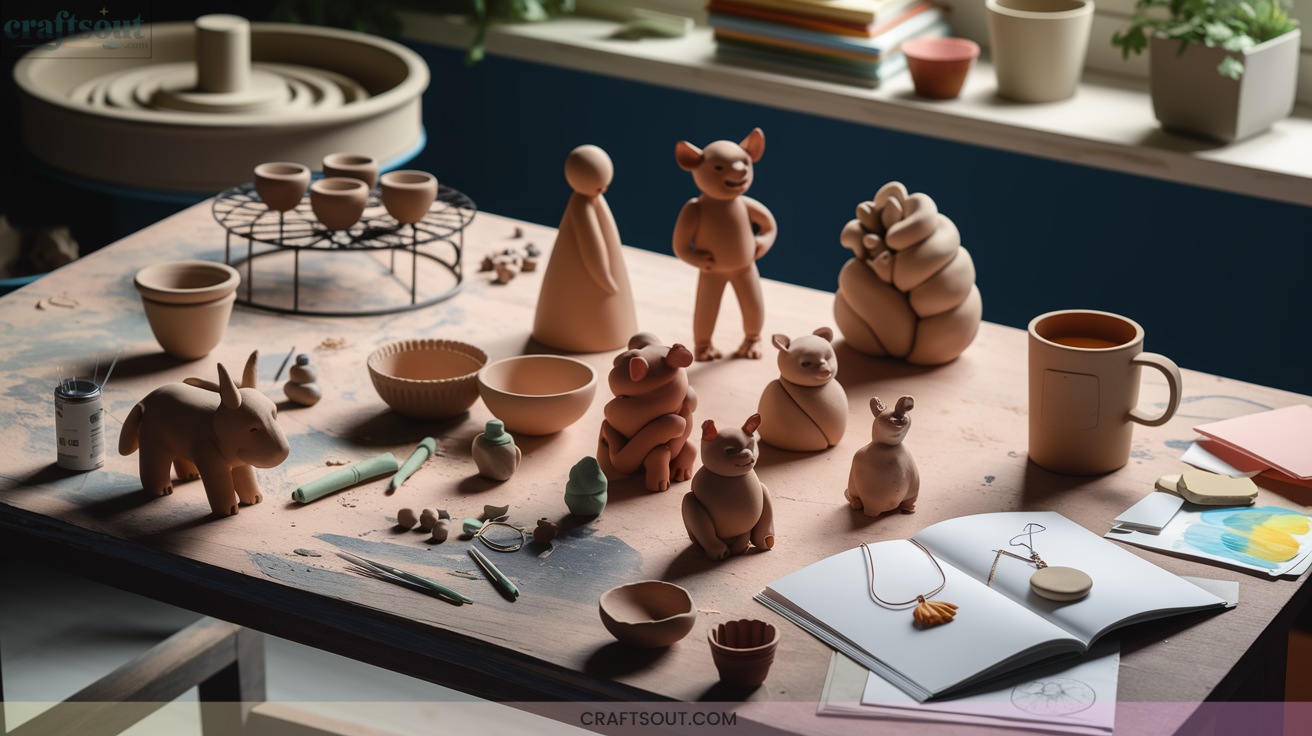
13 Impressive Clay Crafts Figures for Beginners to Try
You can make 13 impressive clay craft figures as a beginner with simple steps and a bit of creativity. Start by shaping and joining basic forms to create a cute bunny, playful piglet, or tiny frog.
Try a sheep, easy ghost, donut, quirky monster, cactus pot, or a lovely rose using rolled shapes and careful detailing. Smooth seams, add texture, and let them dry or bake. You’ll discover more figure ideas and easy finishing tips next.

1. Cute Bunny Figure
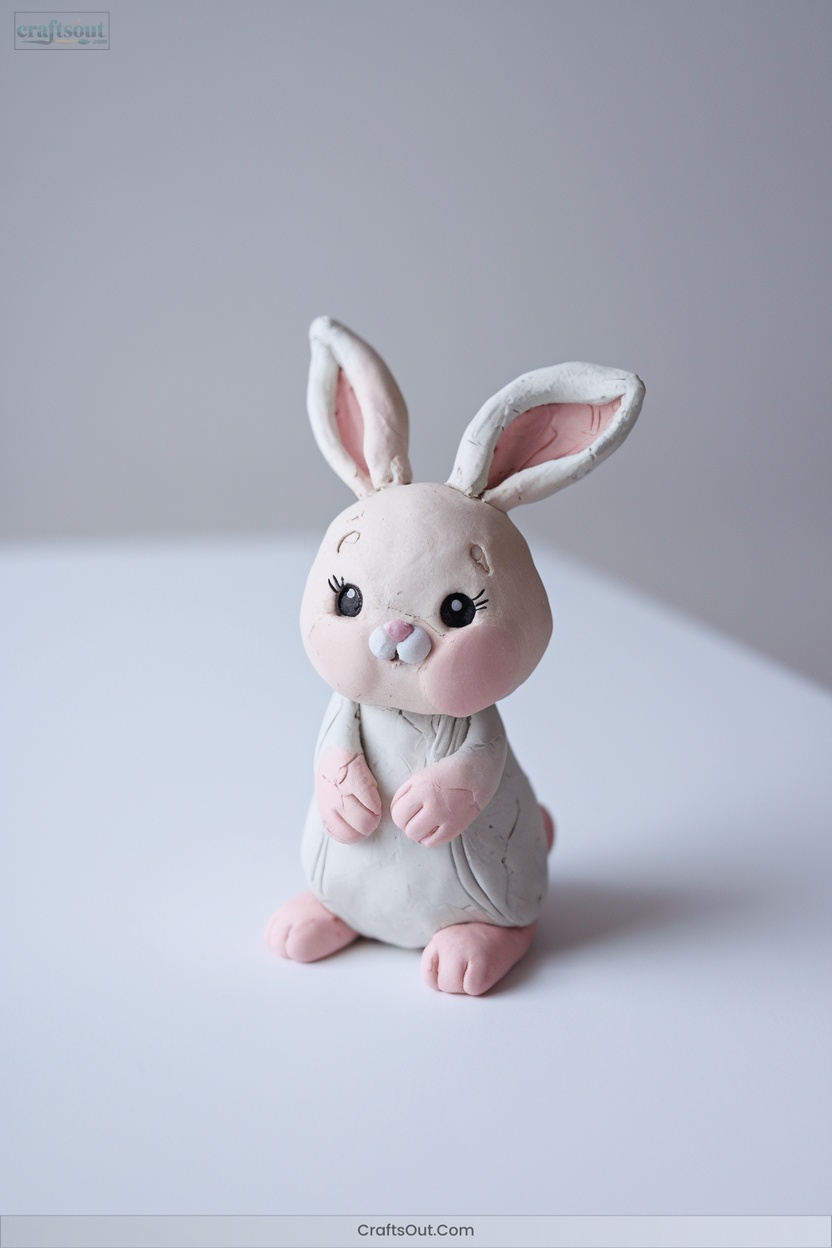
A clay bunny figure is a perfect beginner project that lets you practice basic sculpting and creative details.
Start by choosing your clay—polymer or air-dry.
Roll a larger ball for the body (oval or cone) and a smaller one for the head.
Attach and blend seams.
For ears, shape teardrops or use wire covered with clay; fold one for a floppy effect.
Add paws, a textured tail, and expressive facial details using tiny clay pieces or paint.
Flatten the base for stability.
Dry or bake as required.
Finish with paint, gloss, or quirky accessories for a unique, innovative touch.
2. Playful Piglet Sculpture
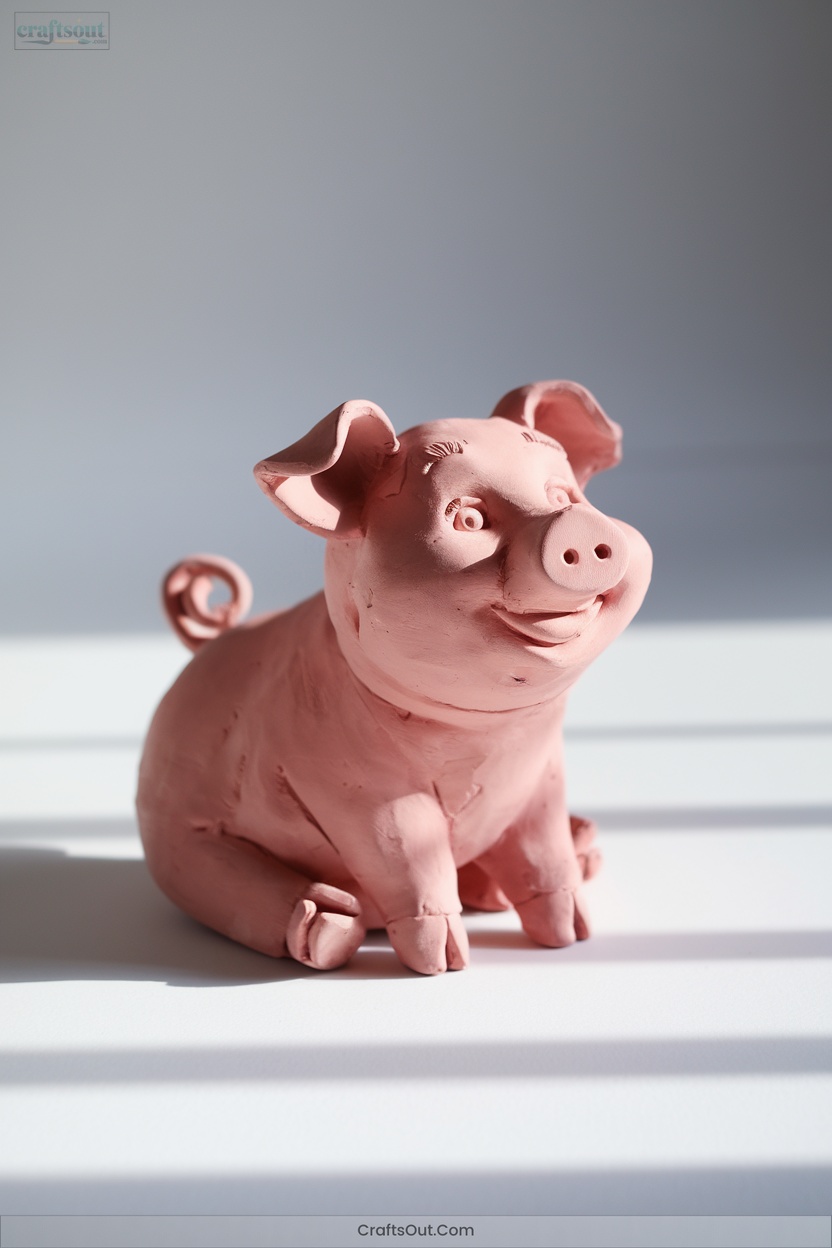
Jump right in by shaping a piglet with simple forms—start by rolling an oval for the body and a smaller circle for the head.
Begin your piglet by rolling an oval for the body and a smaller circle for the head—simple shapes make it easy.
Craft four small balls for legs, a flattened oval for the snout, and two pinched discs for ears.
Attach each part by scoring and adding slip, then press together firmly.
Roll a thin strip, curl it, and add a playful tail.
Create nostrils with a pointy tool and eyes with small black balls or pins.
Smooth seams using a damp sponge or brush.
Let your piglet dry slowly, covered loosely, for best results and crack prevention.
3. Simple Sheep Design

After finishing your playful piglet, you’ll find making a simple sheep just as approachable and fun.
Start by rolling white clay into a ball for the body, then shape a smaller black or peach oval for the head.
Attach the head securely, using a toothpick for extra support if needed.
Innovate your sheep’s wool with these options:
- Roll and press dozens of tiny white balls for a bumpy, realistic fleece.
- Twist thin clay snakes into spirals, then arrange them for a curly-wool effect.
- Use a strainer to create textured clay and layer it for modern, tactile appeal.
Experiment boldly!
4. Tiny Frog Creation
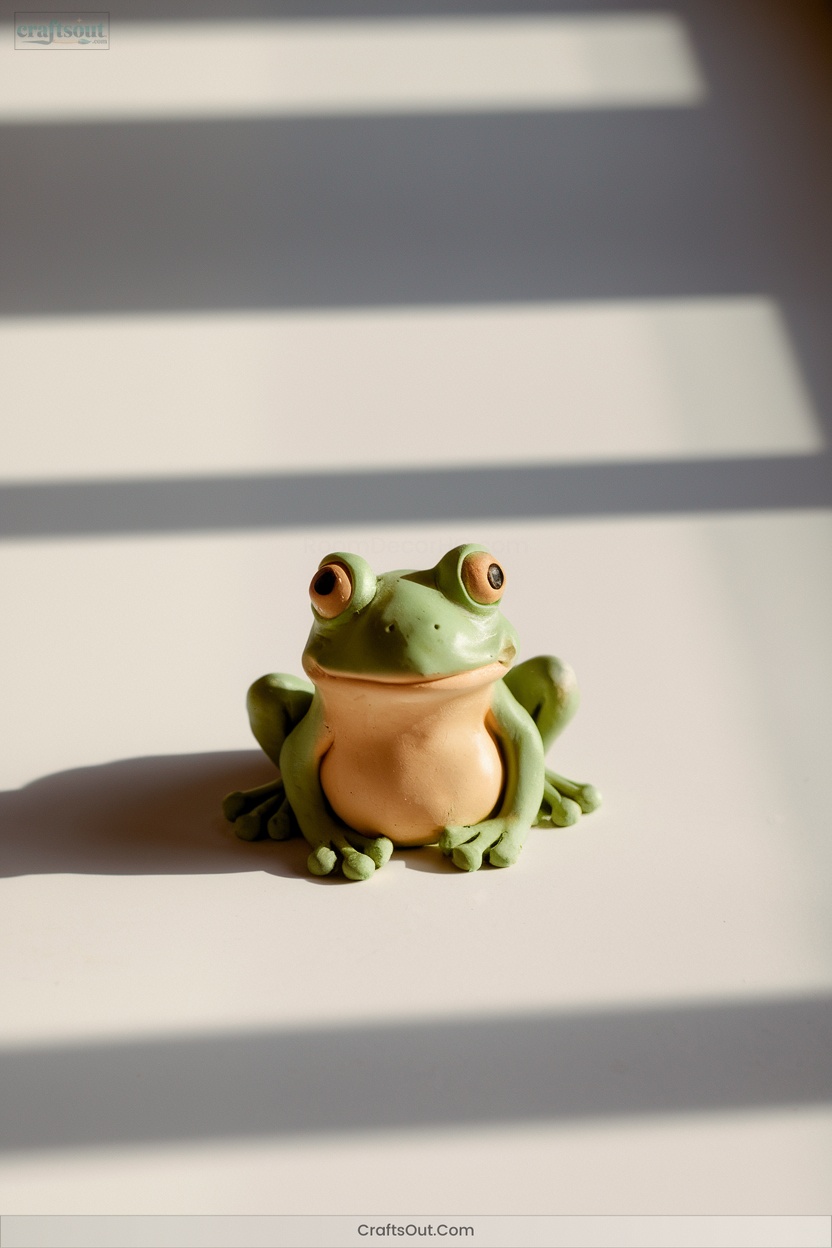
Bring your tiny frog to life by starting with the right materials and a well-prepared workspace.
Choose green polymer or air dry clay, prep your non-stick surface, and gather sculpting tools.
Knead the clay for flexibility, then form a rounded body and a smaller head.
Attach and blend these shapes seamlessly.
Roll and shape legs, positioning them for a lifelike pose, then add small toe details.
For the face, attach raised eye bases, add black and white pupils, and carve a simple smile.
Smooth your frog, then bake or dry according to your clay’s instructions.
Finish with a glossy sealant.
5. Easy Ghost Figurine
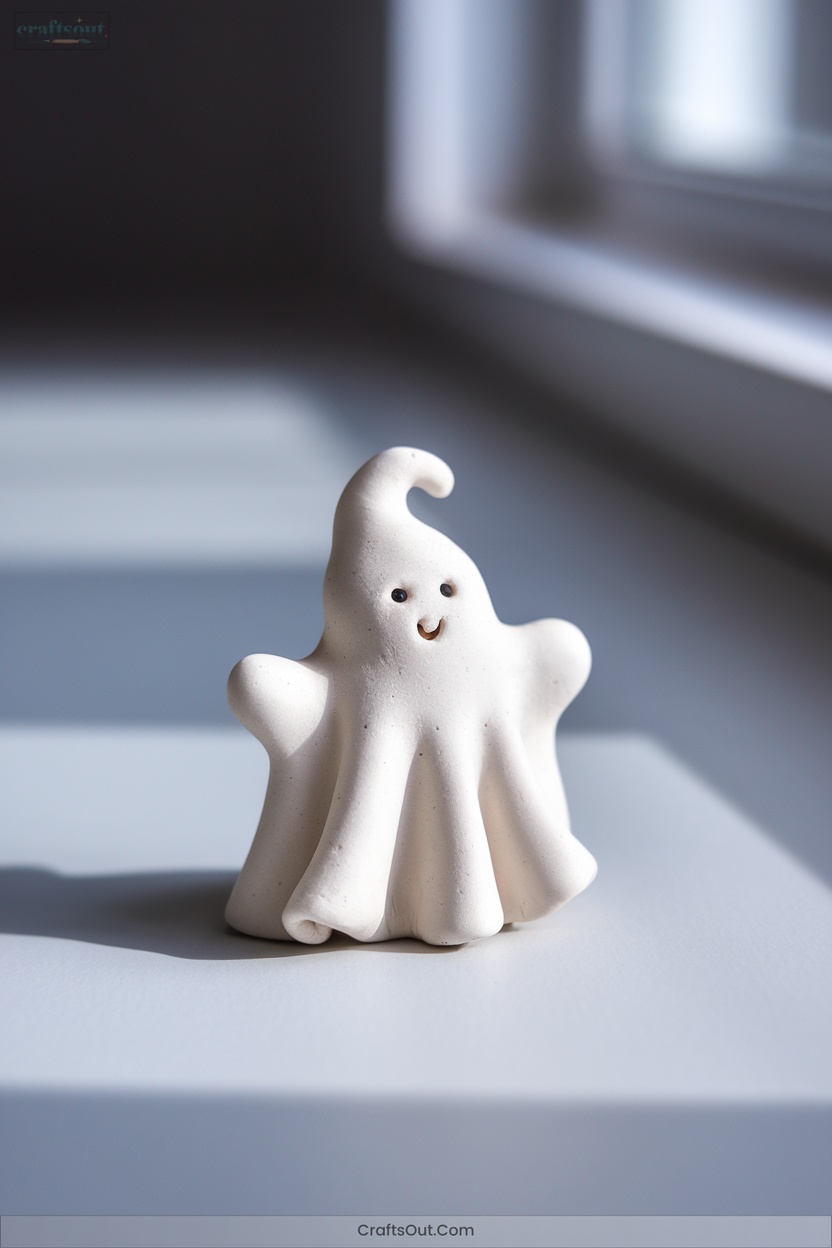
Start your ghost figurine by gathering white air-dry clay, a rolling pin, parchment paper, and a small form like a jar or foil ball. Knead the clay, roll it to about 1/8–1/4 inch thick, and cut a wavy circle. Drape this over your form, letting natural folds shape the ghost. For facial features, use a straw or chopstick to poke eye holes and shape the mouth.
- Let it dry completely (24–72 hours).
- Carefully remove and sand rough edges if needed.
- Paint and seal for a polished finish.
Innovation shines when you experiment with shape and expression!
6. Colorful Snail Model
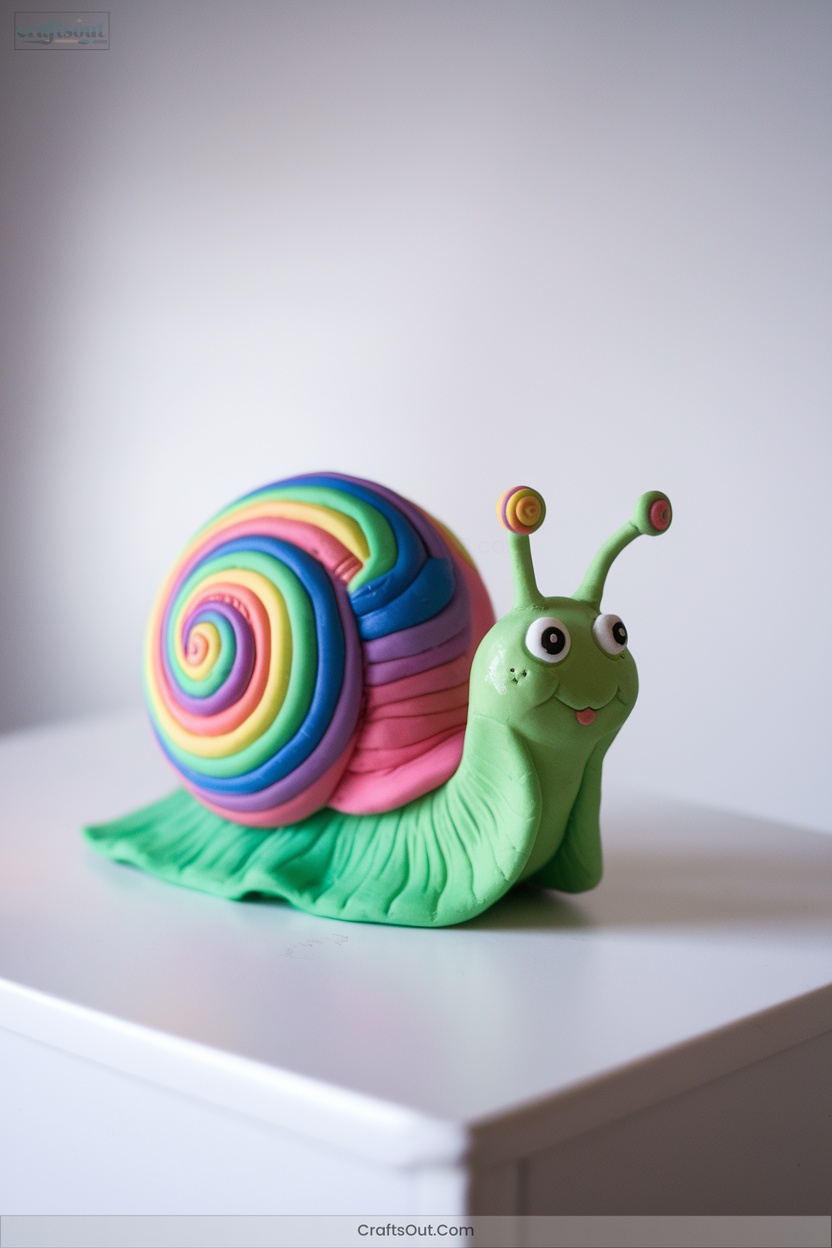
A burst of color brings your snail model to life, and making one is simple with the right materials.
Bright colors and simple steps turn a snail model into a lively creation, perfect for creative hands and curious minds.
Start by splitting your clay into two pieces—one for the body, one for the shell. Roll the body into a sausage shape, tapering one end, then curve it slightly.
For the shell, create a thin, colorful log; coil it tightly and press it onto the snail’s back.
Innovate with marbled clay or bold color contrasts.
Add eyes using clay balls or wiggle eyes, and craft antennae with clay or pipe cleaners.
Let it dry or bake as needed, then seal for shine.
7. Charming Mushroom Shape
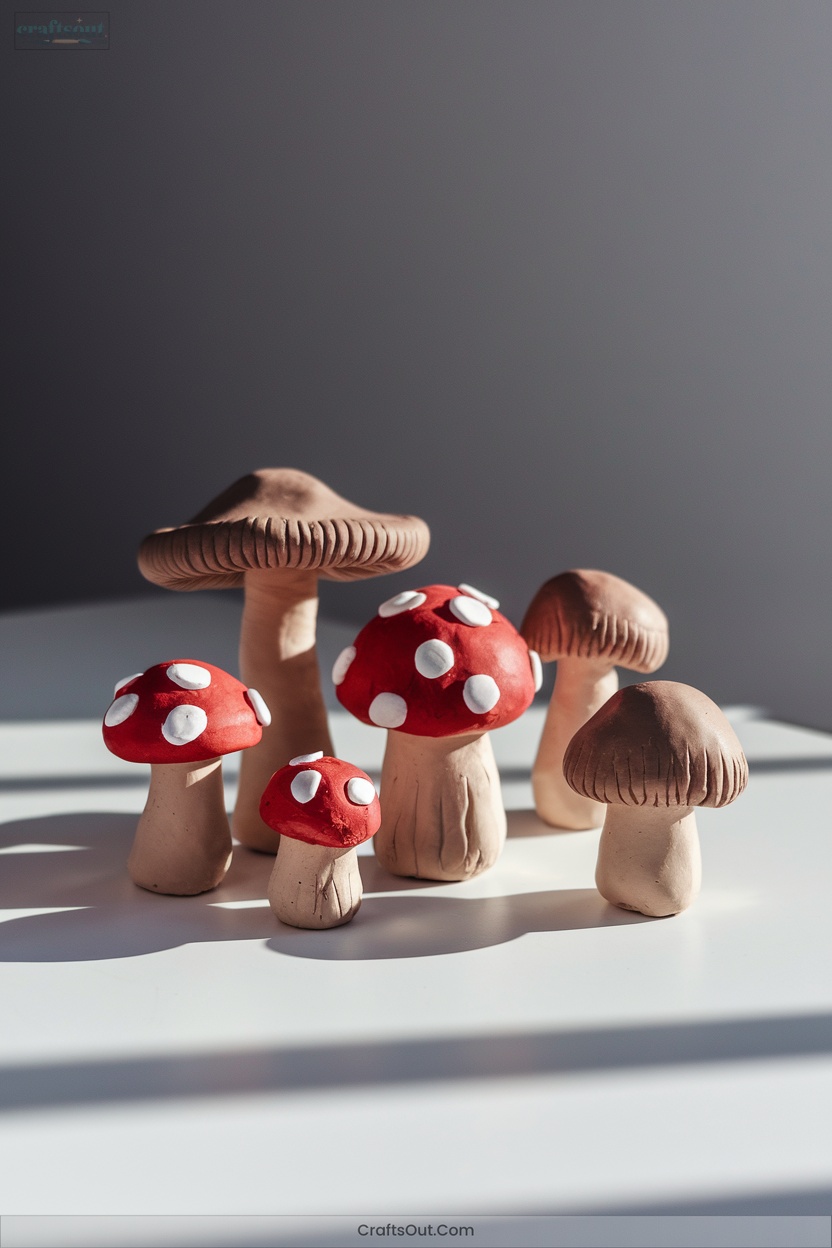
Mushroom shapes make delightful clay projects, and you’ll find them easy to craft with basic materials.
Start by kneading air-dry or polymer clay until soft.
For the stem, roll a cylinder and taper one end.
For the cap, form a ball, flatten one side, and indent the center.
Score and join the pieces, smoothing the seam.
Add creative details:
- Scratch lines on the cap underside for gills with a toothpick.
- Press tiny clay balls onto the cap for whimsical spots.
- Sculpt texture on the stem for realism.
Allow to fully dry or bake, then paint and seal.
8. Adorable Owl Craft
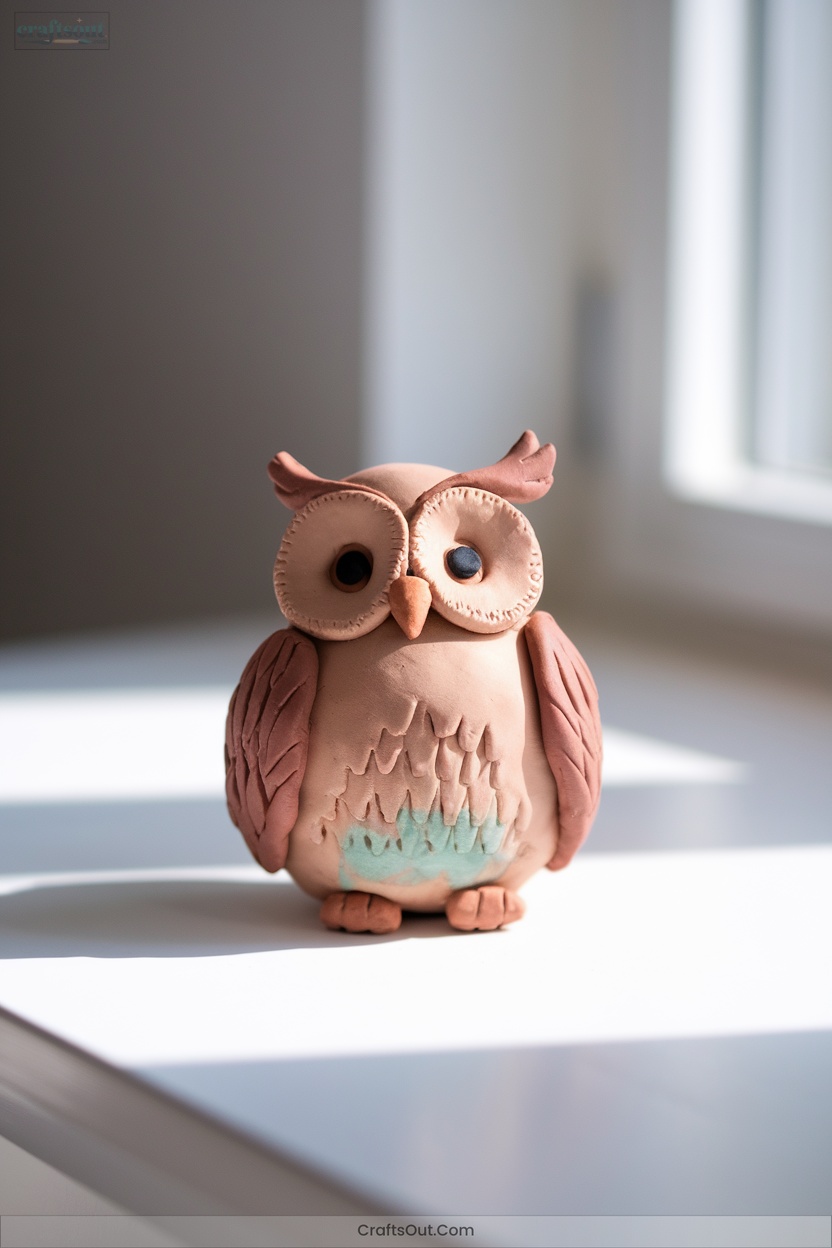
Owls offer a charming subject for clay crafting, and you’ll find them surprisingly simple to sculpt.
Start by rolling your chosen clay into a ball, then shape it into an egg or gentle pancake for the body.
Pinch the top to form ear tufts or press a dent for the head.
Press facial discs with your pinky, add tiny balls for eyes, and shape a small triangle beak.
Attach wings and talons using slip or glue, then create chest feather textures with a toothpick.
Smooth surfaces with wet fingers or rubbing alcohol.
Finish with paint or glaze for a modern touch.
9. Kawaii Sushi Charm
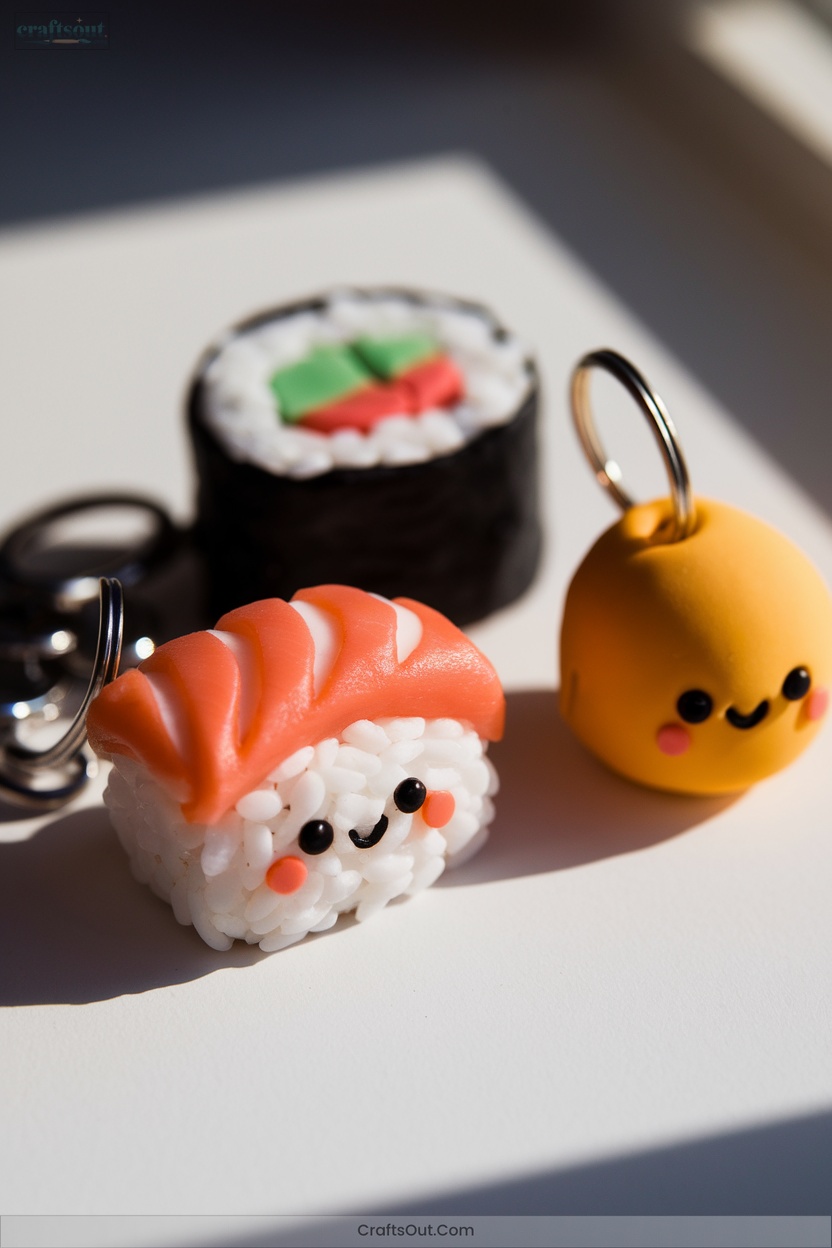
After mastering adorable owls, you’re ready to try your hand at making kawaii sushi charms—a favorite among clay crafters for their playful look and bite-sized appeal. Gather your materials: polymer clay in white, black, and vibrant topping colors, plus basic tools.
Start by shaping the rice base, add texture with dotting tools, then wrap with thin black “nori.” Sculpt toppings—like salmon or tamago—using colored clay and detail with chalk pastels for extra cuteness.
- Shape, texture, and assemble rice and toppings.
- Add kawaii faces using black clay or paint.
- Insert eyepin, bake, and glaze for a polished charm.
10. Miniature Donut Figure

A classic project for any beginner, the miniature donut figure teaches you essential clay techniques while letting you experiment with fun colors and textures.
Miniature donut figures are a fun, beginner-friendly way to master basic clay skills and play with creative colors and textures.
Start by conditioning beige polymer clay until pliable, then roll it into a ball and flatten slightly.
Create the donut hole with a dotting tool, smoothing edges and adding texture with a toothbrush for realism.
For icing, blend liquid clay with colored chalk pastels or use a thin sheet of colored clay.
Add sprinkles—tiny clay pieces or microbeads.
Shade with chalk pastels, insert an eye pin if making a charm, then bake, cool, and glaze for shine.
11. Whimsical Monster Character

Let your creativity run wild by crafting a whimsical monster character from clay.
Start by conditioning your clay, then form basic body shapes like balls or cones.
Attach limbs and a head by gently blending the clay together.
Now, add quirky features that define your monster’s personality:
- Eyes: Create one big, three small, or even googly eyes for a playful look.
- Mouth and Teeth: Cut a mouth slit, then add clay cones for fangs or teardrop tongues.
- Horns and Texture: Roll tiny horns, spikes, or coils, and use a toothpick for fur or skin patterns.
Experiment boldly!
12. Delightful Cactus Pot
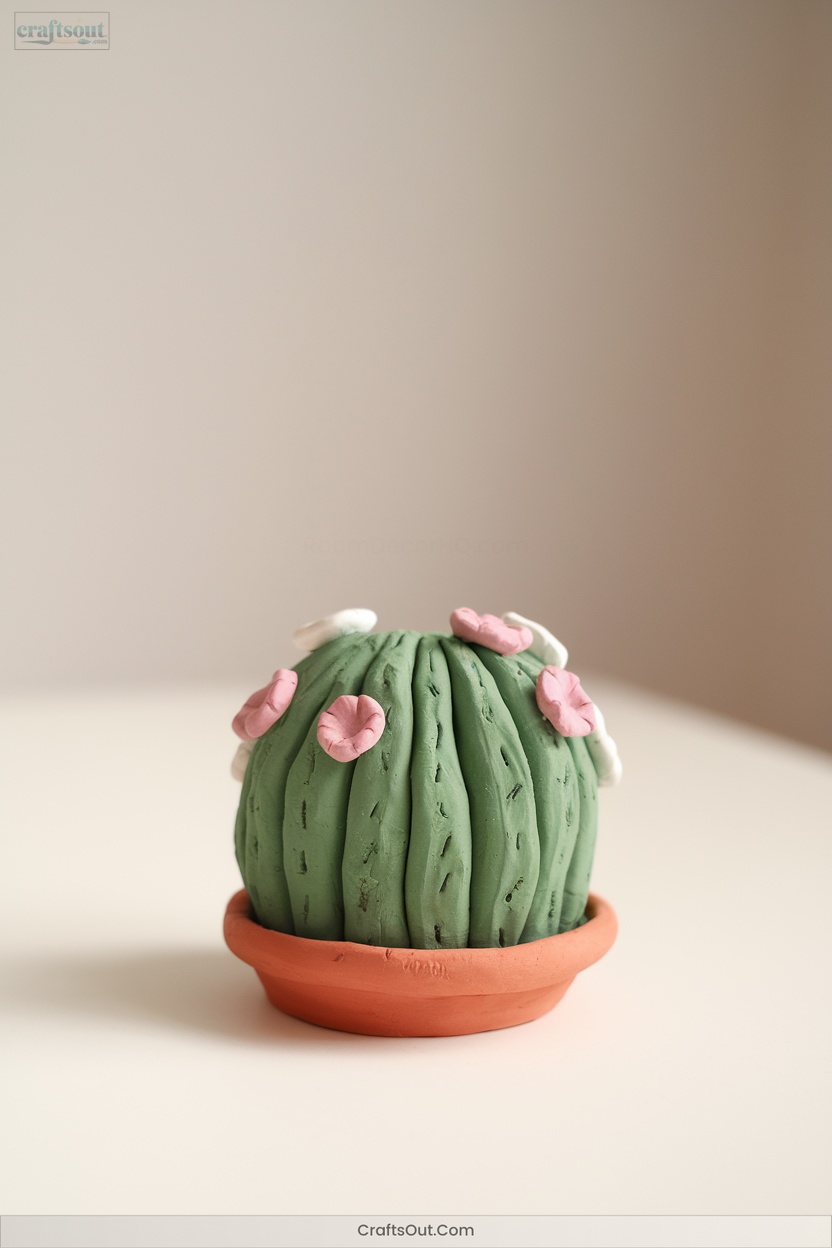
Curious how to bring a bit of desert charm to your space?
Discover simple ways to infuse your home with whimsical desert vibes—no green thumb required!
Start by choosing polymer or air dry clay in green and brown shades.
Roll basic cactus shapes—balls, cylinders, or teardrops.
For larger cacti, wrap clay around an aluminum foil core to save material.
Use a toothpick or pin to add lines, dots, and texture.
Form a mini pot using the pinch pot method or use a tiny terra cotta pot.
Anchor your cactus inside with clay “dirt” or small rocks.
Add tiny clay flowers or thorns for detail.
Bake or air dry, then display your delightful cactus creation!
13. Lovely Rose Blossom
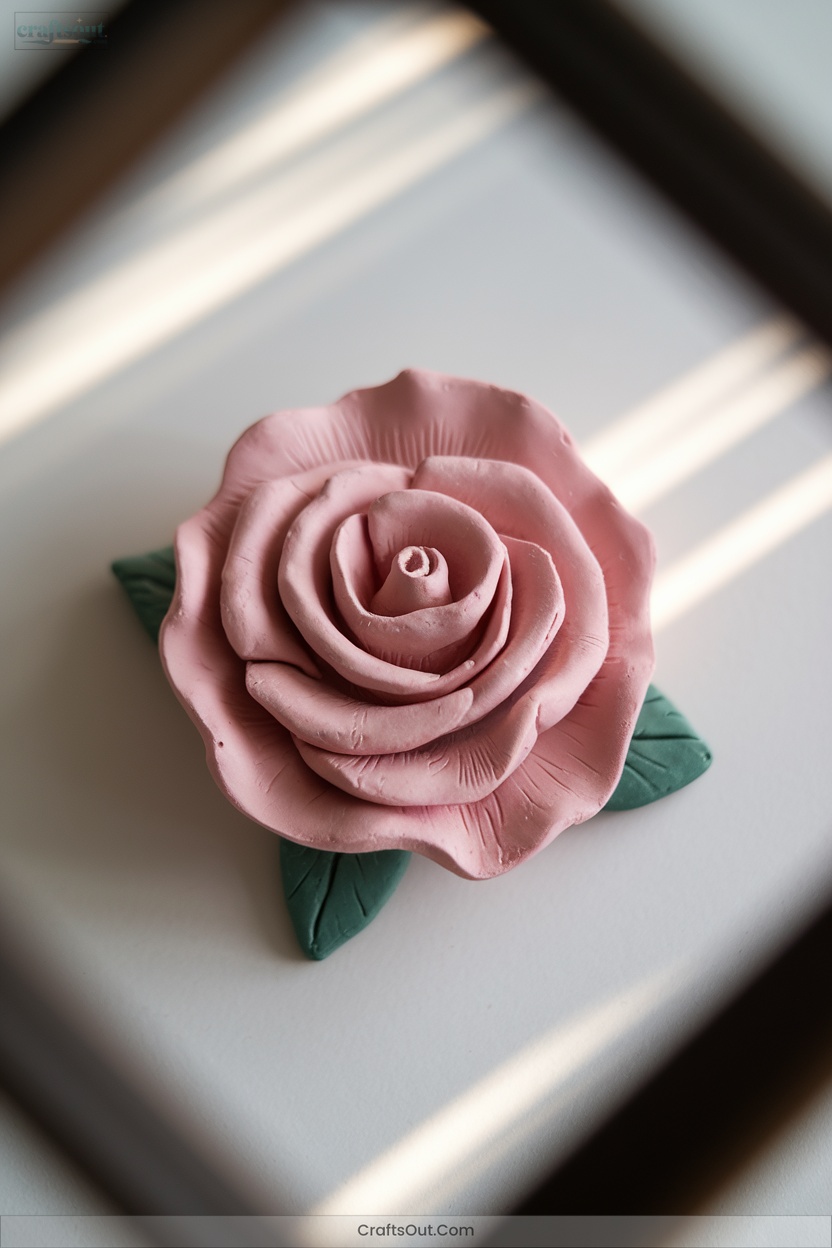
Once you’ve mastered the cactus pot, crafting a lovely rose blossom introduces new techniques and shapes to explore.
Start by conditioning your clay until it’s soft, then divide it into small balls for petals.
Flatten these into thin, delicate shapes using your fingers or a roller.
Form a central bud from one petal, then overlap and attach the others around it, increasing petal size outward.
Gently curl outer edges for realism.
Secure the base, trim if needed, and add a calyx or leaves.
- Use reference images for petal placement.
- Try varying petal sizes.
- Experiment with color blends.
Frequently Asked Questions
Which Type of Clay Is Best for Absolute Beginners?
Start with air-dry clay—you won’t need special equipment, just your hands and creativity. It’s soft, simple to shape, and lets you experiment freely. Once dry, paint and seal your work to make it uniquely yours.
How Do I Prevent My Clay Figures From Cracking While Drying?
Think of your clay like a delicate cake—don’t rush it. Wedge thoroughly, keep thickness even, use minimal water, and dry slowly under plastic wrap. Rotate for even exposure. Add grog or paper fibers for extra strength.
Can I Mix Different Types of Clay in One Project?
You can mix some clays—like different brands of polymer clay—successfully. But don’t mix air dry, polymer, or ceramic clays together. Always check their compatibility, firing temperature, and shrinkage rates to avoid cracking and disappointment. Experiment thoughtfully!
What Are the Safest Paints or Finishes for Clay Crafts?
Choose water-based acrylic or tempera paints labeled non-toxic for vibrant, safe finishes. After drying, seal with a water-based acrylic sealer or Mod Podge. Always check for ASTM D-4236 certification, and let your creative experiments shine.
How Should I Store Leftover Clay to Keep It Usable?
Of course, you want your clay to become a rock overnight! Instead, wrap it tightly, banish all air, double-bag, and hide it from heat. Add a damp cloth for air-dry clay. Your future creations will thank you!
Conclusion
Now it’s your turn—roll, pinch, and shape your way through these clay crafts! Will you start with a playful piglet or a tiny frog? Just follow each step, trust your hands, and remember: every masterpiece begins as a lump of clay.
Don’t worry about perfection; each figure is a chance to learn and have fun. So, gather your supplies, let your creativity flow, and watch your new clay creations come to life!


