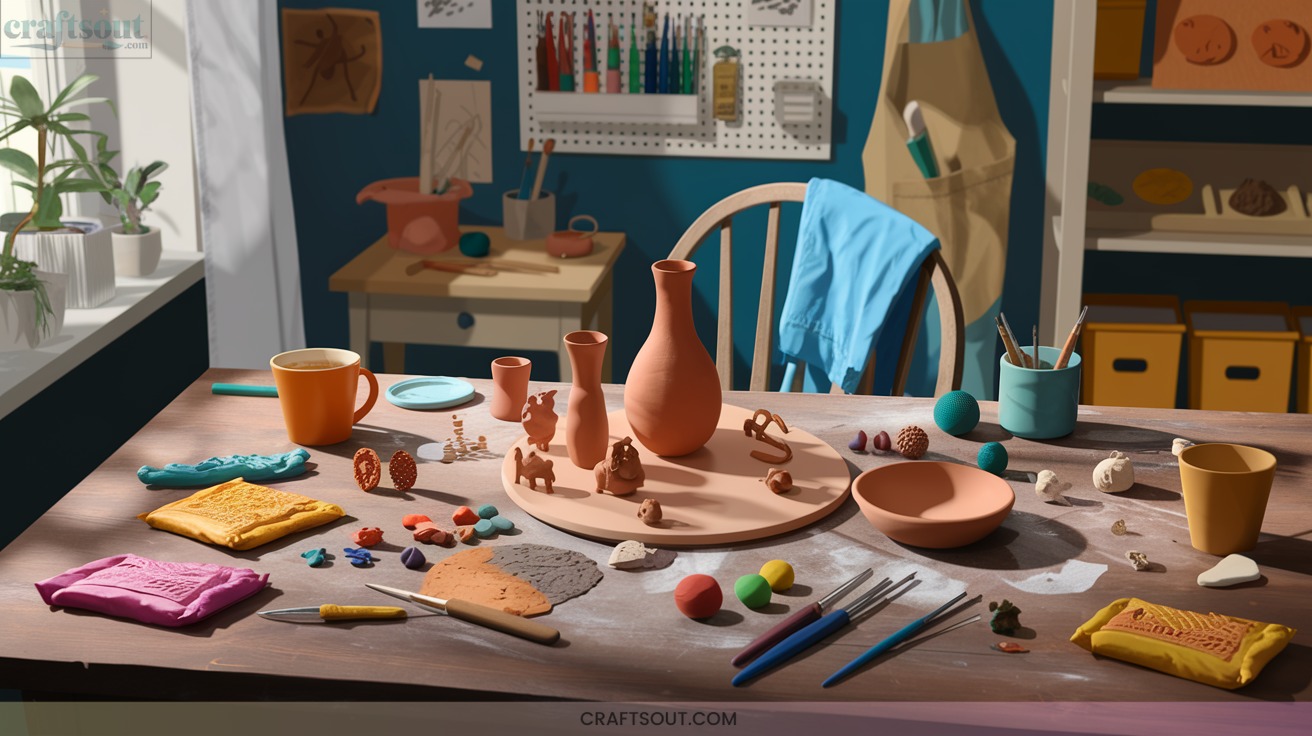
25 Inspiring DIY Clay Crafts Ideas to Try in 2025
You can explore your creativity in 2025 with 25 inspiring DIY clay crafts like air-dry pinch pots, marbled polymer clay coasters, chic jewelry dishes, and minimalist wall hangings. Try handbuilding geometric pendants, whimsical animal figurines, and even upcycled vases with bold finishes. Whether you’re a beginner or an experienced crafter, these cute polymer clay craft ideas are perfect for expressing your personal style. Dive into projects like colorful keychains, unique fridge magnets, or custom-made plant pots that brighten up any space. Each creation is not only a fun way to spend your time but also a chance to gift something special to friends and family. Diversify your projects by incorporating rustic terracotta clay crafts that bring a warm, earthy aesthetic to your home decor. These pieces can be both functional and decorative, allowing you to create unique plant pots or hand-painted candle holders. Embrace the versatility of clay by combining different techniques and styles to make truly personalized works of art. Additionally, you can experiment with colorful clay beads to make unique bracelets and necklaces, perfect for adding a personal touch to your accessories. Look online for even more creative polymer clay craft ideas that showcase different techniques, such as marbling or texturing, to further enhance your projects. These clay crafts not only allow for personal expression but also make thoughtful, handmade gifts for friends and family. Additionally, you can incorporate nature into your creations by embarking on some exciting DIY clay pot garden projects that transform simple clay pots into vibrant displays for your favorite plants. Consider painting these pots with unique patterns or textures to add a personal touch to your garden. With endless possibilities, you’ll find joy in crafting pieces that reflect your style and enhance your space. Incorporate techniques like marbling and caning to create elegant polymer clay home decor that will elevate any space. Whether you’re crafting gifts for loved ones or personal treasures for your own home, these projects promise to unleash your artistic potential. Let your imagination run wild as you experiment with colors and textures to make each piece truly unique.
Use both air-dry and polymer clays for everything from boho garlands to functional trinket boxes. Simple techniques and affordable supplies make these projects perfect for all levels—discover the full roster and step-by-step ideas next.

1. Air-Dry Clay Pinch Pots for Beginners

Ever wondered how to shape clay with just your hands?
Start with an air-dry clay ball, kneading it until smooth and pliable. Press your thumb gently into the center, careful not to break through.
Pinch the walls evenly, rotating as you go—aim for about a quarter-inch thickness. Keep your hands slightly moist to prevent sticking or premature drying.
Let your pinch pot air dry, flipping it to guarantee even moisture release. Once dry, sand rough spots and decorate with acrylic paints or pens.
Seal with a clear varnish for durability. Always store unused clay airtight to keep it workable.
2. Marbled Polymer Clay Coasters

Marbling transforms simple polymer clay into striking, one-of-a-kind coasters with minimal effort. Start by conditioning 2-3 clay colors, rolling each into snakes, then twisting and folding them to create dynamic swirls—stop before the colors muddy.
Flatten your marbled ball with a rolling pin, aiming for even thickness, then cut circles. Smooth the edges and bake on parchment per package instructions. Once cooled, refine with fine sandpaper and add metallic paint to the rim for a modern finish.
Effortlessly create unique marbled clay coasters—twist, flatten, bake, and finish with a metallic rim for a modern, custom touch.
- Choose bold clay color combinations.
- Avoid over-mixing for crisp marbling.
- Personalize with stamped initials.
- Add cork backing for protection.
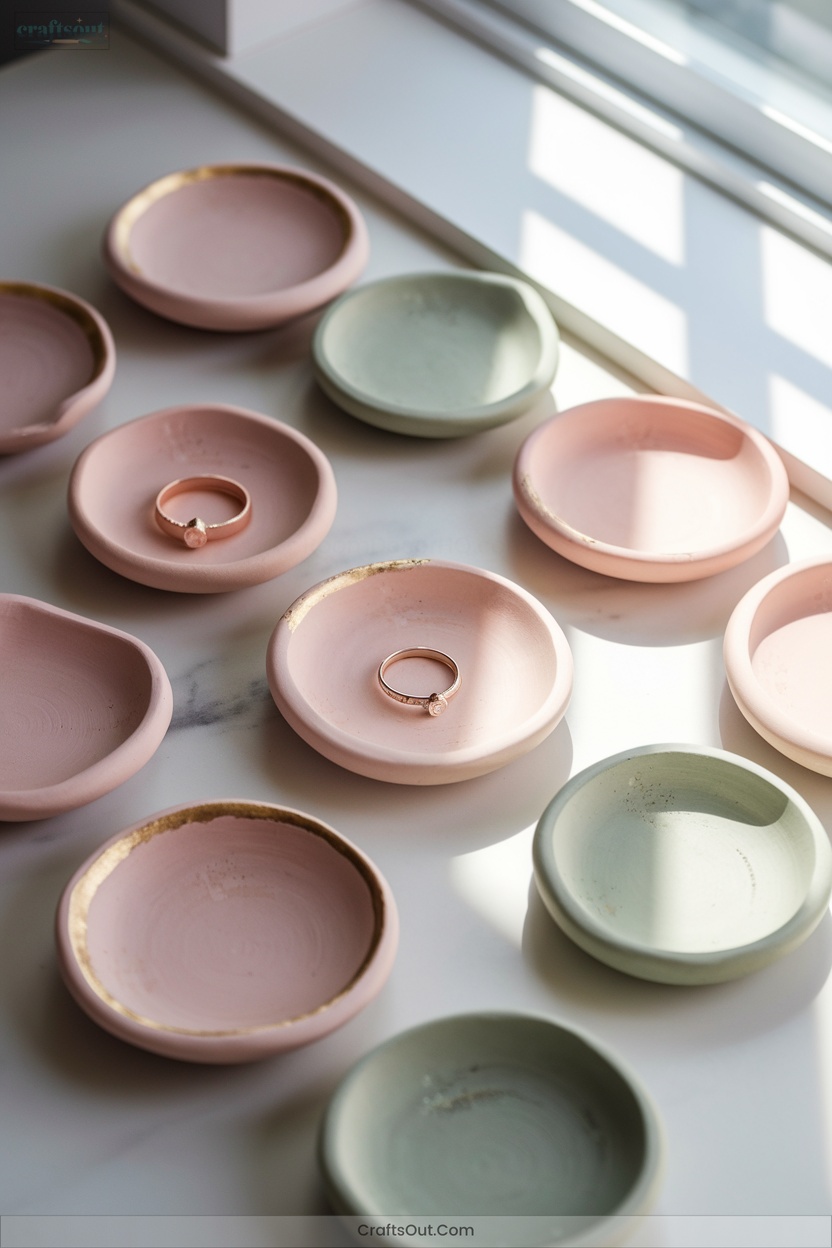
3. DIY Clay Jewelry Dishes

A handmade clay jewelry dish brings both function and artistry to your vanity or nightstand, offering a stylish spot to corral rings, earrings, or small keepsakes.
Choose polymer clay for durability or air-dry clay for easy, no-bake crafting.
Roll clay to about 1/4 inch thick, cut creative shapes—circles, hearts, clouds—and mold them in oven-safe bowls.
Experiment with marbling, imprinting lace or botanicals, or adding gold paint accents.
Sand rough edges after drying or baking.
Always seal air-dry clay for water resistance.
With these techniques, you’ll craft dishes that showcase your vision and stand out as innovative everyday art.
4. Handcrafted Clay Keychains
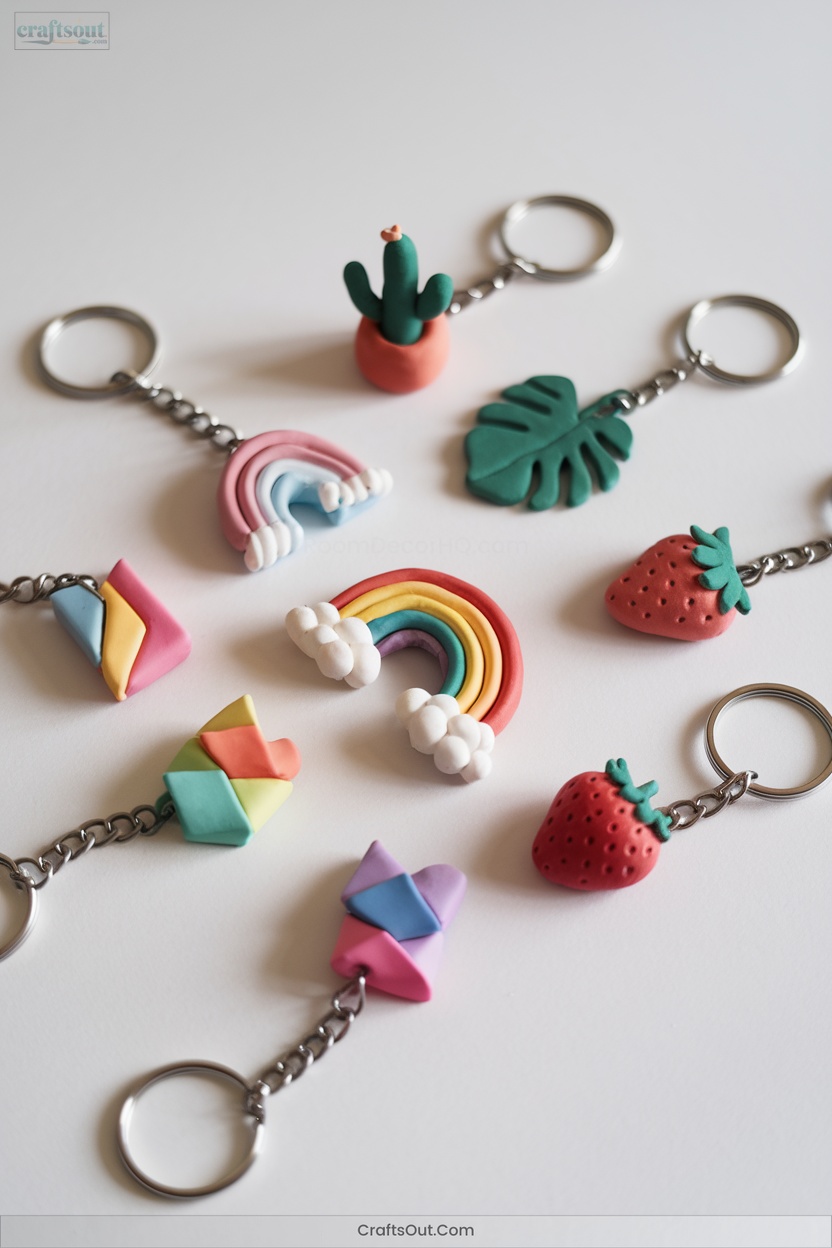
Transform everyday keychains into miniature works of art by crafting your own with polymer or air-dry clay.
Polymer clay (Sculpey, Fimo, Cernit) provides vibrant colors and exceptional durability, while air-dry clay allows for custom painting and lightweight designs.
Experiment with trending shapes, marbled effects, and textural details.
Personalize with initials, zodiac signs, or Ghibli-inspired motifs.
For a professional finish, consider glazing or sealing.
Here’s how to elevate your creations:
- Choose durable polymer clay for daily-use keychains.
- Incorporate texture sheets or cookie cutters for unique shapes.
- Add eye pins before baking/drying.
- Experiment with layered colors and beaded styles.
5. Minimalist Clay Wall Hangings
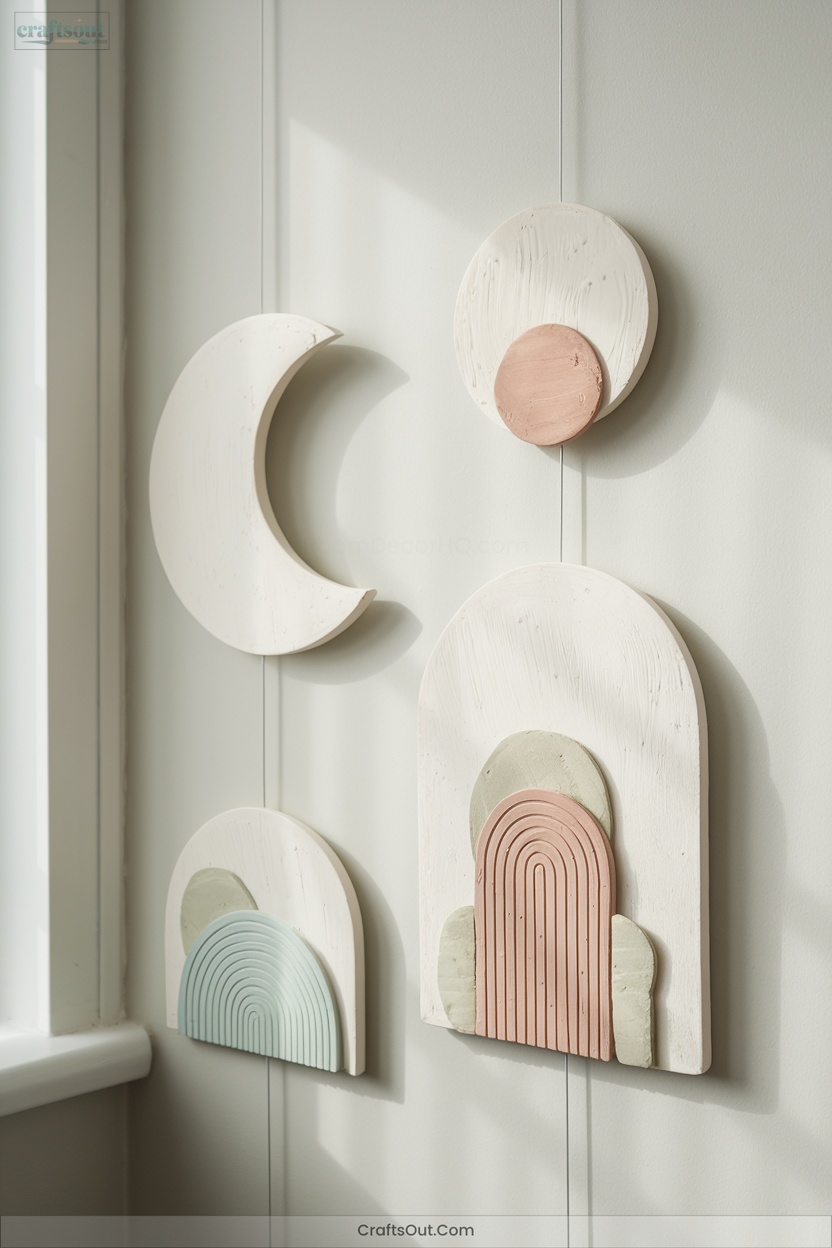
Ever wondered how to bring modern, understated art into your space without overwhelming your walls? Minimalist clay wall hangings are your answer.
Start with air-dry or polymer clay, kneading until smooth.
Roll it out evenly—guide rings help—then cut geometric or nature-inspired shapes.
Poke holes before drying, planning your arrangement for a clean, balanced cascade.
After drying or baking, sand edges and paint with neutral or earthy tones; a splatter or imprint adds subtle flair.
Thread shapes onto jute, leather cord, or wire, knotting securely.
Finish with a wooden bead or two.
Hang for instant modern impact—simple, yet striking.
6. Textured Clay Candle Holders
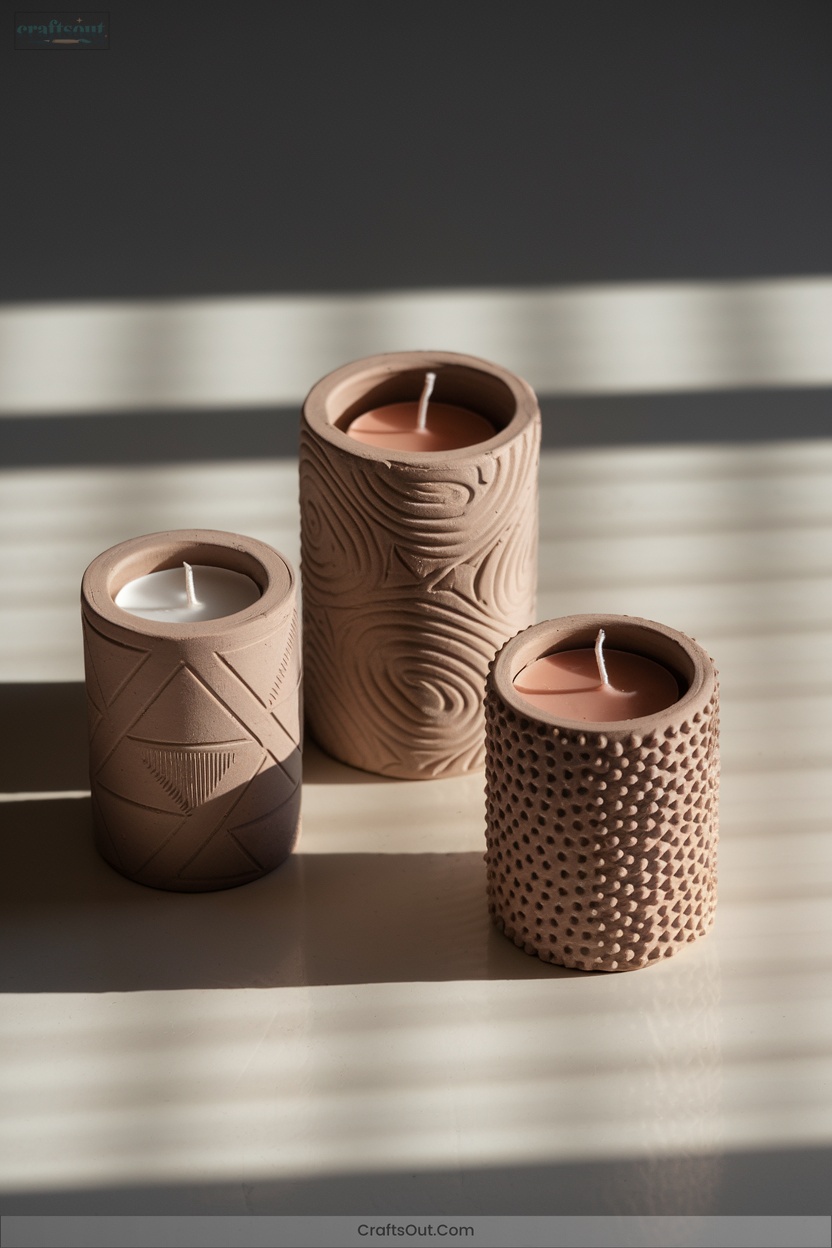
Once you’ve explored the clean lines of minimalist wall hangings, it’s time to let your hands play with texture.
Creating textured clay candle holders lets you experiment with both form and surface, merging tactile intrigue with functional art.
Start with air-dry or polymer clay, roll it to a quarter-inch thickness, and build your structure with coils or slabs.
Imprint or layer textures for unique character.
Don’t forget to size the candle opening for shrinkage.
Here’s how to innovate:
- Press lace, leaves, or foil for organic textures.
- Mix in coffee grounds for gritty dimension.
- Add sculpted coils for raised patterns.
- Finish with metallic accents.
7. Personalized Clay Garden Markers
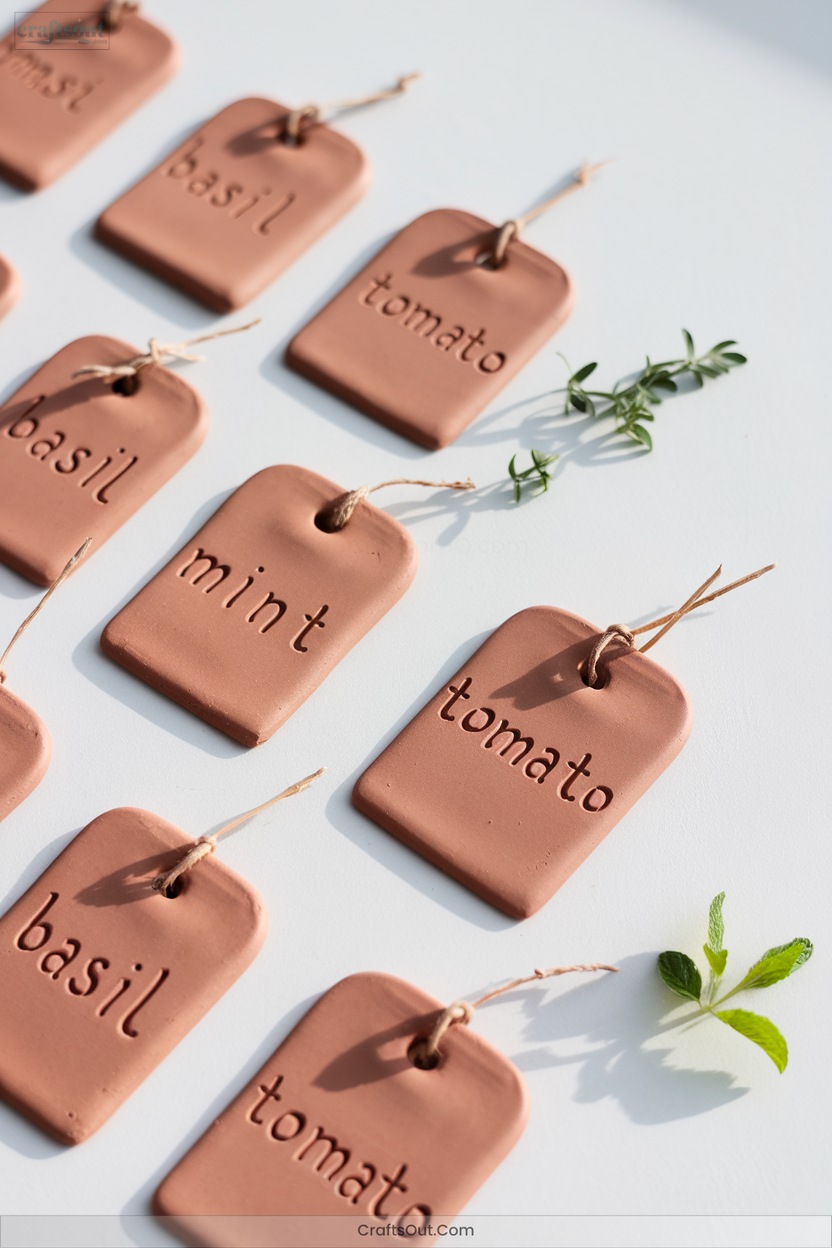
Gardeners know that clear, durable plant labels make all the difference when your seedlings start to look alike.
Upgrade your garden game with personalized clay markers—choose oven-bake polymer or porcelain clay for outdoor resilience.
Roll clay evenly, cut custom shapes with cookie cutters, and smooth edges for a polished look. Personalize using alphabet stamps for crisp names or hand-carve with a skewer for a unique touch.
Press leaves for organic textures or mix clays for marbled effects. Embed wire or bamboo for sturdy stakes before baking.
After curing, highlight details with paint pens or washes. Your innovative labels will thrive season after season.
8. Polymer Clay Statement Earrings
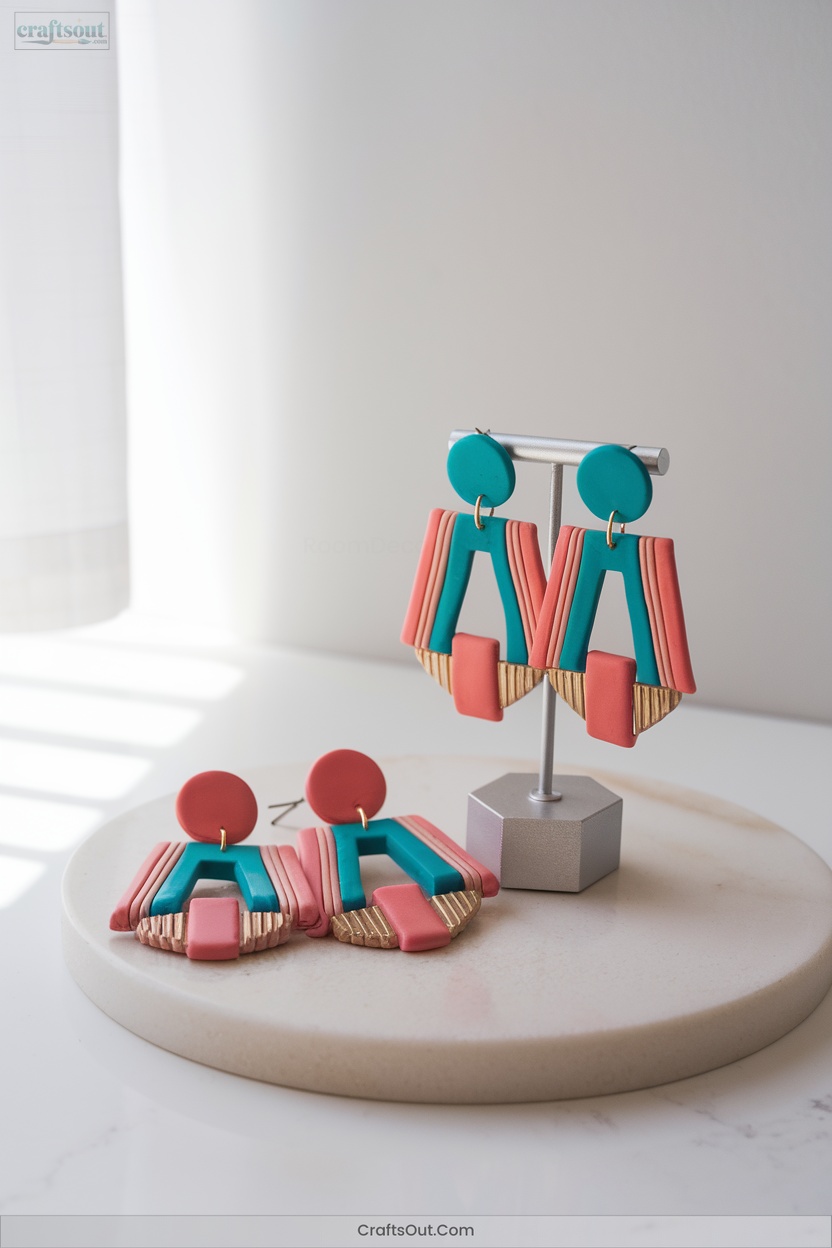
Curious how to elevate your accessory game with custom flair?
Polymer clay statement earrings offer an innovative, affordable way to create bold, one-of-a-kind looks.
Polymer clay statement earrings are a creative, budget-friendly route to crafting striking, unique accessories that express your individual style.
Start with quality clay like Sculpey Premo or Fimo Professional, condition it thoroughly, and roll it to an even 2mm thickness.
Explore current trends—think oversized geometrics, botanical textures, and modular designs.
After cutting and baking, sand edges and attach hardware for a flawless finish.
Mix colors and experiment with metallic or pearl effects to achieve luxury on a budget.
- Condition and roll clay evenly
- Cut bold, trendy shapes
- Bake, sand, and finish edges
- Attach hardware and customize
9. Faux Agate Clay Magnets
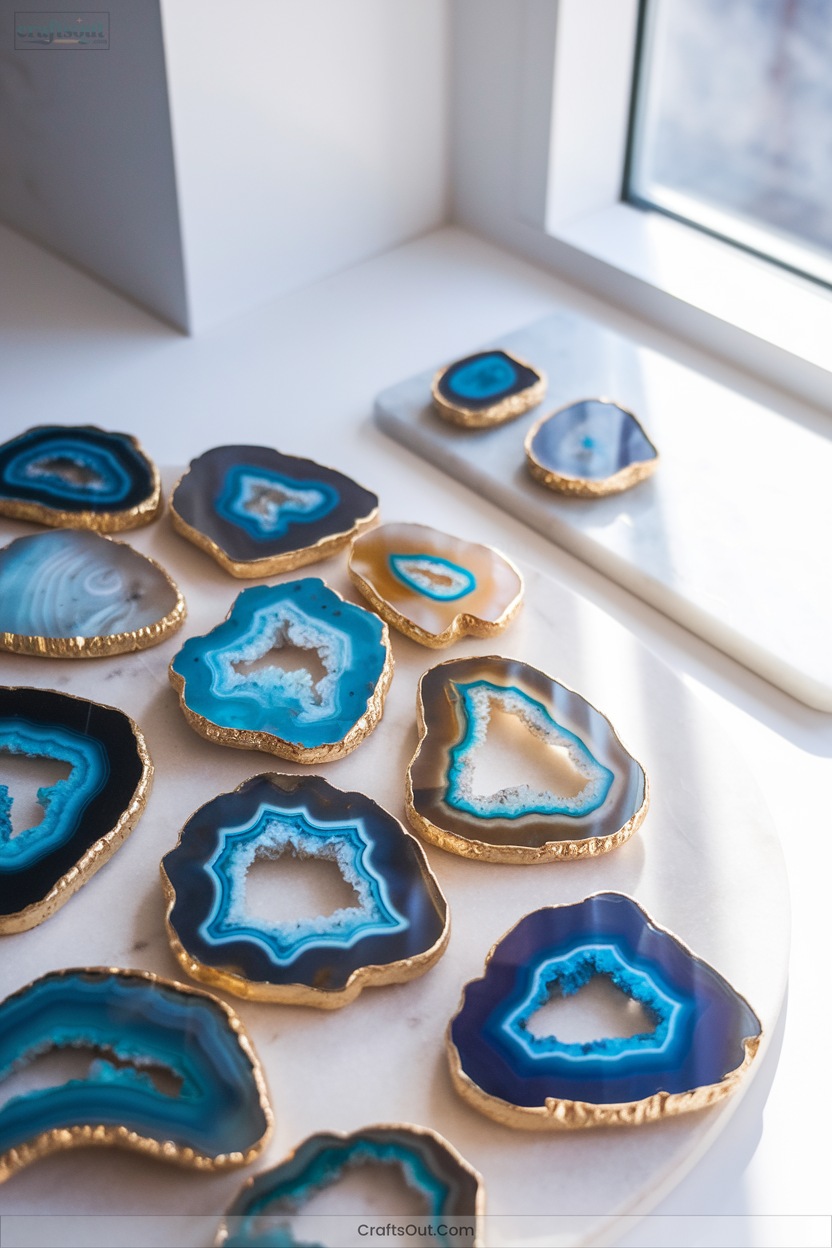
If you love making wearable art with polymer clay, you’ll find just as much satisfaction crafting faux agate magnets—miniature gemstones that brighten up any fridge or workspace.
Start by layering translucent, glittered, and colored clays around a central core, then slice your cane to reveal mesmerizing, agate-like rings.
Shape each slice with fingers or tools, adding jagged geode centers or textured edges for realism.
After baking, sand and buff for a glassy finish.
Glaze or coat with UV resin for depth and shine, then attach a strong magnet with epoxy.
Experiment with alcohol inks and metallic leaf for innovative effects.
10. Kawaii Food Miniatures From Polymer Clay
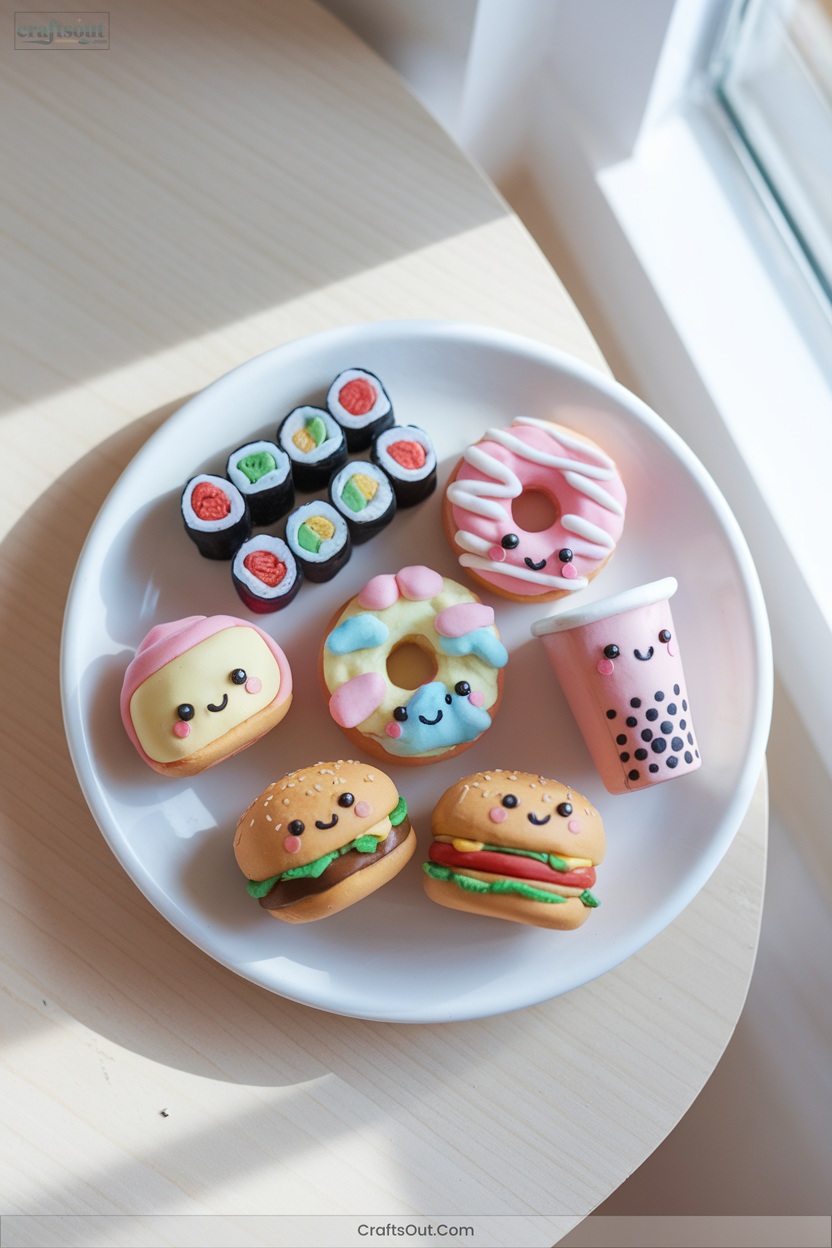
Ever wondered how artists achieve those irresistibly cute, bite-sized food charms that look good enough to eat? Start by selecting high-quality polymer clays like Fimo or Premo—mix subtle colors for realistic effects.
Use needle tools, tissue blades, and old toothbrushes to create convincing bread, cake, or fruit textures. Emphasize kawaii features with exaggerated eyes and pastel accents before baking. After baking, seal and accessorize your miniatures for jewelry or display.
Craft adorable, lifelike food charms with polymer clay, creative texturing tools, and pastel kawaii details for mini treats too cute to resist.
- Mix clay colors for authentic food tones.
- Texture surfaces with everyday objects.
- Add kawaii faces using simple shapes.
- Seal, glaze, and accessorize for durability.
11. Modern Clay Ring Dishes
Once you’ve explored the charm of kawaii food miniatures, it’s time to try your hand at crafting modern clay ring dishes—an elegant fusion of artistry and function.
Start by selecting oven-baked clay for durability, and roll it out evenly using a jar or rolling pin.
Experiment with marbled effects by mixing clay colors and rolling in different directions.
Cut your shape with a clay knife and bake on an oven-safe vessel.
After cooling, paint the rim gold for a luxe touch.
Personalize further with textures or glitter.
Seal with a clear glaze and enjoy a stylish, functional jewelry holder.
12. Upcycled Bottles Turned Clay Vases
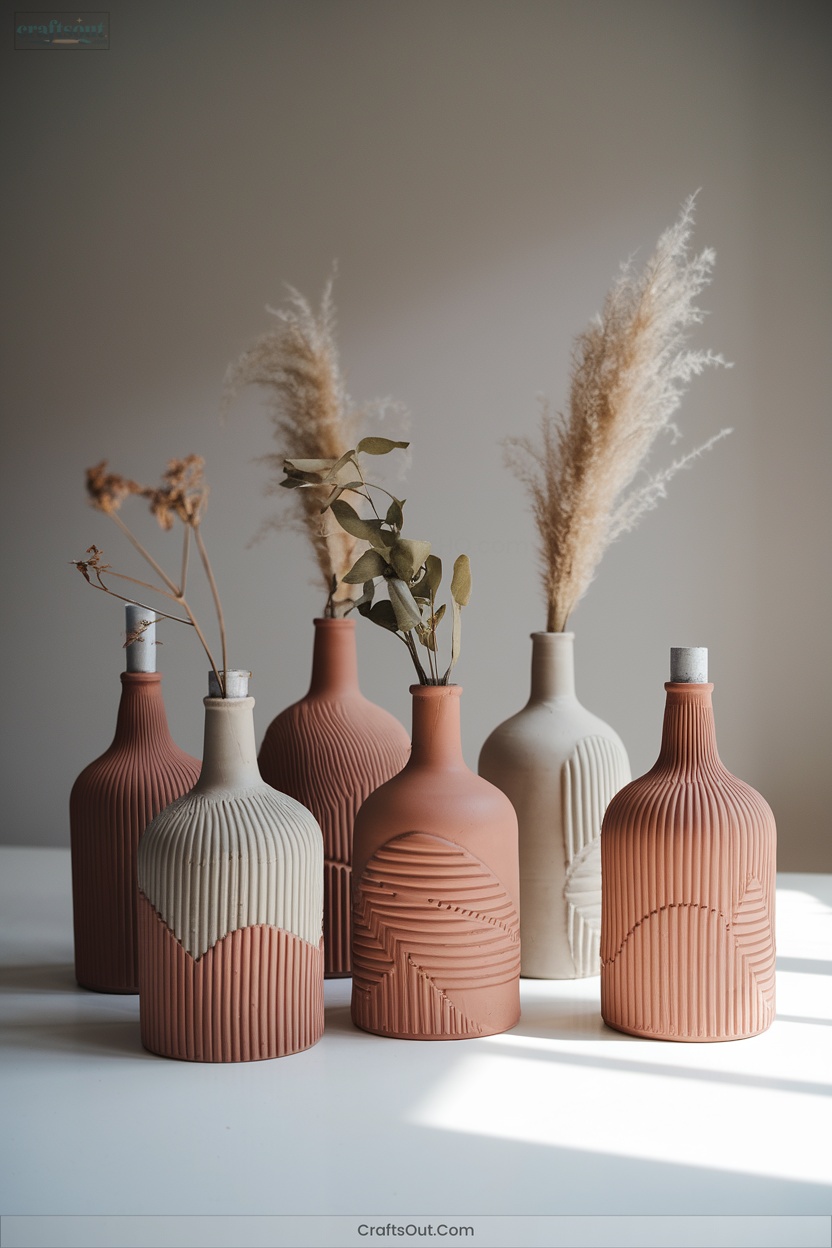
How can ordinary glass bottles become striking statement pieces?
Start by transforming them into innovative clay vases.
Begin with a clean, de-labeled bottle as your eco-friendly base.
Mold air dry clay over the surface, sculpting textures or patterns for a custom look.
Once dry, use acrylic paints or the trendy baking soda technique to achieve bold finishes.
Enhance with layering, embellishments, or botanical paintings for extra flair.
Seal your creation for durability and shine.
- Select and prepare recycled glass bottles.
- Apply and texture air dry clay.
- Paint with acrylics or baking soda technique.
- Add embellishments and seal for longevity.
13. Abstract Clay Picture Holders
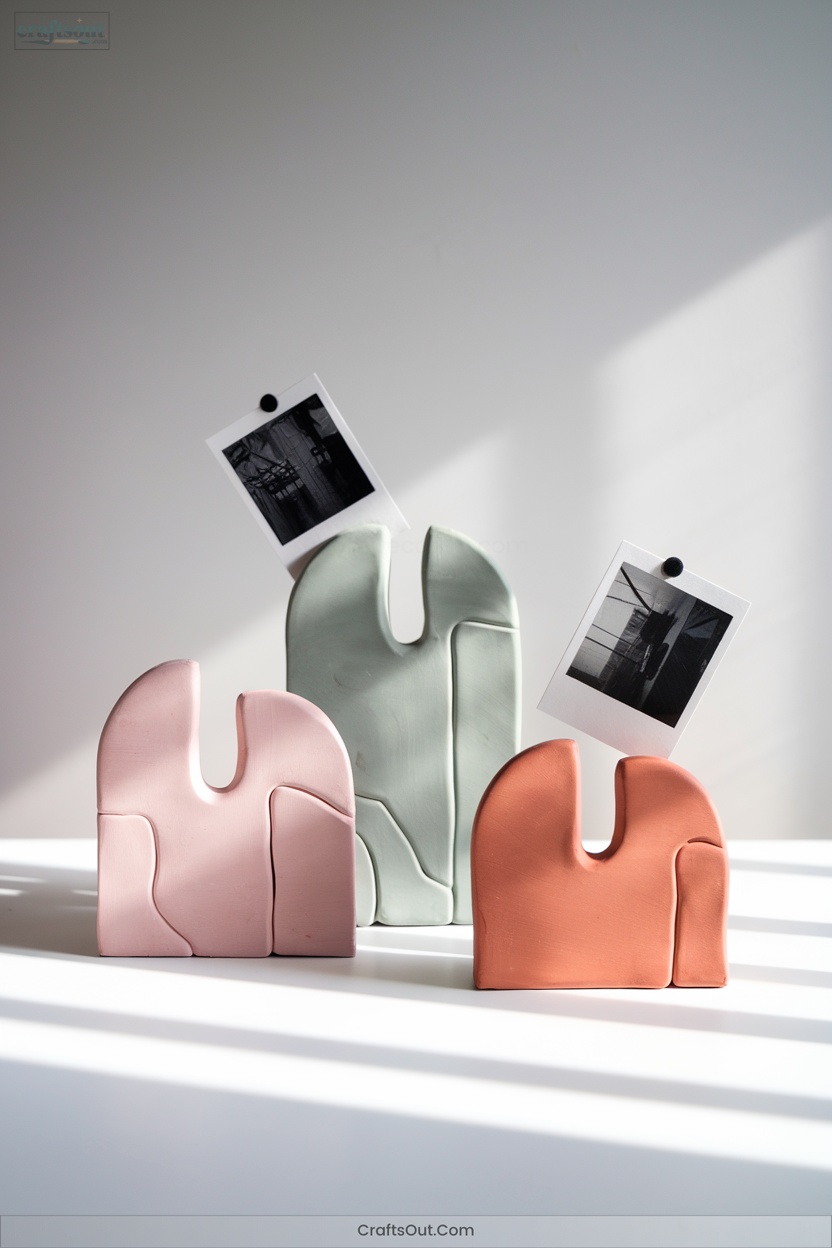
After transforming glass bottles into vibrant clay vases, you can further elevate your decor with abstract clay picture holders that blend artistry with functionality.
Start with air dry or polymer clay, using slab or tube techniques to craft geometric arches, oblong bases, or organic forms.
Apply textures with modeling tools or add mosaic elements for a bold statement.
Cut precise slots for photos using wire cutters, and incorporate personalized touches like painted patterns or embedded beads.
For inspiration, explore YouTube, TikTok, or Pinterest.
These holders make perfect customizable gifts, and collaborating with friends turns the process into a memorable creative experience.
14. Retro-Inspired Clay Mugs
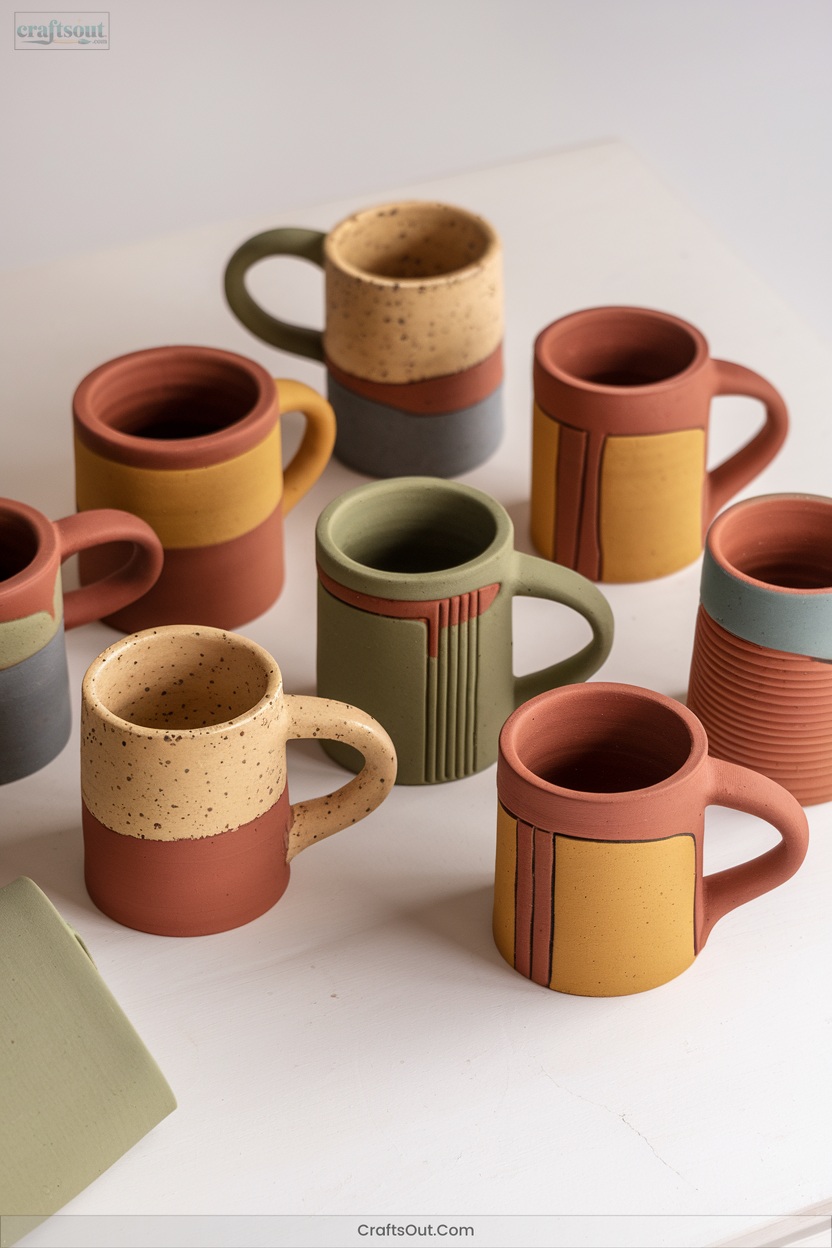
Ever wondered how to capture the bold charm of yesteryear in a handmade mug? Start by rolling out air-dry or polymer clay using a slab technique for that classic, wide-rimmed retro silhouette. Don’t shy away from bold colors—think neon blends and vintage patterns—using acrylic paint or layered slips. Sculpt textured effects with tools and add motifs like cassette players or geometric shapes for authentic flair. Finish with a protective varnish or glaze for lasting vibrancy and durability.
- Roll smooth, even slabs for mug bodies.
- Score, slip, and assemble parts securely.
- Add retro embellishments and textures.
- Seal and display your masterpiece.
15. Custom Clay Name Plaques

Once you’ve mastered the art of retro-inspired clay mugs, channel that same creativity into crafting custom clay name plaques.
Start with air-dry or polymer clay—polymer guarantees longevity if you’re baking. Condition and roll out your clay evenly. Use cookie cutters or a Cricut Maker for crisp letters and shapes.
Begin with air-dry or polymer clay, then roll it out and cut precise shapes using cookie cutters or a Cricut Maker.
Twist clay colors together for dynamic patterns and dust with mica powder for shimmer. Personalize each plaque with names, initials, or themed motifs using molds and texture tools.
Finish with a sealant for durability. Explore video tutorials or community forums for advanced techniques and inspiration.
These plaques elevate gifts, décor, and events.
16. Clay Trinket Boxes With Mixed Media Lids

A clay trinket box with a mixed media lid is the perfect blend of function and artistry, inviting you to experiment with texture, color, and form.
Use air dry or polymer clay for versatile bases, then elevate each lid by layering materials—think fabric, metallic foils, or mosaic tiles.
Draw from geometric patterns or nature-inspired themes for a modern, innovative touch.
Here’s how to get started:
- Shape your box using hand-building techniques for uniqueness.
- Apply texture stamps or wax resist for added dimension.
- Secure mixed media elements with strong adhesives.
- Personalize designs for gifting or display.
17. Faux Concrete Clay Plant Pots
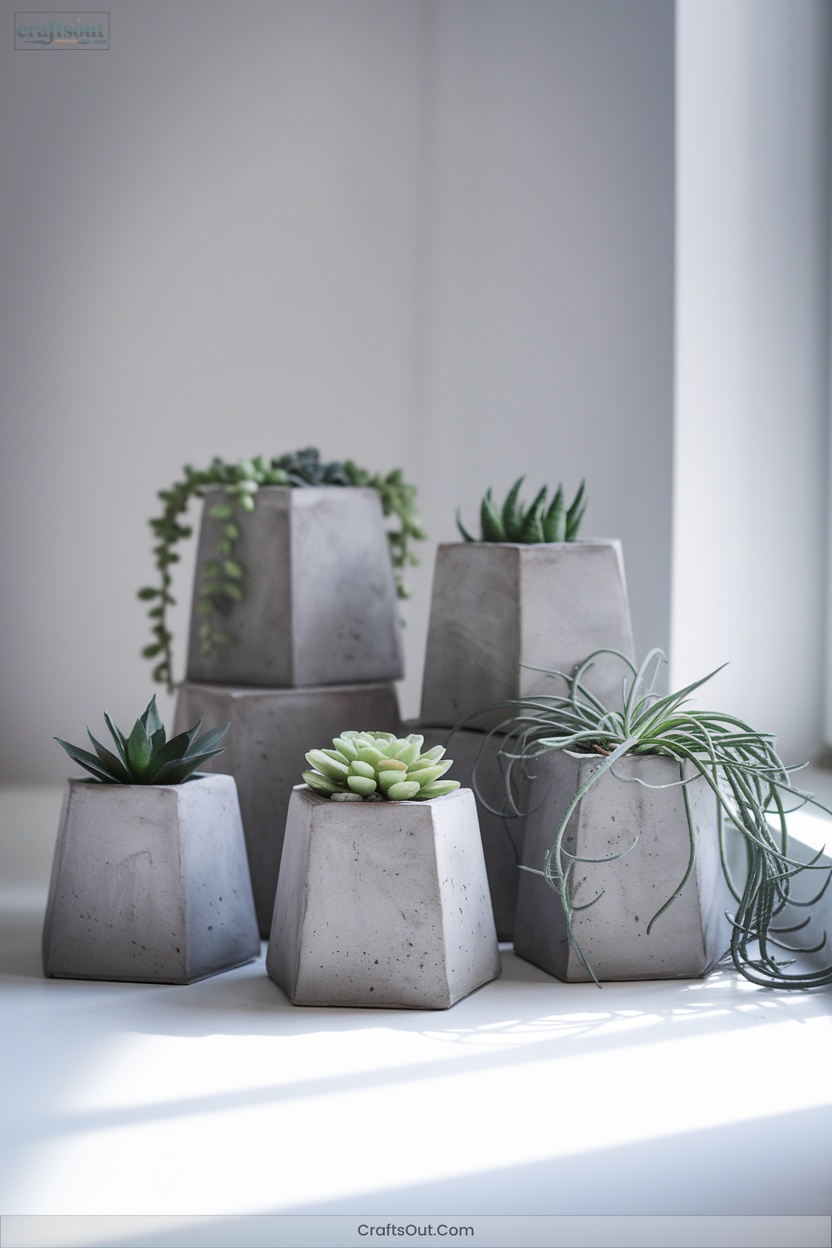
Transform ordinary plastic planters into striking faux concrete clay plant pots with a few clever material swaps and artistic techniques.
Start by applying drywall joint compound for an authentic textured base—cement mesh tape adds extra structure and depth.
Once dry, use latex paint in medium gray for that classic concrete look, or experiment with acrylics for a custom patina.
A quick spray paint base guarantees uniformity.
This method is light, affordable, and sustainable—repurposing thrifted pots for under $70.
Finish with your favorite real or faux plants.
You’ll achieve upscale style and innovative texture without the weight or expense of real concrete.
18. Boho-Style Clay Beaded Garlands
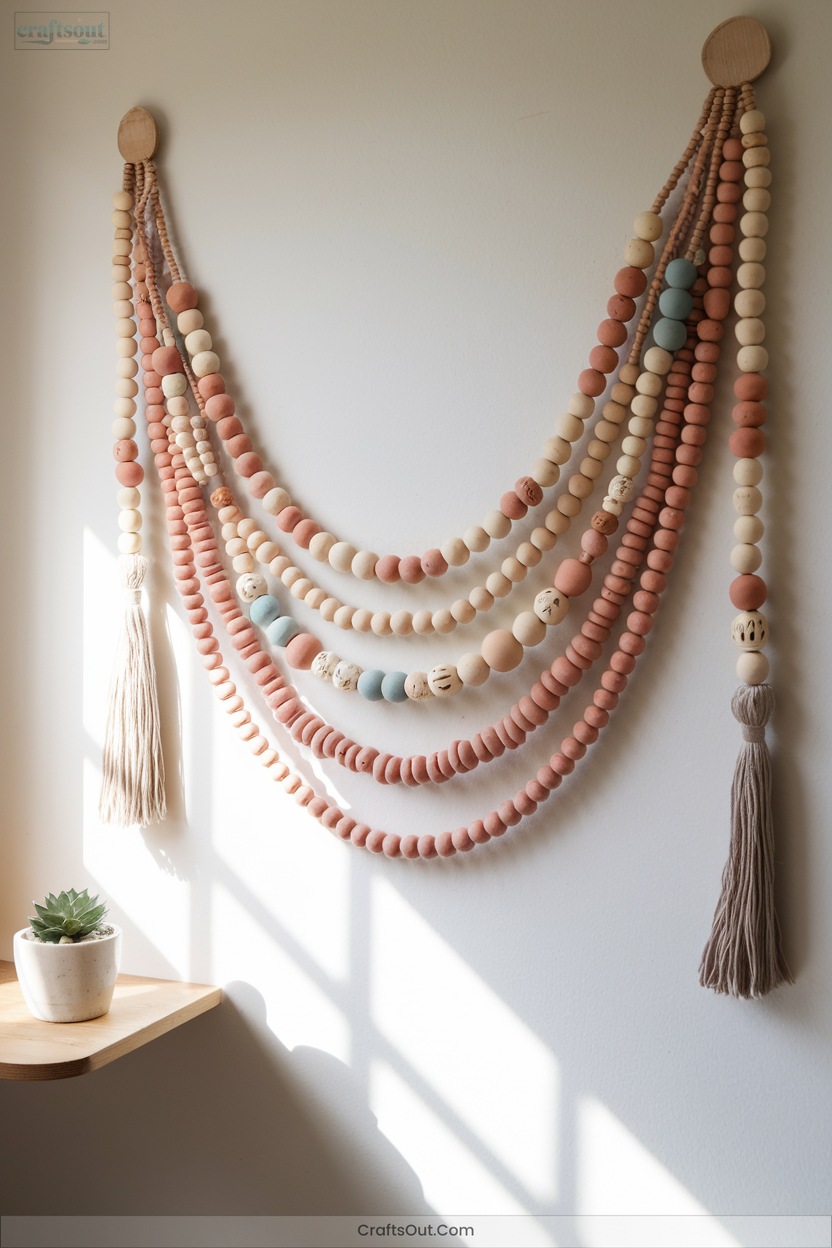
For a dose of global-inspired charm, crafting your own boho-style clay beaded garlands lets you blend earthy textures and colors into any space.
Handcraft boho clay beaded garlands to infuse earthy textures and rich colors, bringing global-inspired charm to your home décor.
Start with air dry clay, hand-shape organic beads, and pierce them with a metal skewer.
Once dry, use mottled painting techniques in terracotta or ochre for that authentic boho look.
Thread your unique beads and wooden accents onto jute twine, layering them for depth and interest.
Elevate your decor with these innovative touches:
- Mix clay and wooden beads for texture.
- Experiment with nature-inspired shapes.
- Space beads randomly for a relaxed vibe.
- Combine with macrame or woven accents.
19. Decorative Clay Fairy Doors

Step into a world of imagination by crafting decorative clay fairy doors that invite magic into your home or garden.
Start with polymer clay, shaping unique doors using sculpting tools or your hands.
Experiment with earth tones for a natural vibe, or bold hues for playful charm.
Add whimsical details—marbled clay knobs, textured wood grains, or miniature hinges.
Personalize with tiny mailboxes, welcome mats, or hidden messages.
Install your creation on a tree or wall using strong adhesive, then enhance the setting with miniature plants and glowing stones.
Seek inspiration from fairy tales, nature, and online communities to spark new ideas.
20. Clay Stamped Gift Tags
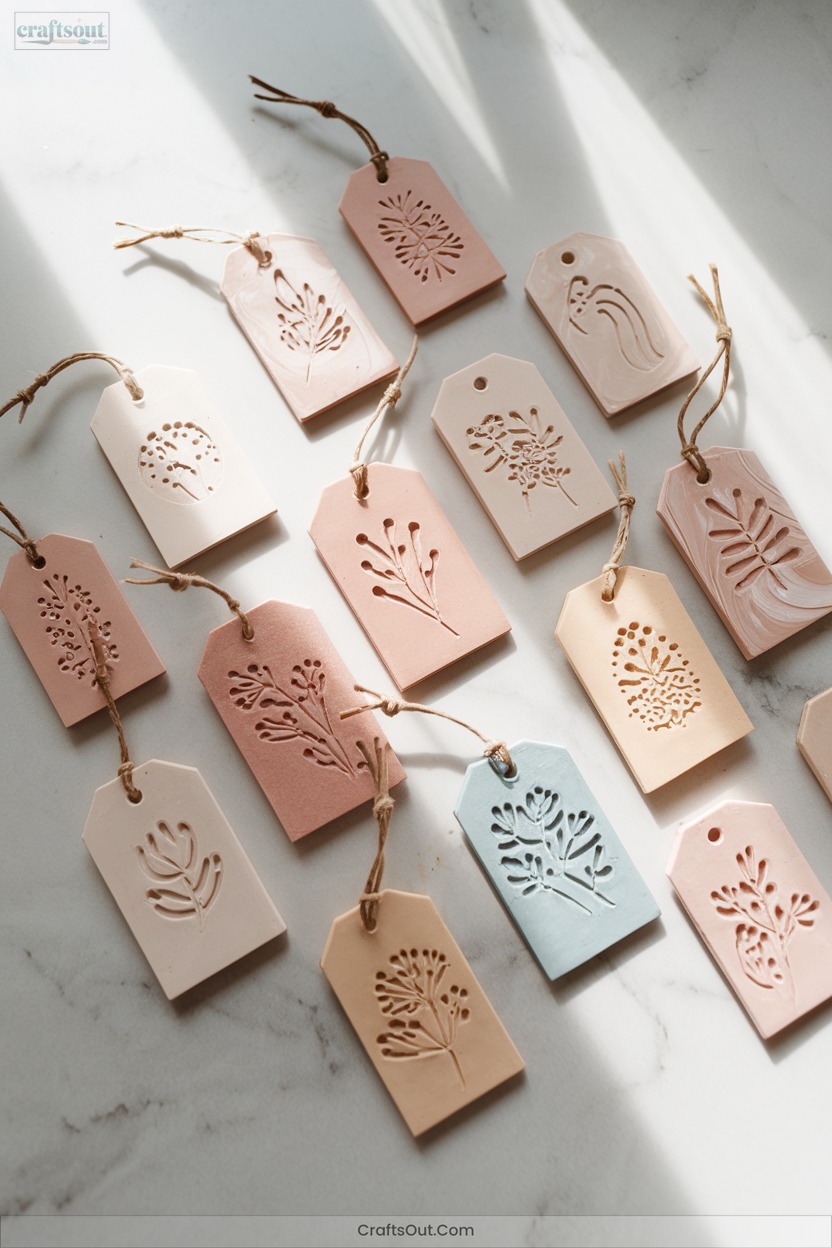
Gift-giving gains a thoughtful, handcrafted edge when you create clay stamped gift tags. Start by rolling out air dry clay to about 1/4″ thickness. Use cookie cutters for innovative shapes and press stamps into the moist clay to personalize each tag. Make a hole for ribbon before letting the tags air dry for 24 hours. For a professional finish, highlight stamped details with paint or use stylish ribbons. These tags elevate your presents, making them memorable and unique. Try these steps:
- Roll and cut clay shapes.
- Stamp personalized messages.
- Create attachment holes.
- Paint and embellish creatively.
21. Sustainable Scrap Clay Mosaic Art
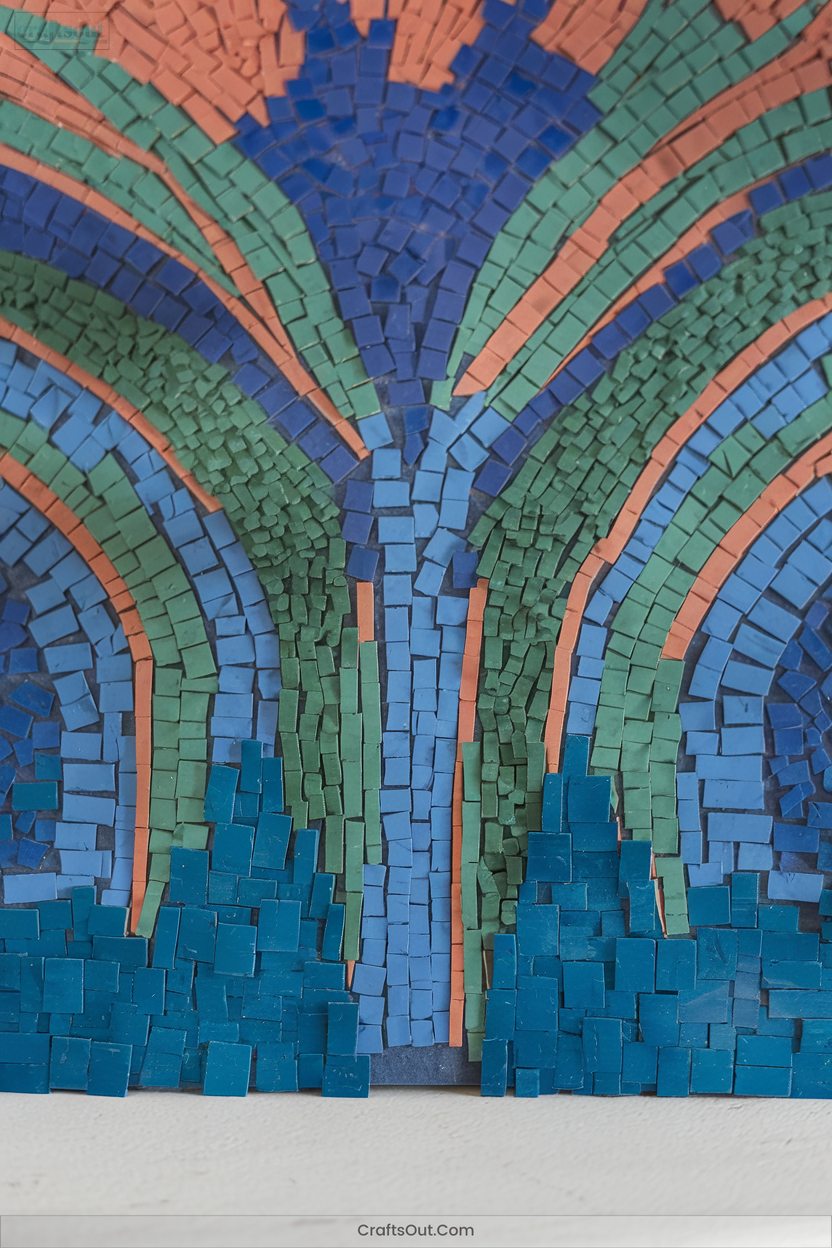
After adding a personal touch to your gifts with clay stamped tags, you can take your creativity a step further by transforming leftover clay into sustainable mosaic art.
Gather scrap clay, recycled glass, and reclaimed tiles to craft eco-friendly masterpieces.
Try the direct method for spontaneous layouts, or the indirect technique for precise patterns.
Use sustainable adhesives and eco-friendly grout to minimize environmental impact.
Draw inspiration from nature, abstract designs, or cultural motifs.
Prepare your materials thoughtfully and plan your design to reduce waste.
Share your knowledge, inspiring others to embrace sustainable art while expressing your unique vision innovatively.
22. Whimsical Animal Figurines
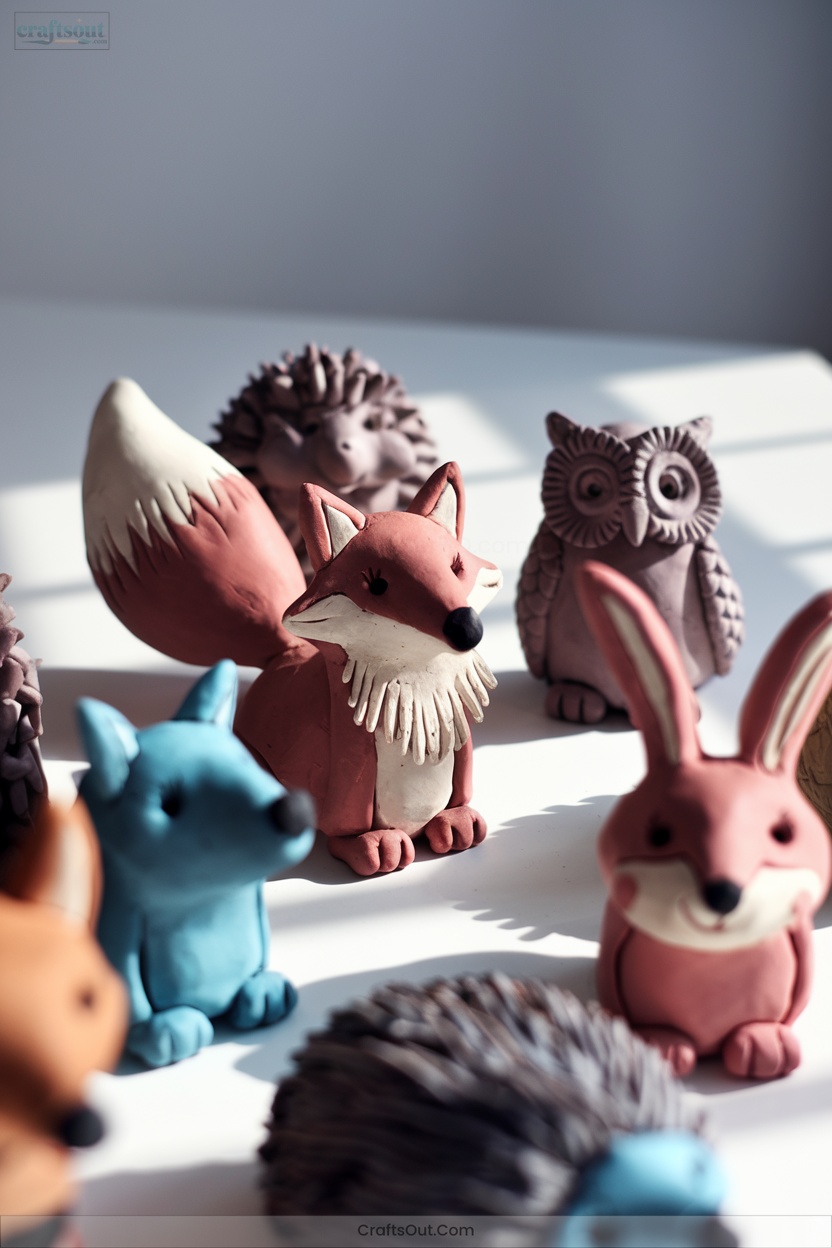
Whimsical animal figurines let your imagination run wild, transforming simple lumps of polymer clay into charming characters for display or play.
Let your creativity shape playful animal figurines from polymer clay, turning imagination into delightful characters for your home or desk.
You can craft everything from classic pandas to imaginative fantasy creatures, adapting complexity to your skill level.
Experiment with bold color schemes, playful textures, and tiny details that bring each piece to life.
Here’s how you can innovate:
- Shape bodies using rolling, pinching, and flattening for expressive forms.
- Attach limbs and features with gentle pressure or adhesive for lasting strength.
- Add details using sculpting tools—think eyes, fur, and scales.
- Bake, paint, and display your unique creations proudly.
23. Geometric Clay Pendant Necklaces

Once you’ve explored shaping playful animal figurines, you’ll find that geometric clay pendant necklaces offer a fresh way to express your creativity with clean lines and bold shapes.
Start by softening polymer clay, then use a roller on a marble surface for an even base.
Cut triangles or squares with a razor blade, or try stacking shapes for depth.
Don’t hesitate to layer colors or twist clay for abstract patterns.
Carefully pierce holes with a toothpick before baking at 230°F for 10 minutes.
Finish with acrylic paint, lacquer, and a cotton cord.
Always prioritize safety when handling sharp tools and adhesives.
24. Handbuilt Clay Incense Holders

A handbuilt clay incense holder blends function and artistry, offering you a canvas to explore both classic motifs and contemporary designs.
Discover how a handbuilt clay incense holder can transform simple artistry into a functional, personalized centerpiece for your space.
Start by kneading air dry clay for flexibility, then form a sturdy base—try a volcano, flower, or geometric shape.
Use needle tools for precise holes and edge details.
Paint your creation with acrylics, and accentuate with metallic highlights for a modern twist.
Always make sure proper drying and workspace cleanliness.
- Experiment with natural, floral, or abstract designs for visual impact.
- Use rubber kidneys and rulers for smooth, professional finishes.
- Add texture with pinching or scoring techniques.
- Seal for enhanced durability.
25. Minimalist Clay Coaster Sets With Pops of Color

Simplicity meets vibrant creativity when you craft minimalist clay coaster sets accented with pops of color.
Start by rolling air-dry clay to a consistent thickness, then use a circle cutter for clean, uniform shapes.
Stick to monochromatic palettes, but add bold stripes or geometric accents with acrylic paint or tape art for a modern twist.
Keep edges smooth and details minimal—less is more.
Experiment with subtle textures using fabric imprints or natural elements, but always seal your finished coasters with spray glaze for protection and shine.
Let your coasters reflect innovative style that’s functional, fresh, and uniquely yours.
Frequently Asked Questions
How Do I Safely Store Leftover Clay for Future Projects?
To safely store your leftover clay, wrap it in cling wrap, seal it in an airtight container, and label it. Keep colors separate, avoid heat and light, and check moisture levels. You’ll guarantee creative freedom for future projects!
What Is the Best Way to Fix Cracks in Dried Clay?
Think of your cracked clay as a scarred landscape waiting for renewal. You’ll blend slip and water, gently fill the fissures, and sand smooth—just like nurturing new growth—transforming flaws into bold, innovative features within your creation.
Can I Mix Air-Dry and Polymer Clay in One Project?
You can mix air-dry and polymer clay in one project, but you shouldn’t. Their different curing processes cause cracks or flaking. Instead, combine their unique techniques or finishes for creative results without structural risks. Innovate thoughtfully!
Are Clay Crafts Suitable for Children Under 10 Years Old?
Absolutely, you can introduce children under 10 to clay crafts with the right materials and supervision. Choose non-toxic clay, protect work surfaces, and guide them creatively—this sparks innovation, hones motor skills, and builds confidence through hands-on exploration.
How Eco-Friendly Are Popular Clay Brands and Sealants?
Imagine crafting with purpose—when you choose corn or expanded clay, you support eco-friendly innovation, while Monster Clay’s reusability shines. Avoid traditional PVC-based clays and chemical sealants; instead, seek plant-based or natural wax finishes for greener projects.
Conclusion
With these 25 clay crafts, you’re holding a box of colored pencils—ready to sketch your own creative story. Don’t be afraid to get your hands messy and experiment with techniques, shapes, and finishes.
Each project is a chance to blend artistry with practical skills, letting you craft both beauty and function. Jump in, trust your instincts, and remember: with every pinch and roll, you’re turning simple clay into everyday magic. Happy crafting!


