
10 Innovative Clay Crafts on Canvas to Create Dimensional Art
Push your art past the flat by sculpting florals in air-dry clay, layering abstract textured sheets, or shaping rolling hills for landscape reliefs right on canvas. Blend paper scraps, imprint textures from everyday objects, and embed beads or gems for tactile intrigue.
Try functional clay shelves, metallic accents, or merging painted backgrounds with 3D forms. Experiment with layering, adhering, and highlighting to create bold dimensional canvases—discover these hands-on techniques and more creative surprises just ahead.


10 Innovative Clay Crafts on Canvas to Create Dimensional Art: Push your art past the flat by sculpting florals in air-dry clay, layering abstract textured sheets, or shaping rolling hills for landscape reliefs right on canvas. Blend paper scraps, imprint textures from everyday objects, and embed beads or gems for tactile intrigue.
1. Sculpted Florals: Building 3D Blossoms on Canvas

How do you make blooms leap from a flat canvas?
Start by prepping your base—stretch canvas tight, mist the back, or use handmade board for tactile intrigue.
Blend air-dry clay with PVA glue for tacky adhesion; layer it over a primed surface or smear texture paste for extra grip.
Sculpt petals by flattening clay balls, then pinch, fold, and lift edges to mimic organic forms.
Use palette knives, sticks, and stencils to carve, press, and define.
Layer clay, cheesecloth, or joint compound for bold dimension.
Paint dried florals with acrylics, then seal with varnish.
Innovate—let texture drive your botanical vision.
2. Abstract Texture Panels With Layered Clay Sheets
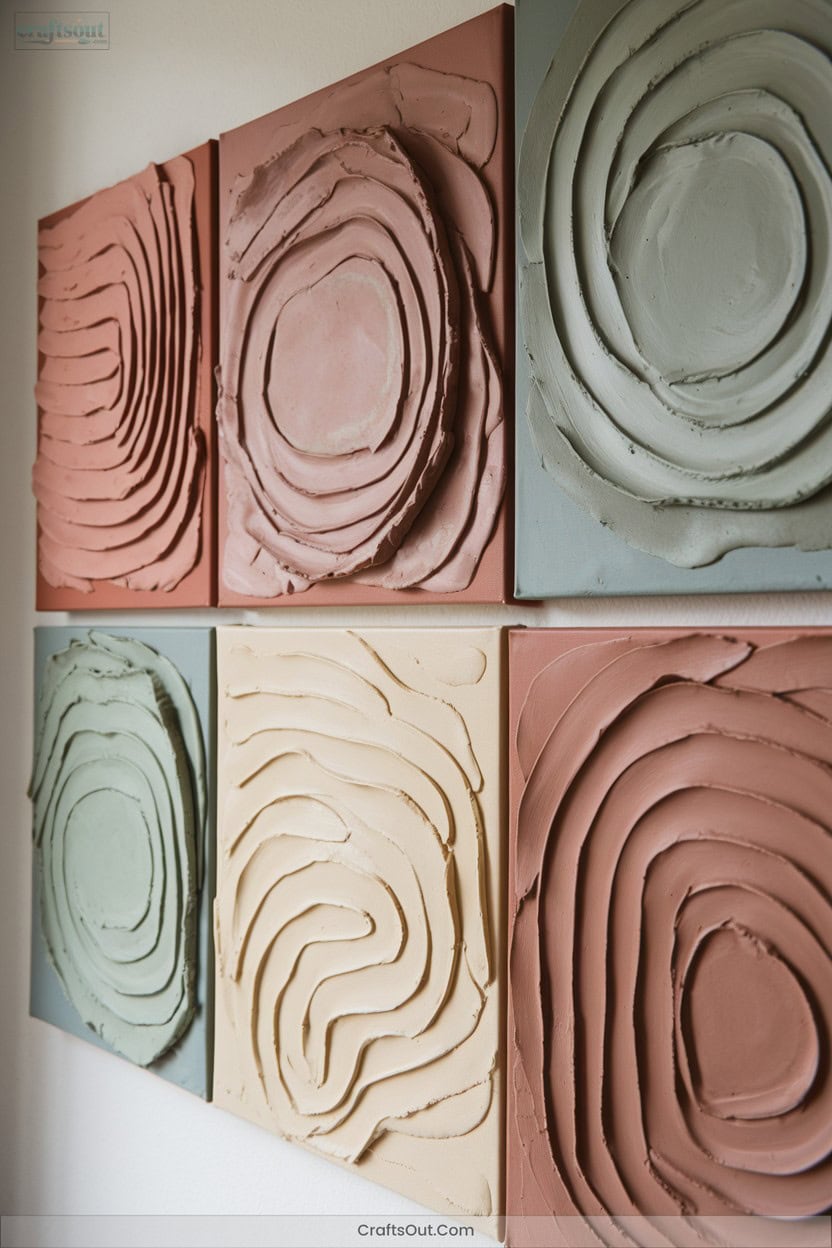
A sheet of clay, rolled thin and pressed onto canvas, transforms flatness into a landscape of folds, creases, and tactile rhythms.
Thin clay on canvas unfolds into a tactile landscape, where creases and folds turn flatness into rhythmic, sculptural terrain.
You’ll shape abstract panels by draping, layering, and stacking 3–5mm clay sheets—embracing torn edges, organic waves, or crisp geometric cuts.
Press in texture with combs, forks, or stencils, or embed textiles and sand for unexpected relief.
Score clay backs for secure adhesion; use PVA glue or modeling paste for dried pieces.
Scratch through surfaces for sgraffito effects.
Once dry, seal with gesso, then paint and highlight raised contours.
Bold experimentation reveals dimensional art that’s unmistakably yours.
3. Landscapes in Relief: Rolling Hills and Trees in Clay

Where abstract forms introduced tactile energy, clay landscapes invite you to sculpt rolling hills and tree silhouettes that rise from the canvas in tangible relief.
Experiment with air dry clay, CelluClay, or polymer blends—moisten your primed canvas for superior adhesion.
Layer thick, textured hills, then carve tree bark or rock strata when the clay’s leather-hard.
Roll trunks, attach with slip, and blend seamlessly using sculpting tools or even forks for bark.
Play with high and low relief: oversized, detailed trees leap forward, while distant hills recede.
Always consider weight and drying—innovation demands both structural soundness and textural delight.
4. Mixed-Media Collage: Integrating Clay With Paint and Paper

An ordinary canvas becomes a playground for texture when you blend clay with paint and paper.
Transform a simple canvas into a vibrant landscape of texture by merging clay, paint, and paper into tactile artistry.
You’re not just creating art—you’re engineering layers, depth, and tactile intrigue.
Prepare your surface, prime it, and let your instincts guide your hand as you fuse materials in unexpected ways.
Here’s how to push the boundaries:
- Choose your base: canvas, wood panel, or even recycled cardboard for bold texture.
- Prime with gesso, then lay down a wash of acrylic paint.
- Collage in paper—think tissue, newsprint, or handmade scraps for visual intrigue.
- Sculpt air-dry clay elements, securing them with strong adhesives for dimensional flair.
5. Imprinted Patterns: Textured Canvases Using Everyday Objects

Once you’ve explored the interplay of clay, paint, and paper, it’s time to focus on texture itself—specifically, the marks and impressions you can coax from the simplest objects around you.
Roll pliable air dry clay to a uniform slab, spritz lightly with water, and press in textures: textured glass, lace, bubble wrap, even LEGO bricks.
Layer imprints—overlap burlap with a fork’s linear drag for complexity. Smooth edges with a damp finger before drying. Attach the imprinted pieces to canvas with PVA glue. Seal with gesso or paint, amplifying every groove and detail.
Let everyday objects redefine your surface language.
6. Dimensional Mandalas: Coiled and Molded Clay Designs

Mandalas thrive on rhythm and repetition, but clay brings them into a tangible world—one where every coil and molded shape rises from the canvas in sculptural relief.
Clay mandalas transform rhythmic patterns into sculptural forms, each coil and shape emerging in vibrant relief from the canvas.
With a primed canvas as your stage, you’ll lay down slender coils in hypnotic patterns, pressing and blending for seamless dimension.
Merge hand-molded forms with extruded ropes and watch texture evolve with every layer.
Experiment boldly—combine stippling, loops, and overlapping petals.
Try this process:
- Mark your center and build outward with coiled ropes.
- Integrate molded shapes for complexity.
- Overlap layers for height.
- Finish with paint and varnish for lasting effect.
7. Functional Art: Clay Shelves and Holders on Canvas

One inventive way to break the flatness of canvas is by sculpting functional forms—think shelves and holders—directly onto its surface with clay.
Embrace air-dry clays like Creative Paperclay for lightweight, textural builds, or use polymer clay, attaching baked pieces with robust adhesives.
Reinforce your canvas with wood backing to support these protrusions.
Experiment—score clay surfaces, blend in cheesecloth or stencils, and let textures fuse clay with canvas.
Keep shelves light: perfect for air plants, keys, or trinkets.
Paint over or contrast the clay forms, blurring boundaries between art and utility in your dimensional, touchable design.
8. Figurative Scenes: Blending Painted Backgrounds With Clay Features

Transform flat canvas into a tactile narrative by fusing sculpted clay figures with painted environments.
You’ll experiment with material blending, letting raised forms animate the story while your brushwork sets the scene.
Create rich contrast as 3D clay elements rise from layered backgrounds—every gesture, shadow, and hue intentionally integrated.
Lean into the interplay of texture and color, making your figurative subjects emerge dynamically from the canvas.
- Prime and sketch: Gesso your canvas and map out the composition.
- Sculpt and secure: Attach air-dry clay shapes for key figures.
- Paint and blend: Surround clay with depth-building washes.
- Unify with detail: Paint, dry-brush, and seal for cohesion.
9. Metallic Accents: Highlighting Raised Details With Waxes and Paints

Shimmer draws the eye to every peak and contour—metallic accents invite you to trace raised details with your fingertips and your gaze.
Experiment boldly: sweep Rub ’n Buff or Inka Gold waxes over high points, then buff for a subtle gleam that clings to every curve.
Dry-brush metallic acrylics atop a deep base coat to make textures leap forward, layering lighter hues for electric contrast.
Mica powders, pressed into raw clay, fuse shimmer and form; blend with acrylic medium for painterly effects.
Each technique heightens dimension, revealing new topographies—let metallics redefine your canvas, merging tactile and visual intrigue seamlessly.
10. Embedded Treasures: Incorporating Beads and Gems Into Clay Art

Metallics catch the light, but embedded treasures catch the eye—and the imagination.
With bold hands, press glass beads or dazzling gems into moist clay, letting each piece nestle into sculpted forms.
Experiment by blending liquid polymer clay as an adhesive, or layer foil beneath transparent stones for luminous depth.
On canvas, fuse clay tiles and sparkling accents, merging tactile textures and radiant surfaces.
- Press twisted wire-ended beads into polymer for extra hold.
- Highlight gems with mica or contrasting clay shades.
- Use epoxy clay for direct, secure embedding on canvas.
- Support canvas from behind to maintain surface integrity.
Frequently Asked Questions
How Do I Prevent My Canvas From Sagging Under Heavy Clay Elements?
You’ll want to reinforce your canvas—install sturdy cross braces, add rigid backing like melamine, and prime with layered gesso. Blend materials: experiment with gel mediums and adhesives, distributing clay elements creatively so your surface stays taut and dynamic.
Which Adhesives Work Best for Attaching Clay to Canvas Securely?
You’ll get the strongest bond by blending heavy gel medium for flexibility or PVA glue for porous grip. For heavier or non-porous clay, experiment with epoxy or gel super glue—layer, score, and press for lasting dimensional adhesion.
Can Air-Dry and Polymer Clay Be Used Together on the Same Canvas Piece?
You’d think combining air-dry and polymer clay would end in chaos, but surprise—you can absolutely blend both on one canvas. Just cure each separately, then fuse them with bold glue, creating wildly unexpected, tactile, hybrid surfaces.
How Do I Seal and Protect My Finished Clay-On-Canvas Artwork?
Seal your clay-on-canvas piece by layering thin, even coats of acrylic or clay-specific varnish, exploring both brush and spray techniques. Blend matte and gloss finishes for texture play. Let each layer cure fully—don’t rush that tactile brilliance.
What Is the Best Way to Fix Cracks in Air-Dry Clay After Drying?
Over 70% of air-dry clay artists battle cracks—embrace this as texture! Blend slip (clay paste) with PVA glue for strength, massage it into fissures, then sand smooth. Experiment with layered fillers for uniquely tactile, innovative surfaces.
Conclusion
So, you’ve smeared, squished, and pressed your way through the wild world of clay on canvas—congratulations! You’re officially a mixed-media alchemist, because who needs boring old flat art when you can glue a tiny clay shelf to it?
Let’s be honest: your walls were gasping for 3D texture and metallic drama. Embrace the lumpy, the layered, the gloriously tactile. Go on, blend that polymer with paint—your inner art rebel just found its favorite playground.


