15 Versatile Soft Clay Crafts Ideas for Beginners and Experts
You’ll discover 15 soft clay crafts ranging from seamless trinket dishes and functional coasters to precision-cut magnets and advanced inlay techniques. Shape intricate beads, craft marbled jewelry with mokume gane, mimic wood grain, or create hyper-realistic faux gemstones.
Engineer sculpted animals, master armature for figures, and use layered clays for optical complexity. Incorporate texturing, detailed canes, and innovative assembly to elevate your results. Explore how each transformative method reveals new levels of design and tactile artistry ahead.


1. Trinket Dishes and Bowls
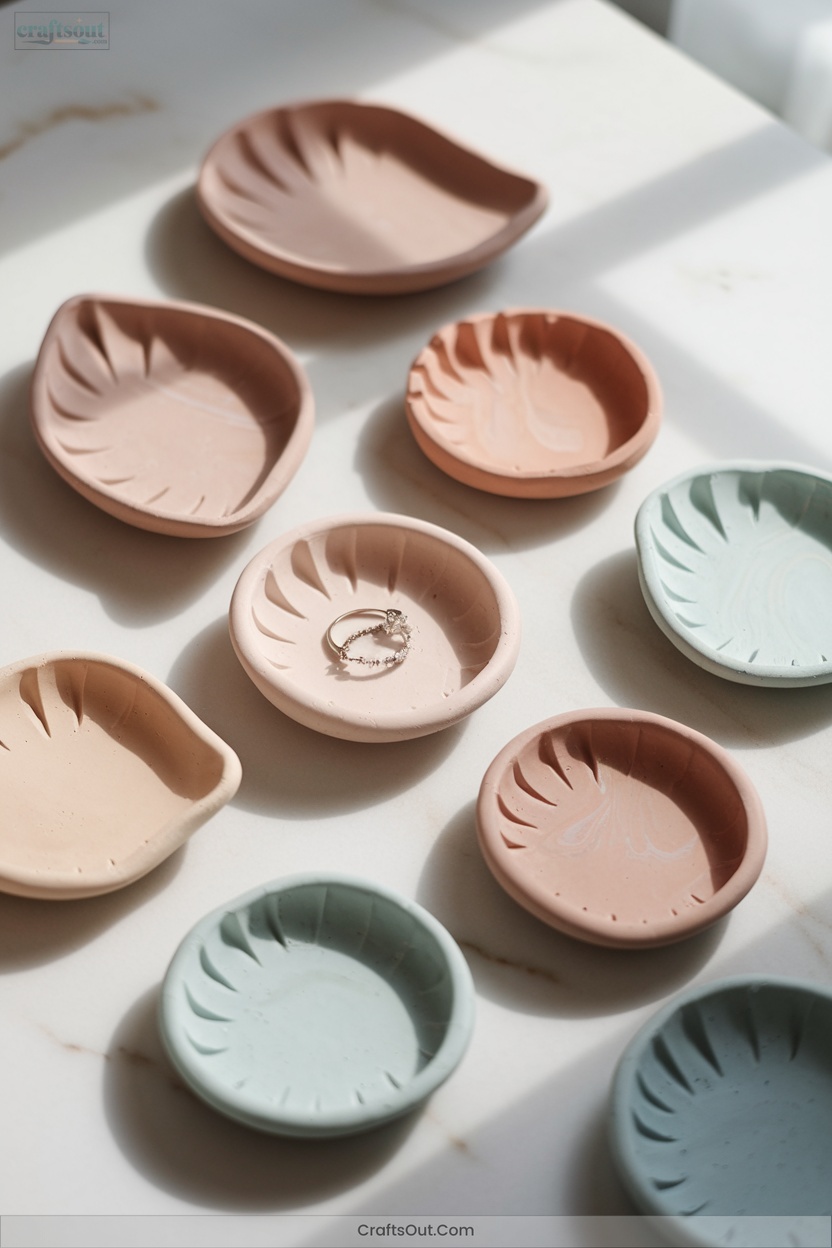
Trinket dishes and bowls offer a versatile introduction to soft clay crafting, blending functional design with advanced forming techniques.
Start by thoroughly kneading your selected clay—air-dry or polymer—to achieve pliability and eliminate air pockets.
Roll evenly to a 3–7mm thickness, then cut precise shapes with cutters or templates.
Shape using either the interior or exterior of oven-safe bowls for smooth or textured contours.
To innovate, incorporate texture tools or stamps while clay remains workable.
Air-dry clay requires gradual drying and sanding, while polymer demands precise oven curing.
Finish with acrylic paints and sealants for durability, protection, and a professional sheen.
2. Handmade Clay Magnets
Expanding your repertoire beyond dishes and bowls, handmade clay magnets offer an opportunity to practice precise shaping and finishing on a miniature scale. Select polymer or air-dry clay, kneading thoroughly for uniformity. Employ dedicated tools or stencils to achieve sharp edges and intricate textures.
Roll clay to ~5mm for durability—too thin invites breakage. After baking or drying, seal surfaces with UV resin or specialized glaze for vibrancy and resilience. Attach neodymium or ceramic magnets using industrial-strength adhesives for longevity.
Handmade clay magnets let you refine miniature shapes, experiment with textures, and create vibrant, functional art for everyday use.
- Experience the joy of tactile precision.
- Shape functional art in every detail.
- Transform your creative vision into everyday interaction.
3. Custom Coasters for Home Decor
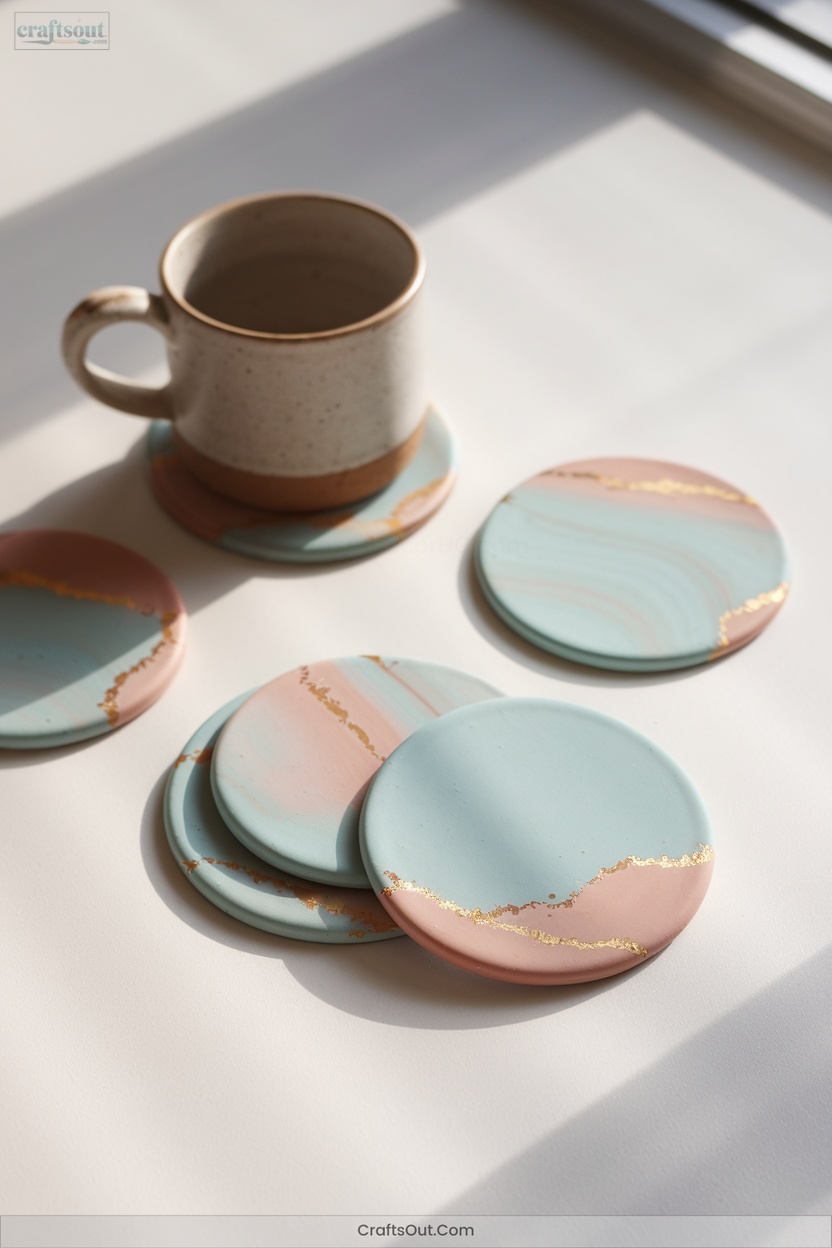
How do you craft coasters that not only protect surfaces but also elevate your home’s aesthetic?
Start with air-dry or polymer clay—condition thoroughly to eliminate air pockets and achieve uniform pliability.
Roll to a 1/4″-1/2″ thickness on a non-porous surface, using guides for precision.
Shape with templates, cutters, or freehand; refine edges with a damp fingertip or sanding.
Innovate: imprint botanicals or textiles for texture, marble polymer colors, or assemble geometric patterns.
Personalize with letter stamps.
Dry air-dry clay evenly, applying weights to prevent warping.
Bake polymer clay as directed.
These methods yield both functional and visually striking coasters.
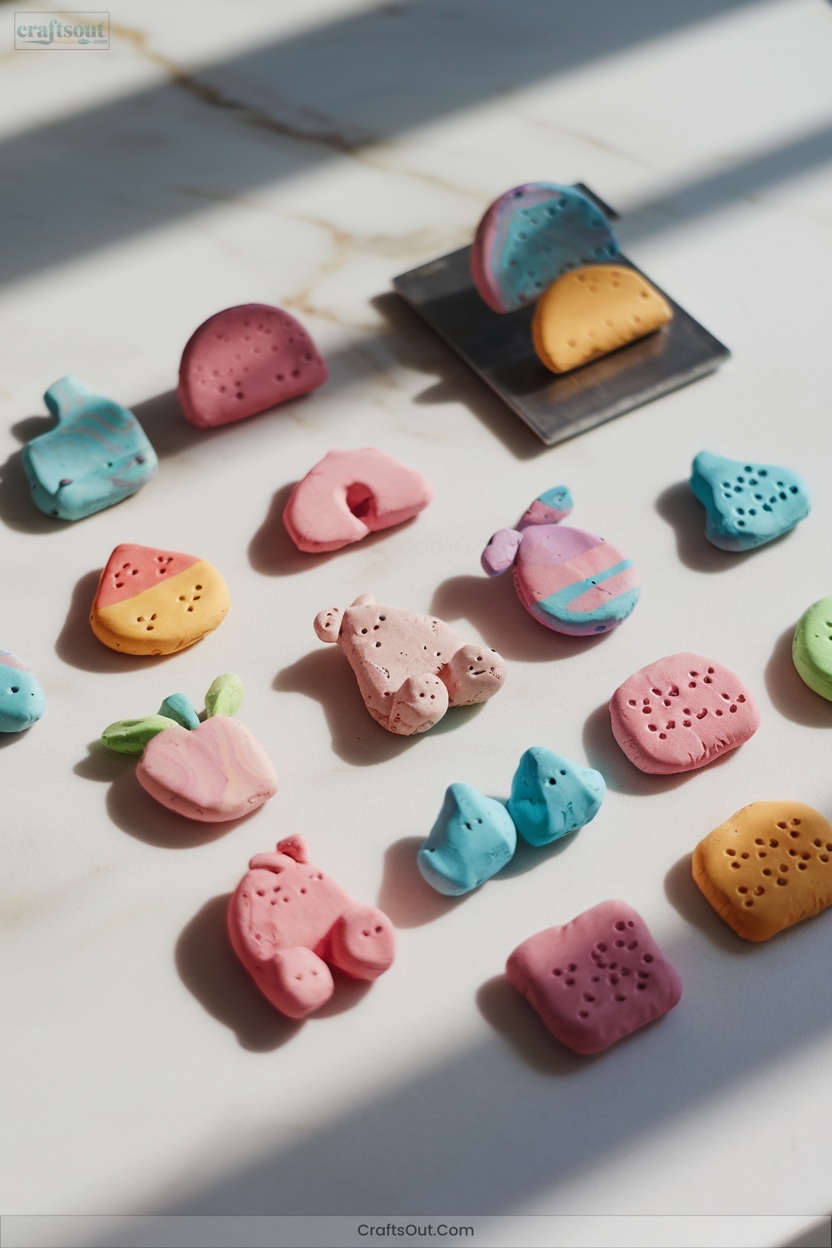
Transform clay into charming animal and food figurines by mastering foundational sculpting techniques that prioritize structural integrity and detail.
4. Simple Animal and Food Figurines
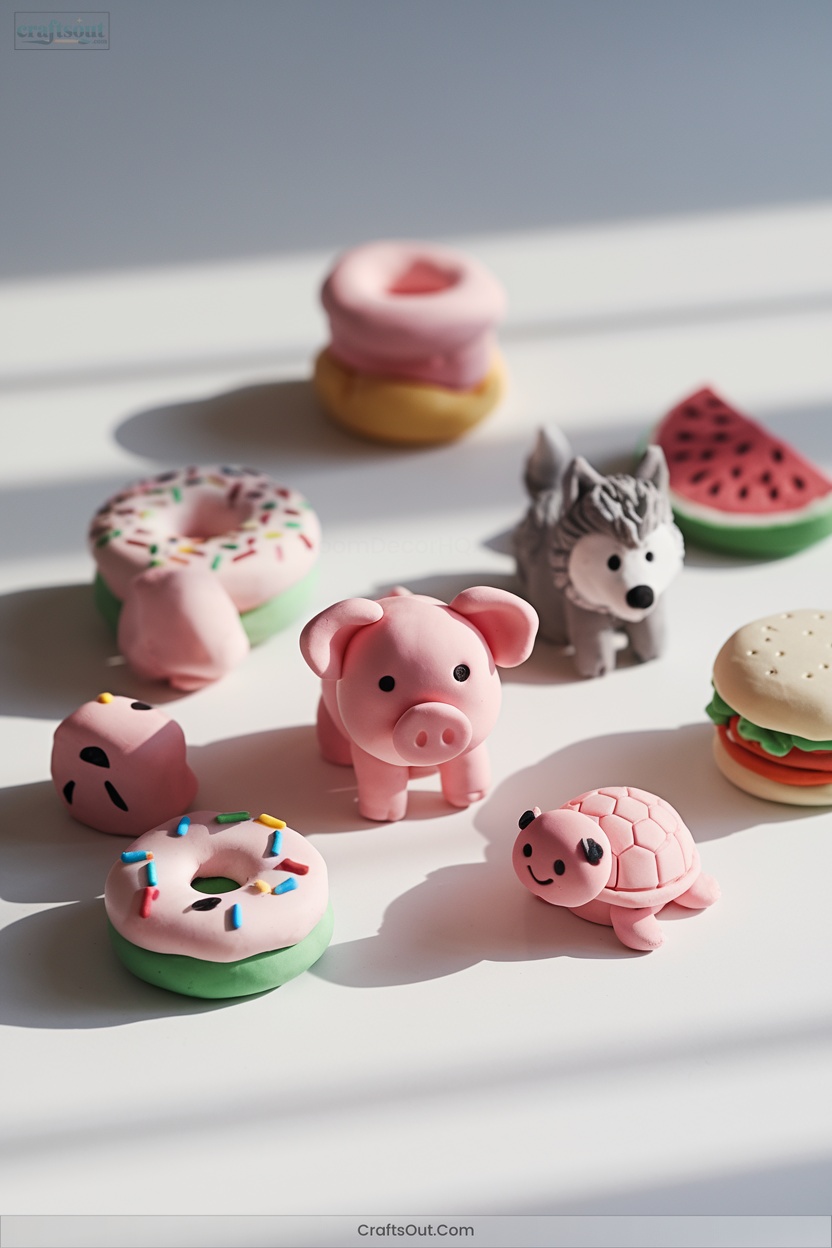
Begin with geometric bases—spheres, ovals, cylinders—refining each form using precise finger pinching and tool shaping.
For animals, blend seams meticulously and introduce texture with toothbrushes or foil, invoking tactile realism.
Food miniatures demand strategic color layering and custom texturing to echo authentic ingredients.
Elevate your craftsmanship further:
- Experience the satisfaction of creating expressive eyes and intricate fur.
- Savor the realism of food textures and color gradients.
- Achieve seamless integration between sculpted components for flawless, innovative designs.
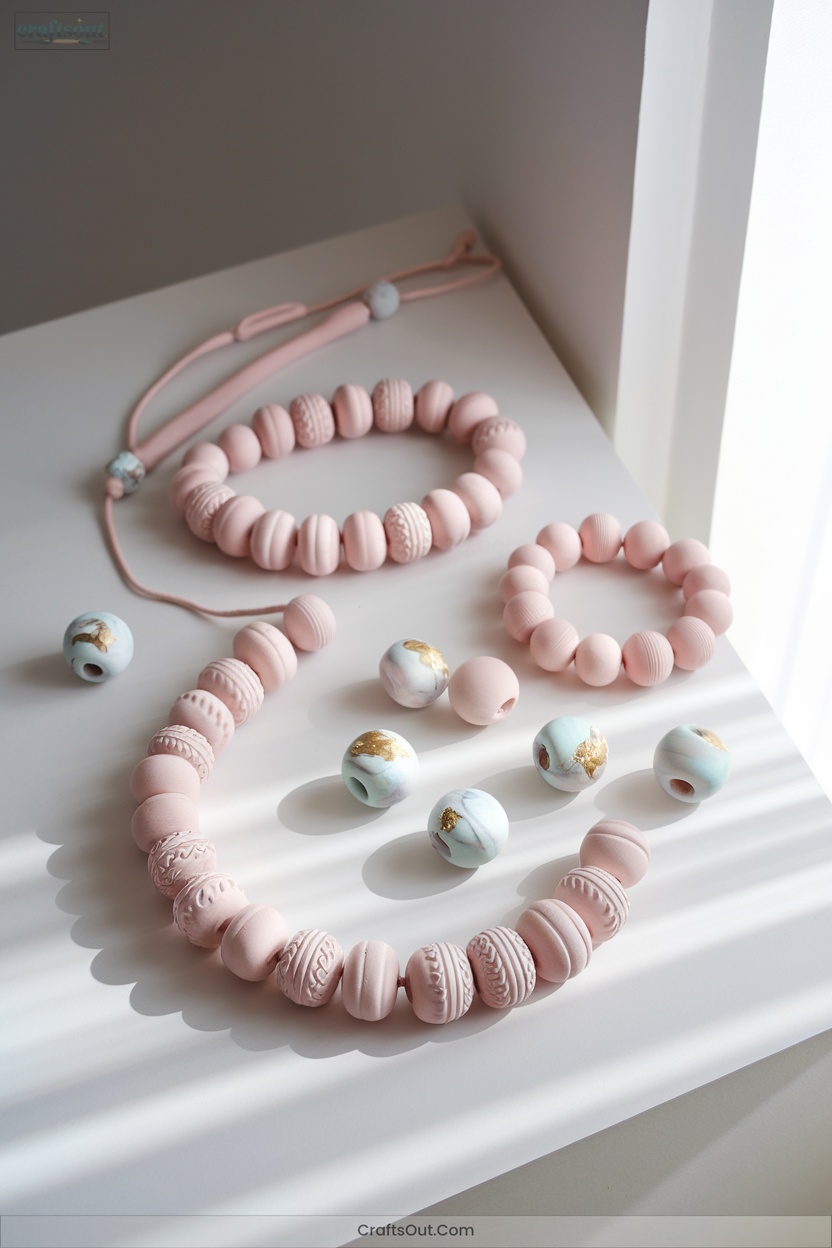
5. Unique Beads and Jewelry Pieces
Curious about elevating your clay work beyond figurines?
Master advanced bead formation by rolling spheres, ovals, or using molds for precision.
Slice canes for patterned beads, or veneer wooden cores for lightweight, large-scale results.
Integrate metal leaf, inclusions, or mimic gemstones by blending clays and surface treatments.
Employ mokume gane or mica shift for intricate, layered effects.
Stamp and texture raw clay for tactile dimension, and extrude faux beadwork details.
After baking, sand through progressive grits, buff for metallic sheen, and seal with resin or wax.
Clean holes meticulously to guarantee flawless stringing—your jewelry demands exacting craftsmanship.
6. Marbled Clay Techniques

Reveal a spectrum of intricate surface effects by mastering marbled clay techniques, where precise clay conditioning and controlled mixing yield dynamic, layered patterns. Start by conditioning 2–4 contrasting clays separately; use metallics, glitters, or translucents for innovation.
Construct snakes, bundle, twist, and fold—cut slices to inspect progress. Prevent muddiness by resisting over-mixing. For advanced effects, chop, layer, or stack colors to engineer distinct “shattered,” “grain,” or “layered block” marbling.
- Achieve striking contrast through controlled color selection.
- Harness specialty clays for unique optical depth.
- Challenge conventions—engineer new surface illusions with each iteration.
7. Adding Texture With Everyday Objects

How can you achieve complex, professional-grade surface textures in soft clay without specialized tools? Leverage common items for advanced results.
Crumple aluminum foil tightly for fine stippling or loosely for bold impressions. Use a lace strip for intricate relief, or roll a patterned pin for seamless repeats.
Press a tracing wheel for precise dotted lines, or employ a toothbrush’s bristles for dynamic stippling.
Experiment with spices or coffee grounds mixed into clay for tactile, color-rich finishes.
For organic detail, imprint leaves, stones, or shells.
Harness the unexpected: binder clips, bubble wrap, or wire loops—each transforms soft clay into innovative, textured art.
8. Embellished Jars and Container Covers
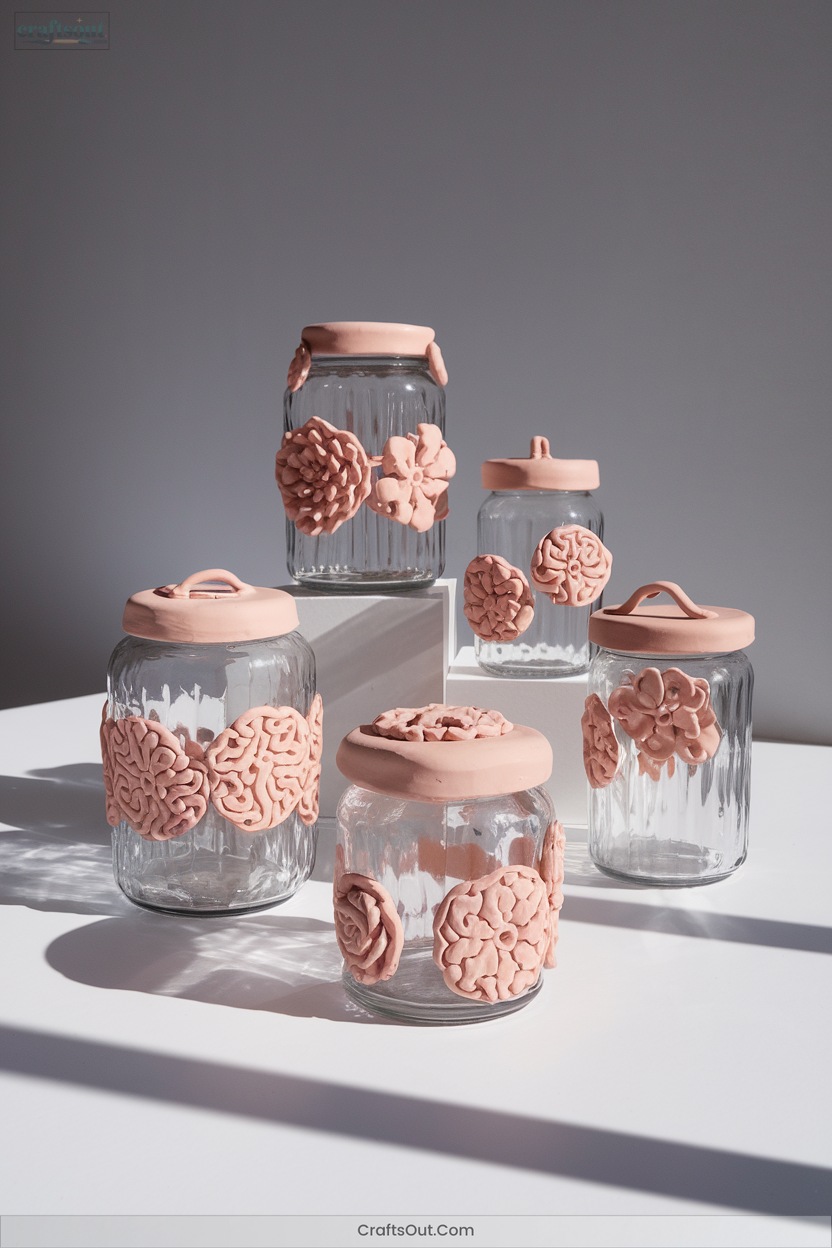
Why settle for plain storage when you can transform everyday jars and containers into striking, functional art with soft clay?
Begin by meticulously prepping your glass or metal base—clean, dry, and optionally primed with adhesive for ultimate clay adherence.
Achieve seamless coverage by rolling clay at precise thickness and smoothing away air pockets.
Innovate further:
- Engineer custom-fit lids—trim to maintain closure integrity.
- Incorporate advanced embellishments—sculpted motifs, millefiori, and layered effects elevate tactile dimension.
- Finish with technical mastery—precision baking, progressive sanding, and selective varnishing guarantee both durability and visual impact.
Harness every detail; redefine decorative utility.
9. Slab-Built Pots and Vases
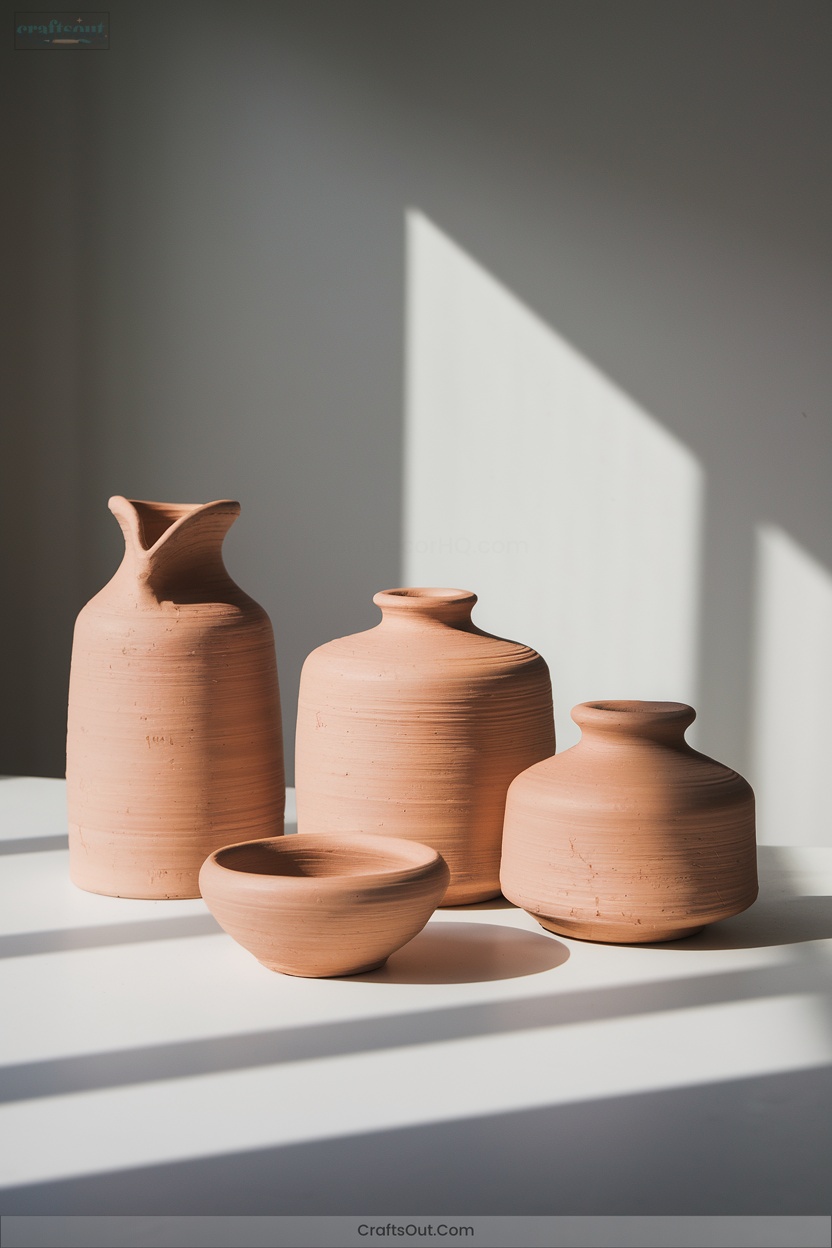
Geometry meets craftsmanship in slab-built pots and vases, where you’ll harness the architectural strength of clay sheets to create forms impossible on the wheel.
Begin by rolling clay to a uniform 5–12mm thickness using guides; precision here prevents future warping.
Cut geometric or organic shapes with templates and sharp tools.
For strong joints, aggressively score and slip the edges, then reinforce with a thin coil, blending meticulously.
Experiment with soft slabs for draping curves or leather-hard slabs for crisp, angular structures.
Texture, carve, or stamp designs pre-assembly for enhanced surface innovation.
Dry slowly under plastic to maintain structural integrity.
10. Creating Colorful Polymer Clay Canes

Curious about transforming polymer clay into intricate, repeating patterns? Polymer clay canes, defined as logs with designs running through their length, let you achieve precision and creative depth. You’ll need firmer clays like Fimo Professional, a sharp blade set, and a pasta machine for conditioning and blending.
Master basic techniques—jelly roll, bullseye, striped, and checkerboard canes—by combining sheets, rolling, and layering. Consistent packing with background clay prevents distortion during reduction.
- Experience the thrill of slicing perfectly patterned canes.
- Revel in the tactile satisfaction of flawless reductions.
- Imagine your signature designs embedded in every colorful slice.
11. Millefiori Pattern Making
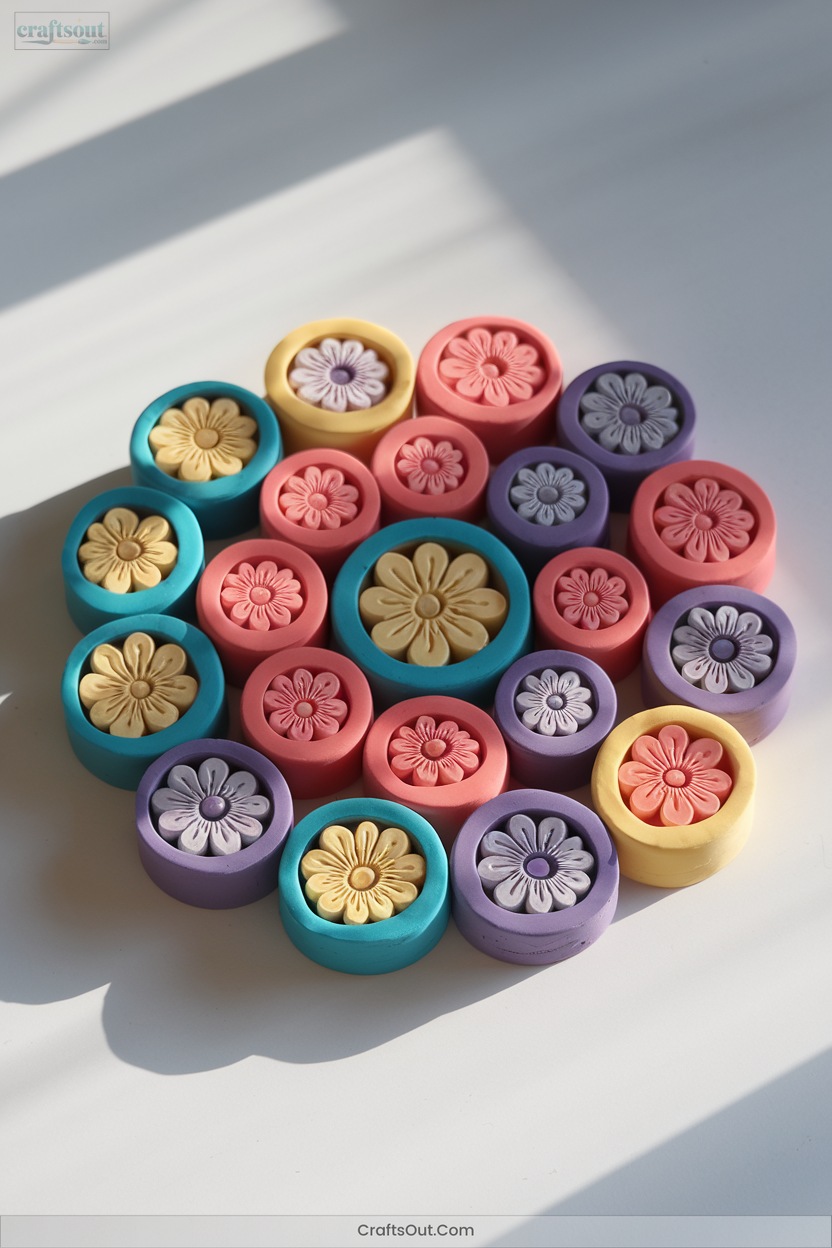
A true hallmark of advanced polymer clay artistry, millefiori pattern making draws from centuries-old glasswork traditions to create intricate, repeating motifs within a single cane.
Millefiori canes transform polymer clay into mesmerizing tapestries of repeating patterns inspired by ancient glasswork mastery.
You’ll begin by conditioning premium polymer clay, ensuring flawless color blending and uniform malleability.
Construct individual design components—central motifs, petals, backgrounds—then assemble with meticulous layering.
Achieve geometric precision by filling voids with contrasting clay.
Reduce the cane slowly, applying even pressure to preserve pattern integrity.
Chill the cane if necessary to combat distortion.
Slice using an ultra-thin blade, rotating between cuts for symmetry.
Apply slices as veneers or inlays, then cure for durable, vibrant results.
12. Mokume Gane Wood Grain Effects
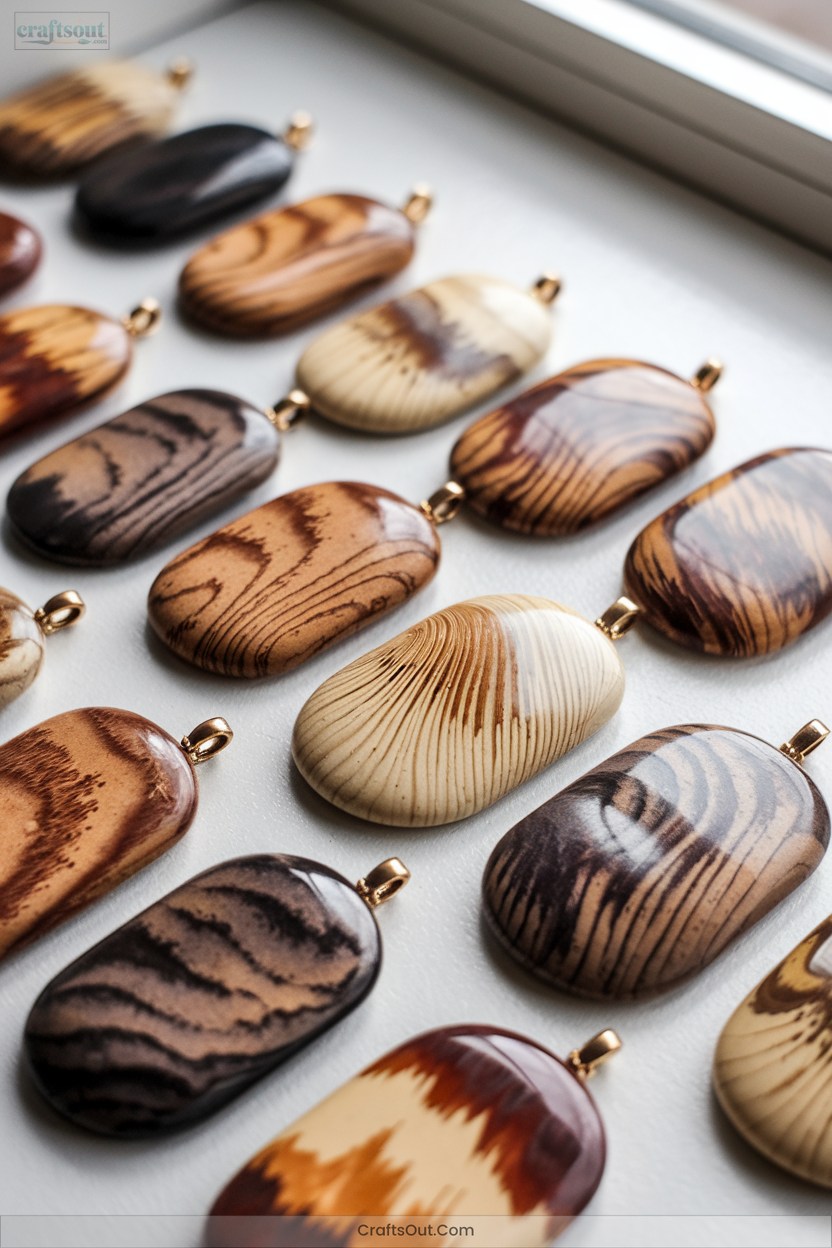
Rooted in Japanese metalworking tradition, mokume gane translates to “wood grain metal,” yet its polymer clay adaptation allows you to engineer striking, organic patterns that closely mimic natural wood.
Begin with meticulously conditioned clay sheets, selecting high-contrast, translucent, or metallic hues.
Stack, compress, and distort the layers using precision tools, then slice thin veneers to reveal intricate cross-sections.
For innovative artists, this technique delivers unparalleled control and expressive potential:
- Shape visual complexity by stacking and layering color.
- Manipulate depth with targeted distortion and compression.
- Reveal unique, organic patterns with each careful slice—no two are alike.
13. Faux Gemstones and Stone Finishes
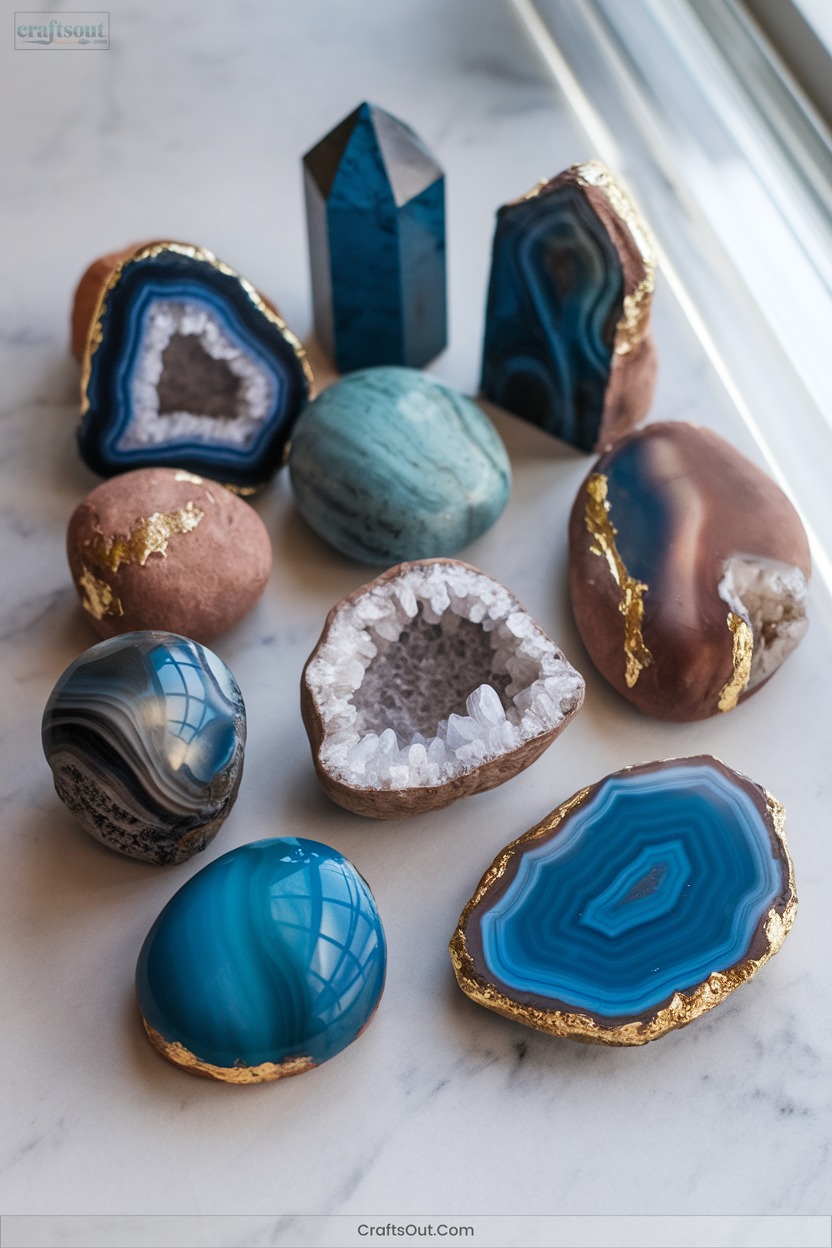
Why settle for ordinary when polymer clay lets you engineer convincing faux gemstones and stone finishes with remarkable realism?
Polymer clay unlocks the power to craft faux gemstones and stone textures with stunning, lifelike realism—why create anything less?
Harness translucent clays as your matrix—layer, marble, or chop with colored clays, adding inclusions like mica, fine glitter, or metal leaf for authentic depth.
Employ liquid polymer for domed effects or to suspend pigments in geode slices.
For veining (turquoise, agate), chop, paint, and reassemble for crisp, natural fractures.
Sand and buff thoroughly—translucency and shine demand precision.
Integrate antiquing with acrylics to accentuate fissures.
Experiment with texturing, surface powders, and strategic layering for innovative, tactile gemstone imitations that defy expectation.
14. Detailed Character Sculpting
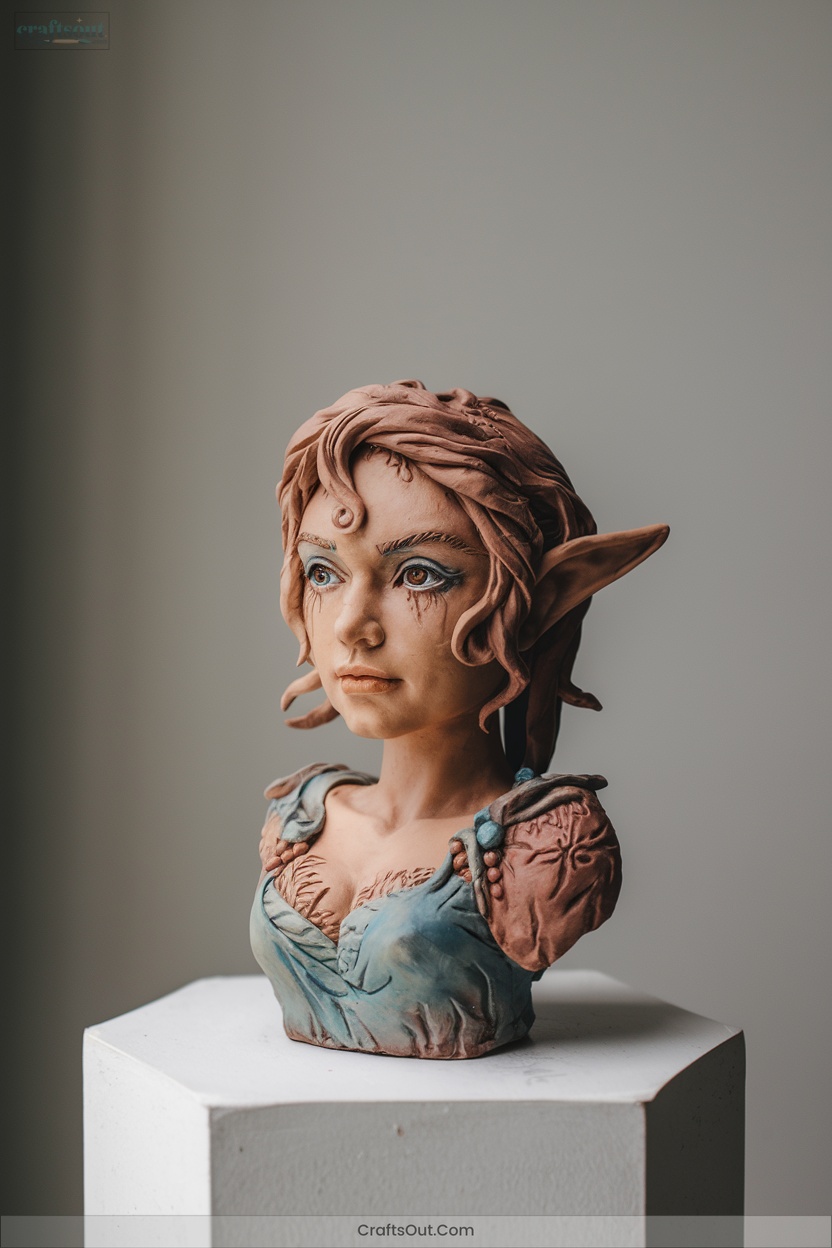
Meticulous character sculpting in soft clay hinges on your mastery of both structural engineering and surface detailing.
Start with a well-constructed armature, using twisted aluminum wire and tightly packed foil to define anatomy and prevent collapse.
Condition firmer polymer clays like Fimo Professional for crisp details, leaching excess oils when necessary.
Deploy advanced tools—micro rakes, dental picks, silicone shapers—to capture expressive features and seamless textures.
Maintain a dust-free workspace for pristine finishes.
To push boundaries and infuse life into your creations:
- Engineer sturdy, poseable skeletons
- Manipulate clay consistency for precision
- Harness micro-tools for emotional depth
15. Intricate Clay Inlay and Hidden Magic

How do you achieve striking, seamless designs in soft clay? Master intricate inlay and hidden magic techniques.
Begin by embedding contrasting clay colors—use cane slice inlay for millefiori effects or try the Sutton Slice for deep, precise patterns. For ultra-crisp lines, employ slip or underglaze inlay on ceramics, carving and filling with colored slip.
Hidden magic leverages layered blends, deeply textured, then shaved to reveal complex internal patterns—think Mokume Gane with polymer clay. Precision tools are essential: sharp blades, texture stamps, and sanding for flawless finishes.
These methods enable you to engineer innovative, visually stunning surfaces in jewelry or decor.
Frequently Asked Questions
How Do I Store Leftover Soft Clay to Prevent It From Drying Out?
To prevent your soft clay from drying out, immediately wrap it tightly in plastic wrap, expel air, seal it in a zip-top bag, and store in an airtight container with a damp towel. Monitor moisture levels and avoid temperature extremes.
Can I Mix Different Brands or Types of Soft Clay Together?
Mixing clays is like blending unique alloys—possible, but you must analyze drying times, hardness, and curing temperatures. Always test small batches, condition thoroughly, and monitor for incompatibilities to engineer innovative textures, colors, and performance in your creations.
What’S the Safest Way to Work With Soft Clay Around Young Children or Pets?
You guarantee safety by selecting certified non-toxic clays, maintaining vigilant supervision, and establishing a dedicated, well-ventilated workspace. Always prevent ingestion, use age-appropriate tools, enforce rigorous hand hygiene, and securely store all materials away from children and pets.
Are There Eco-Friendly or Non-Toxic Soft Clay Options Available?
Yes, you’ll find eco-friendly, non-toxic soft clays like terracotta air-dry, paper clay, and homemade cold porcelain or baking soda clay. Prioritize AP or EN71 certification, recycled content, and allergen-free formulations for ideal sustainable innovation.
How Can I Repair Cracks or Breaks in Dried or Baked Clay Projects?
A stitch in time saves nine: identify cracks early. For dried clay, blend slip or paper clay for seamless repairs. On baked polymer, mix clay dust and epoxy for durable fills. Sand, refine, and innovate structural reinforcement.
Conclusion
With these soft clay craft ideas under your belt, you’re well-equipped to push the envelope—whether you’re refining your techniques or mastering advanced effects like mokume gane or intricate inlays.
Each project offers a hands-on way to sharpen your skills and experiment with textures, finishes, and sculpting methods. Remember, practice makes perfect; your creative journey with soft clay will only get richer as you dive deeper into the art and science behind every piece you create.


